L7
L5
L4
L3'
L3
L2'
L2
L
R7
R1
15
16
17
-6-
A
A
B
C
C
D
E
A
A
A
B
B
L11
R11
L8
L9
L10
L11
L12
L13
R8
R9
R10
from right to left from left to right
detail chart
thread
L6
R6
R11
R12
R13
R5
R2
R3
R4
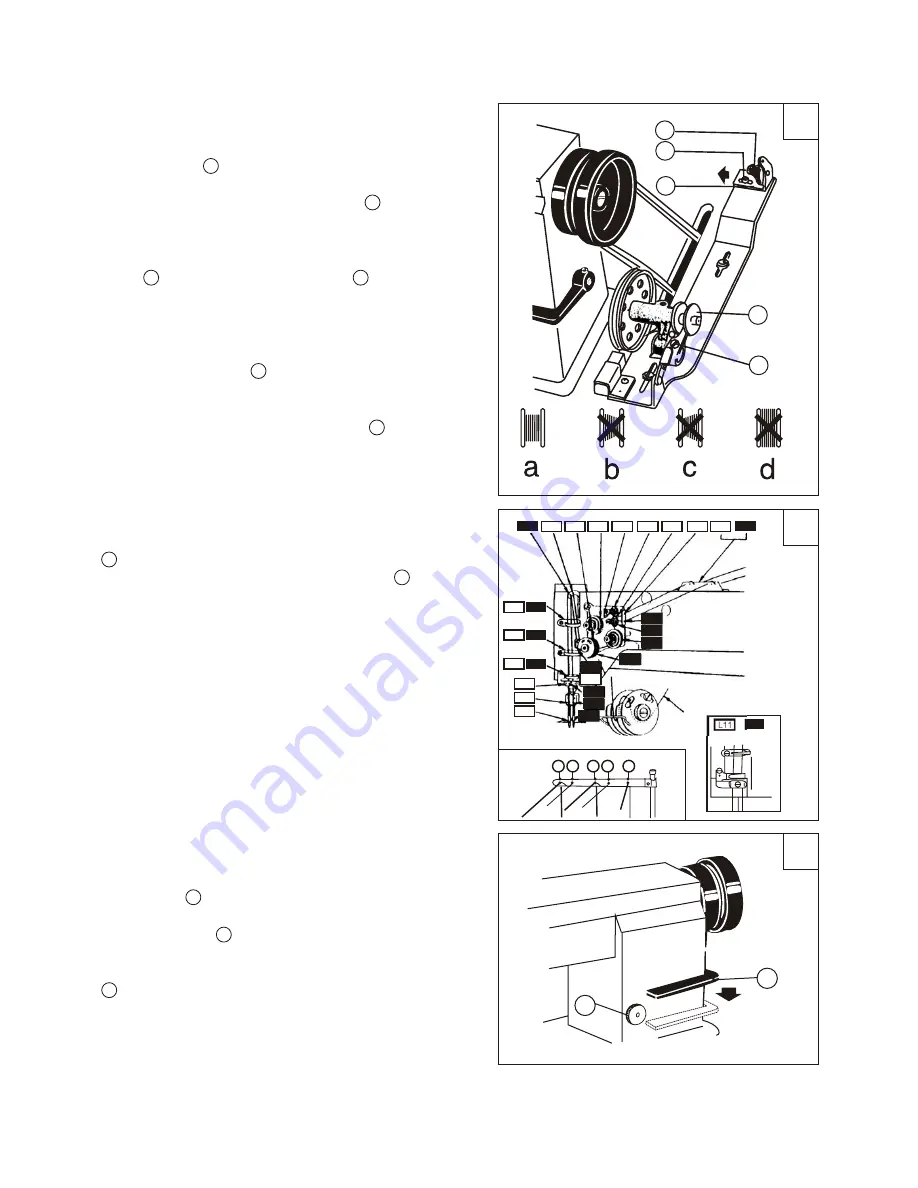
4.3.2 Winding adjustment (Fig.15)
1) Wound bobbin thread should be neat and tight,
if not , adjust the thread tension by turning tension
stud thumb nut A of bobbin winder tension bracket.
Note: nylon or polyester thread should be wound
with light tension , otherwise bobbin D might be
broken or deformed.
2) When the wound thread layer does not present a
cylindrical shape as in Fig.15a, loosen tension bracket
screw B and move tension bracket C leftward or
rightward. If thread is wound as shown in Fig, 15b,
move the tension bracket rightward, while if thread
is wound as shown in Fig.15c,move the tension bracket
leftward, After adequately positioning the tension
bracket, tighten screw B .
3) Do not over fill the bobbin , the optimum capacity
of thread will fill about 80% of bobbin ouside diameter,
this can be adjusted by stop latch screw E .
4.3.3 Threading (Fig.16)
Every thread should be drawn through Thread Hole
A , when use light and smooth thread (polyester or long
silk thread), it should be drawn through Hole B , Keep
the thread take-up lever in its highest position , draw
every thread in the following numerical order.
4.3.4 The stitch length and forward and reverse sewing
control (Fig.17)
The stitch length can be regulated by Stitch
Length Dial A . Turn it counter-clockwise to expand
its length and clockwise to shorten its length . The
numbers on Dial A show the sizes of the stitch length
in mm.
For reverse feed, press down Release Feed Lever
C to perform reverse sewing , Release the lever, the
reverse feed lever can reset automatically and the
forward sewing is resumed.
( )
( )
( )
( )
( )
( )
( )
( )
( )
( )
( )


