13
14
A
B
C
D
E
G
H
2
1
F
-5-
long groove
long groove leftward
clearance
(a)
(d)
(b)
(c)
A
4.1 Coordination between needle, thread and sewing
material
Please use needle DP
17,Nm125-180.The coarseness
of needle should be in accordance with the nature of
material. If stitch on heavy duty material with a slim
needle, the needle will be easily bent, skip or thread
breakage occurs, on the contrary, stitch on tightly woven
material with a very coarse needle, the material will
be destroyed with over-big needle. So the needle and
thread should be properly selected.
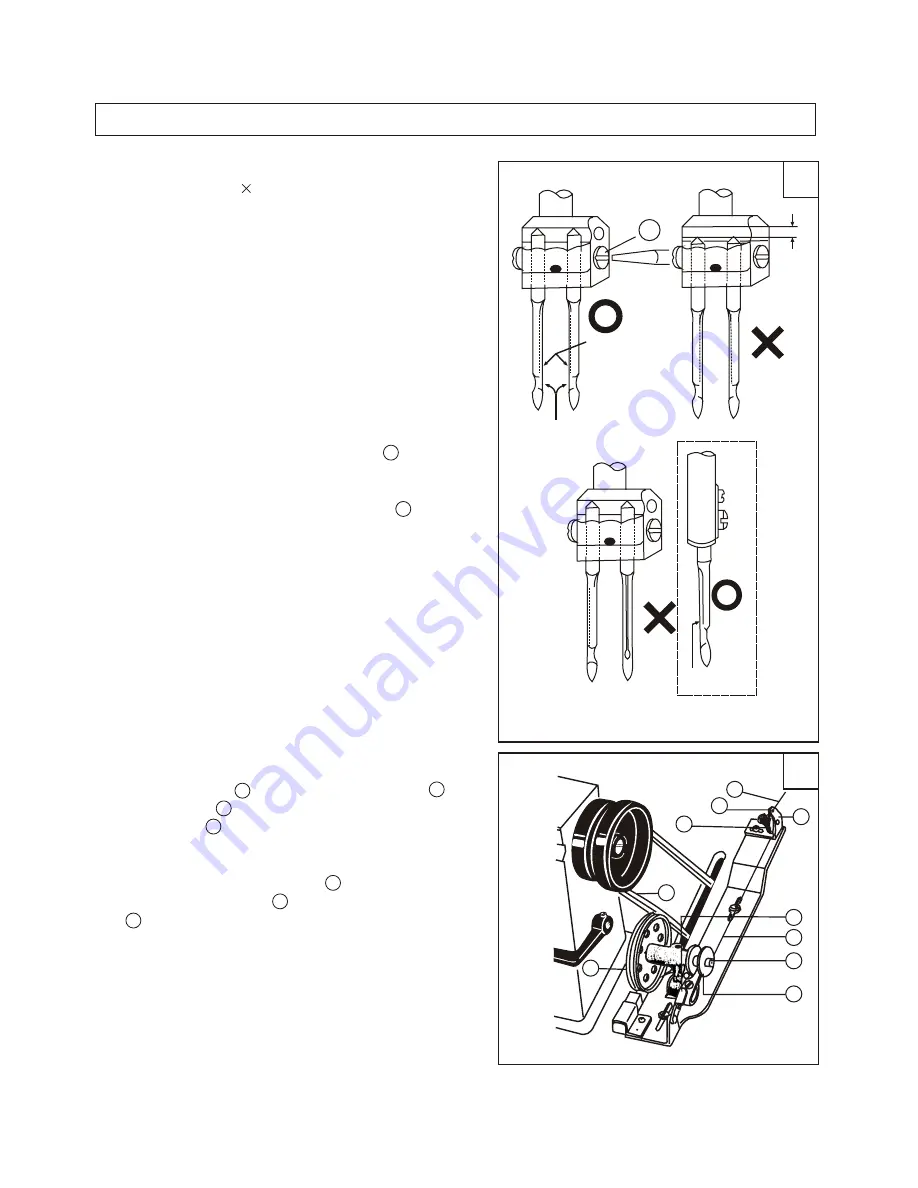
4.2 Needle installation(Fig.13)
Turn the balance wheel to lift needle bar to the
highest position, loosen Needle Set Screw A , fully
insert the needle shank upto the bottom of needle
socket, keeping the long grooves of the two needles
opposite with each other, then tighten Screw A , For
single needle, keep the long groove of needle facing
the left of the operator. See Fig (b).
Note: Fig.(c) : insufficient insertion.
Fig.(d) : wrong direction of needle long groove
in insertion.
4.3 Winding the Bobbin thread
4.3.1 Winding method(Fig.14)
1) Install bobbin A to bobbin winder spindle B .
2) Pass thread C from spool through the eye 1 on
tension bracket E . Pass ti between tension discs 2 ,
and then wind the end of the thread a few turns on
the bobbin.
3) Push stop latch thumb lever D down to lock the
bobbin, the winder pulley F is thereby pressed on
belt G .
4) Start the machine to wind thread.
Note when thread is wound without sewing opera-
tion, be sure to keep the presser foot lifted.
5) When the thread is fully wound, the bobbin winder
stop latch automatically release the bobbin winder,
thus stopping the winding motion.
( )
( ) ( )
( )
( )
( )
( )
( )
4. Operation
single needle


