


2
Importante!
Prima del montaggio controllare se il prodotto ha subito
danni di trasporto. Per danni su prodotti già installati
l'azienda non si assume alcuna responsbilità. Per la
pulizia utilizzare esclusivamente il detergente consigliato,
oppure un detergente a pH neutro. Non utilizzare solventi,
detergenti abrasivi, acidi alcalini, ossidanti o contententi
cloro.
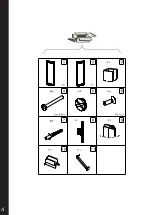
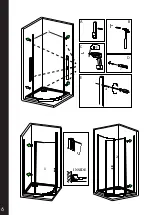
Utensili per il montaggio:
Livella, matita, bulino, martello, trapano, punta da muro 6
mm, cacciavite a croce, silicone, nastro adesivo.
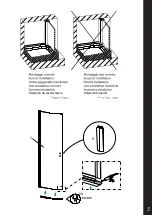
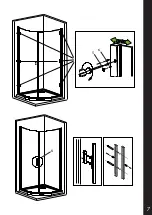
Attenzione:
Controllare che i punti di fissaggio non coincidano con
le linee elettriche o del gas. I tasselli e le viti fornite a
corredo alla cabina doccia sono adatti per materiale edile
in cemento armato e di costruzione. Per pareti in materiale
costruttivo diverso utilizzare elementi di fissaggio specifici
per quel tipo di materiale. Utilizzare solo silicone o materiale
isolante adatto alle superfici sulle quali verrà montata
la cabina doccia. Il fissaggio a parete, il montaggio e la
siliconatura della cabina doccia devono essere eseguiti in
modo preciso e professionale. In caso di dubbi e domande
in riferimento al montaggio della cabina doccia contatti il
servizio clienti.
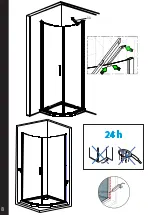
Siliconatura:
A montaggio ultimato pulire la cabina doccia e le piastrelle.
Siliconare lungo i profili di compensazione e lungo il
cristallo. Non utilizzare la cabina doccia per le 24 ore
successive, in modo da garatire l’asciugatua del silicone.
Important!
Before assembling the shower, please check that the
product has not been damaged during transport. The
company shall not be liable damages on products already
assembled. To clean, just use the recommended detergent
or a pH-neutral cleaning agent. Do not use solvents,
abrasive detergents, alkaline, oxidising or chlorine-based
acids.
Required assembly tools:
Level, pencil, burin, hammer, drill, bit 6 mm wall, phillips
screwdriver, silicone, scotch tape.
Attention:
Check that the fastening points do not coincide with
power lines or gas. The plugs and screws supplied with
the shower stall, are only suitable for masonry walls. For
different wall constructions and material types, please use
the appropriate fasteners. Use only silicone or insulating
material suitable for the surfaces on which you will mount
the shower stall. The Wall mounting, assembly and sealing
of the shower should be performed in a precise and
professional way. Should you have any doubts with regard
to assembly and installation procedures, please contact
our Customer Service.
Silicone sealing:
Once the assembly is completed, clean the shower stall
and the tiles. Seal the load balancing profiles and glass by
applying a line of sealant along these edges. Let it dry for
24 hours before using the shower stall.
Important!
Avant de monter la douche, vérifiez que le produit n'a pas
été endommagé pendant le transport. La société ne peut
être tenue responsable des dommages sur les produits
déjà assemblés. Pour nettoyer, il suffit d'utiliser le détergent
recommandé ou un nettoyant pH neutre. N'utilisez pas de
solvants, détergents abrasifs, alcalins, oxydants ou à base
de chlore.
Outils d'assemblage requis:
Niveau, crayon, burin, marteau, foret, bit 6 mm de mur,
tournevis cruciforme, silicone, ruban adhésif.
Attention:
Vérifier que les points de fixation ne coïncident pas avec les
lignes électriques ou le gaz. Les bouchons et les vis fournis
avec la cabine de douche ne conviennent que pour les murs
en maçonnerie. Pour les différentes constructions murales
et types de matériaux, utilisez les fixations appropriées.
Utilisez uniquement du silicone ou du matériau isolant
approprié pour les surfaces sur lesquelles vous monterez
la cabine de douche. Le montage mural, l'assemblage et
l'étanchéité de la douche doivent être effectués de manière
précise et professionnelle. Si vous avez des doutes
concernant les procédures d'assemblage et d'installation,
veuillez contacter notre service à la clientèle.
Silicone d'étanchéité:
Une fois l'assemblage terminé, nettoyer la cabine de
douche et les carreaux. Sceller les profils d'équilibrage de
la charge et le verre en appliquant une ligne d'étanchéité
le long de ces bords. Laissez sécher pendant 24 heures
avant d'utiliser la cabine de douche.
Wichtig!
Stellen Sie vor dem Zusammenbau der Dusche sicher,
dass das Produkt während des Transports nicht
beschädigt wurde. Das Unternehmen haftet nicht für
Schäden an bereits montierten Produkten. Verwenden Sie
zum Reinigen nur das empfohlene Reinigungsmittel oder
ein pH-neutrales Reinigungsmittel. Verwenden Sie keine
Lösungsmittel, Scheuermittel, alkalische, oxidierende oder
chlorhaltige Säuren.
Erforderliche Montagewerkzeuge:
Level, Bleistift, Burger, Hammer, Bohrer, Bit 6 mm Wand,
Kreuzschlitzschraubendreher, Silikon, Scotchband.
Aufmerksamkeit:
Überprüfen Sie, dass die Befestigungspunkte nicht mit
Stromleitungen oder Gas zusammenfallen. Die mit der
Duschkabine gelieferten Stecker und Schrauben sind
nur für Mauerwände geeignet. Für unterschiedliche
Wandkonstruktionen und Materialtypen verwenden Sie bitte
die entsprechenden Befestigungselemente. Verwenden
Sie nur Silikon oder Isoliermaterial für die Oberflächen, auf
denen Sie die Duschkabine montieren. Die Wandmontage,
Montage und Abdichtung der Dusche sollte präzise und
professionell erfolgen. Sollten Sie Zweifel hinsichtlich der
Montage und der Installation haben, wenden Sie sich bitte
an unseren Kundenservice.
Silikondichtung:
Sobald die Montage abgeschlossen ist, reinigen Sie
die Duschkabine und die Fliesen. Dichten Sie die
Lastenausgleichsprofile und das Glas, indem Sie eine
Reihe von Dichtmittel an diesen Kanten anbringen. Lassen
Sie es für 24 Stunden trocknen, bevor Sie die Duschkabine.
IT
FR
DE
EN
Summary of Contents for Light 695-RF
Page 4: ...4 ...
Page 5: ...5 INSIDE Helytelen telepítés تيبثت ريغ حيحص Helytelen összeszerelésére عيمجتلا حيحصلا 1 9 10 ...
Page 6: ...6 A B D C E 7 4 INSIDE 3 1 2 ...
Page 7: ...7 6 5 8 ...
Page 8: ...8 11 24 h ...
Page 9: ...9 NO ...


