18
19
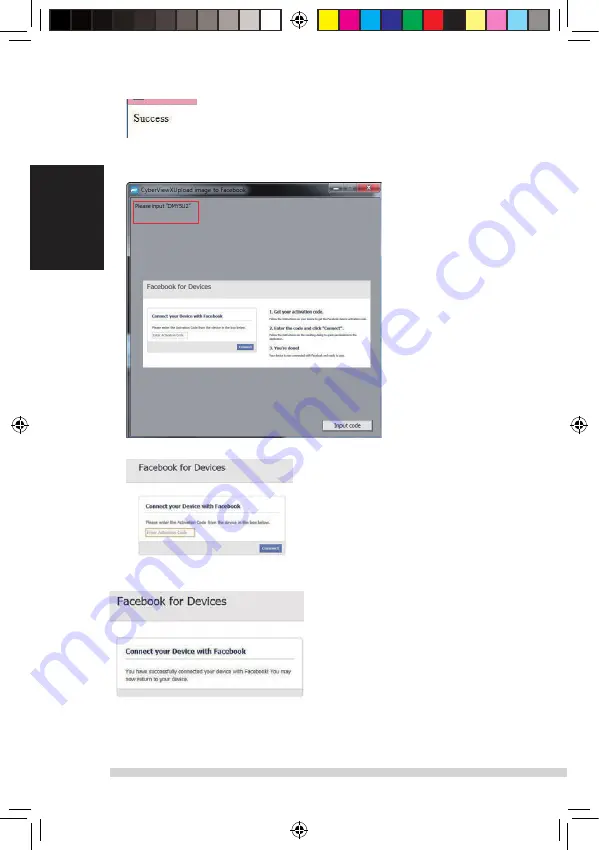
Minimize the browser window and on the next CyberView screen, not the Code number you have
been given (this will be a different code every time, make a note of it, yo will need to enter it on the
Facebook website
English
Minimize this browser window
Minimize the browser window and on the next CyberView screen,
4. note the Code number you have been given (this will be a different code every time,
copy it down, you will need to enter it on the Facebook website
5. Enter the code you made a note of earlier, then click Connect
6. Your scanner is now connected to Facebook
English
To scan to
, you must first go here:
https://www.dropbox.com/
and sign up for
an account and download and install their software, if you are not currently a Dropbox member
and would like to use this service.
Once you have created and installed Dropbox application you will now have a new folder on your
computer that you may select to scan into for automatic sync uploads with your Dropbox account.
To scan into the Dropbox folder
1. Open Cyberview X5
2. Next select Scan – Preference – the film type you wish to scan (Positive or Negative)
3. In this scan settings window select the Sharing and CloudStorage tab
4.
Check the box beside CloudStorage to activate it
NOTE:
When selecting the CloudStorage - Dropbox feature the software will automatically scan to
the CyberviewX folder it creates in your Dropbox folder on your computer, ready for synchronization
with your Dropbox account.
5. Click OK to save settings, Once configured you are ready to scan.
6. All the files scanned will be saved into the Dropbox folder
Synchronization will automatically occur with your online account when active. (Active=Dropbox is
running in the system tray)
Manual-RPS10M.indd 18
23.12.2016 10:00:32
Summary of Contents for 4005039659102
Page 20: ...20 English USER INTERFACE Manual RPS10M indd 20 23 12 2016 10 00 32...
Page 30: ...Manual RPS10M indd 30 23 12 2016 10 00 32...
Page 31: ...reflecta RPS 10M CyberView X5 Bedienungsanleitung Manual RPS10M indd 31 23 12 2016 10 00 32...
Page 32: ...2 Manual RPS10M indd 32 23 12 2016 10 00 33...
Page 33: ...3 Hauptscan Standard Scanbereich 25 30 Manual RPS10M indd 33 23 12 2016 10 00 33...
Page 34: ...4 Manual RPS10M indd 34 23 12 2016 10 00 33...
Page 35: ...5 Manual RPS10M indd 35 23 12 2016 10 00 33...
Page 36: ...6 Manual RPS10M indd 36 23 12 2016 10 00 33...
Page 37: ...7 Manual RPS10M indd 37 23 12 2016 10 00 34...
Page 38: ...unten liegt 8 Manual RPS10M indd 38 23 12 2016 10 00 34...
Page 39: ...9 unten liegt 8 Manual RPS10M indd 39 23 12 2016 10 00 34...
Page 40: ...iew 10 Manual RPS10M indd 40 23 12 2016 10 00 34...
Page 41: ...11 Benutzeroberflache Manual RPS10M indd 41 23 12 2016 10 00 34...
Page 90: ...Manual RPS10M indd 90 23 12 2016 10 00 39...
Page 120: ...Manual RPS10M indd 120 23 12 2016 10 00 44...
Page 127: ...7 ITALIANO Manual RPS10M indd 127 23 12 2016 10 00 45...
Page 137: ...17 INTERFACCIA UTENTE ITALIANO Manual RPS10M indd 137 23 12 2016 10 00 46...
Page 157: ...7 NEDERLANDS Manual RPS10M indd 157 23 12 2016 10 00 50...


