background image

38

20. Disposal

a) Product

  Electronic devices are recyclable waste and must not be disposed of in the household waste. At the end of 

its service life, dispose of the product according to the relevant statutory regulations.


Remove any inserted (rechargeable) batteries and dispose of them separately from the product.

b) (Rechargeable) batteries

You as the end user are required by law (Battery Ordinance) to return all used batteries/rechargeable batteries. Dis-

posing of them in the household waste is prohibited.

  Contaminated (rechargeable) batteries are labelled with this symbol to indicate that disposal in the domes-

tic waste is forbidden. The designations for the heavy metals involved are: Cd = Cadmium, Hg = Mercury, 

Pb = Lead (name on (rechargeable) batteries, e.g. below the trash icon on the left).

Used (rechargeable) batteries can be returned to collection points in your municipality, our stores or wherever (re-

chargeable) batteries are sold.

You thus fulfil your statutory obligations and contribute to the protection of the environment.

21. Declaration of Conformity (DOC)

Conrad Electronic SE, Klaus-Conrad-Straße 1, D-92240 Hirschau, hereby declares that this product conforms to 

Directive 2014/53/EU. 

  Click on the following link to read the full text of the EU Declaration of Conformity:


www.conrad.com/downloads


Select a language by clicking on the corresponding flag symbol, and then enter the product order number 

in the search box. The EU Declaration of Conformity is available for download in PDF format.

Summary of Contents for R5-Foldable FPV Drone RtF

Page 1: ...Operating Instructions Electrical quadrocopter R5 Foldable FPV Drone RtF Item No 1714585 ...

Page 2: ... Operating the quadrocopter 13 a Charging the flight battery 13 b Folding the rotor arms in and out 14 c Attaching the propeller guard 14 d Checking the drive 15 e Inserting the flight battery 15 f Switching the quadrocopter on 16 g Basic information on steering quadrocopters 17 h Practical flight tips for beginners 20 i Starting the quadcopter 21 j Landing the quadrocopter 22 k Trimming the quadc...

Page 3: ... 17 Recording photos and videos 34 18 The smartphone as a remote control 36 19 Maintenance and cleaning 37 20 Disposal 38 a Product 38 b Rechargeable batteries 38 21 Declaration of Conformity DOC 38 22 Troubleshooting 39 23 Technical data 40 a Remote control 40 b Quadcopter 40 c Camera 40 d USB charger 40 e Software 40 ...

Page 4: ... to a third party without the operating instructions Therefore retain these operating instructions for reference All company and product names are trademarks of their respective owners All rights reserved If there are any technical questions please contact International www conrad com contact United Kingdom www conrad electronic co uk contact 2 Explanation of symbols The symbol with an exclamation...

Page 5: ...e product and result in a short circuit fire electric shock or other hazards The product must not become damp or wet This product is not suitable for children under 14 years of age Always follow the safety information in these operating instructions It contains important information on how to handle the product safely You are responsible for the safe operation of this model 4 Delivery content Read...

Page 6: ... desired direction and the lift thereby also acts as thrust The quadrocopter flies in the respective direction On the model two propellers turn clockwise and two turn anti clockwise Through a targeted change of speed of the two propeller groups relative to each other propellers turning to the right turn somewhat faster and propellers turning to the left turn somewhat slower or vice versa it is pos...

Page 7: ... countries you are required to have insurance when using a model aircraft Familiarize yourself with the local statutory regulations for using model aircraft In Germany for example the regulations for model aircraft are stipulated in the German Air Traffic Act Any breaches of the statutory regulations could lead to severe penalties as well as restrictions to your insurance cover The unauthorised co...

Page 8: ...ient distance from people animals and objects Never try to grab the flying model with your hand Only fly the model when you are fully alert and able to respond Fatigue alcohol and medication can affect your ability to respond Keep objects and body parts away from the rotors when the rotors are moving Do not fly the model towards spectators or towards yourself Never try to grab hold of the flying q...

Page 9: ...teries with half full batteries Always use batteries of the same type and from the same manufacturer Never mix disposable batteries with rechargeable batteries Always use disposable batteries to power the remote control If you do not plan to use the model for an extended period e g during storage remove the batteries from the remote control to prevent them from leaking and causing damage Turn the ...

Page 10: ...im button for the roll function right 7 Trim button for the roll function left 8 On off switch 9 Push button for the start and land function 10 Push button for the motor emergency off function 11 Push button for the headless return function 12 Joystick for the pitch and yaw function 13 Push button for photo and video recording without function on this model 14 Push button to switch between beginne...

Page 11: ... please order 3 x Important Use only standard batteries 1 5 V cell and not rechargeable batteries 1 2 V cell as the power supply for the transmitter To insert the batteries proceed as follows Loosen the retaining screw 1 on the battery compart ment cover 2 on the back of the transmitter with a suit able screwdriver Press the latch 3 of the lid locking mechanism down and remove the battery compartm...

Page 12: ...itter emits another short beep with a high er frequency and the LED glows steadily Then switch off the transmitter again using the on off switch If the power supply is no longer sufficient for the proper operation of the transmitter the LED indicator see Figure 3 no 15 will start to flash and the transmitter will emit short beeps In this case stop flying the quadrocopter immediately and insert a n...

Page 13: ...f the USB plug goes out Disconnect the flight battery from the charging cable im mediately after charging and unplug the USB plug on the charging cable from the computer laptop or charger plug Warning Do not connect the USB cable to a USB hub without its own power supply e g a USB port on a keyboard as the current is not sufficient to charge the battery The operating system will not detect any new...

Page 14: ...port c Attaching the propeller guard The quadrocopter comes with two plastic guards 1 that ensure protection against rotating propellers Slide the plastic guards over the landing legs from below until the two latches 2 lock into place on the guard holder of each motor For better illustration Figure 6 shows a guard already mounted To disassemble the guard slightly open the two latches on each motor...

Page 15: ...wise when seen from above A and two propellers turn anti clockwise B e Inserting the flight battery To insert the charged flight battery 1 easily turn the quad rocopter on its back Mount the flight battery on the quadrocopter as shown in Figure 8 above Then slide it forward until it locks into place in the holder To remove the rechargeable battery press on the grooved surface 2 with your thumb and...

Page 16: ...nd The LED below the function button will go on Then use the on off switch to switch on the transmitter see also Fig 1 no 8 The transmitter will then be paired with the quadrocopter If the LEDs on the transmitter and the quadrocopter glow steadily the quadrocopter is ready to start Important There should be no other 2 4 GHz transmitters in the immediate vicinity during the switching on process The...

Page 17: ...ure 10 Steering is carried out with the left joystick see also Figure 1 no 12 When the motors are started by remote control they run at idle speed If the joystick is now pushed forwards from its central position the rotational speeds of the propellers increase and the quadrocopter lifts off Once the desired flight altitude has been reached the joystick can be returned to the centre position Thanks...

Page 18: ...rtical axis to the left as viewed from above see arrows in Figure 11 If the joystick is moved to the right the speed changes of the propellers come out exactly the opposite and the model turns to the right Figure 11 Roll function The roll function allows you to move the quadrocopter sideways to the right and to the left see Figure 12 The control is effected with the right joystick see Figure 1 no ...

Page 19: ...tick see also Figure 1 no 4 When the joystick is pushed slightly forward the quadrocopter electronics change the propeller speeds so that the model tilts slightly forward and thus also flies forward see arrows in Figure 13 If you steer backward on the transmitter exactly the opposite speed changes of the propellers occur and the model flies backward Figure 13 ...

Page 20: ...ore unstable If the propellers bump against objects and get blocked immediately press the push button for the motor emergency stop function see Figure 1 no 10 so that the drive motors are no longer supplied with power After a clumsy landing or a crash the quadrocopter cannot be started for approx 10 seconds During this time the position sensors are automatically recalibrated This process can be sh...

Page 21: ...erwise the propellers will restart In an emergency you can also use the push button for the motor emergency stop function see Figure 1 no 10 to disable the motors Manual start If the propellers are rotating at low speed carefully move the left joystick forward The quadrocopter will significantly increase the propeller speeds and take off With the right joystick you can easily correct any drift for...

Page 22: ...l the propellers have come to a standstill The quadrocopter can now be switched off Method 2 When the quadrocopter is hovering press the button for the automatic take off and landing function see Figure 1 no 9 The quadrocopter will now reduce its flight altitude itself until it is on its landing legs again While charging the quadrocopter can still be fully controlled using the yaw bob and roll fun...

Page 23: ...the trim s end position is reached no more beeps are emitted by the transmitter The middle position of the trim is audibly indicated with a higher pitched beep Roll trimming If the quadrocopter drifts or tips sideways to the right slowly reduce the flight altitude until the quadrocopter is safely back on its landing feet Press the left trim button for the roll function see also Figure 1 no 7 sever...

Page 24: ...ncy to drift forwards If the quadrocopter wants to drift backwards press the upper trim button for the bob function see also Figure 1 no 3 Figure 16 If you have the quadrocopter under secure control after a few test flights you can also optimally adjust the trim during the flight The trim for the roll and bob functions is not saved After you switch the transmitter on and off the trim returns to th...

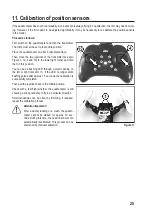
Page 25: ...the lower right corner and hold them in this position You can see a flashing LED through a small opening on the left or right rotor arm 1 If the LED no longer emits flashing pulses after approx 1 5 seconds the calibration is successfully completed Then pull the joysticks back to the middle position Check with a test flight whether the quadrocopter is still showing a strong tendency to fly in a par...

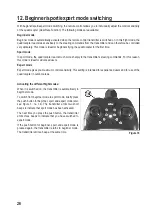
Page 26: ...ter s steering commands For this reason this mode is ideal for advanced users Expert mode Expert mode gives you maximum control sensitivity This setting is intended for experienced users and for use of the quadrocopter in outdoor areas Activating the different flight modes When it is switched on the transmitter is automatically in beginner mode To switch from beginner mode to sport mode briefly pr...

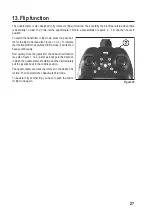
Page 27: ...e see also Figure 1 no 2 To indicate that the transmitter has switched to flip mode it emits short beeps continuously Now quickly move the joystick for the bob and roll function see also Figure 1 no 4 as far as it will go in the direction in which the quadrocopter should flip and then immediately pull the joystick back to the middle position The quadrocopter executes the roll over in the desired d...

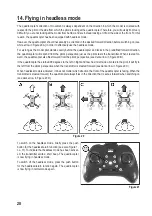
Page 28: ...transmitter When steered for ward the quadrocopter also flies forward from the pilot s perspective see dark arrow in Figure 20 B If the quadrocopter has turned 90 degrees to the left in flight and now has its left side oriented to the pilot it will fly to the left from the pilot s perspective when the transmitter is steered forward see dark arrow in Figure 20 C When headless mode is activated it d...

Page 29: ...d forwards direction and the pilot is in line with the quadrocopter facing forwards If the quadrocopter is offset laterally it will fly past the pilot laterally when enabling the return function and will thus fly away again see Figure 22 C Figure 22 To enable the return function press and hold down the push button for the headless return function see Figure 21 no 11 To show that the return home fu...

Page 30: ... for iOS QR code for Android Alternatively search for the GX FPV app in Apple Store for the iOS operating system and in Google Play Store for the Android operating system a Opening the app Once the app has been successfully installed on your smartphone you can open the app As the app is constantly updated it is possible that new functions have been added to the current app which are beyond the sco...

Page 31: ...ters e g trim val ues activation recommended Reset the parameters Reset of the stored trim values to the factory parameters Right hand mode If the function is disabled the virtual joysticks on the smart phone see Figure 30 nos 18 and 19 will function just as the ones on the supplied transmitter control mode 2 If the function is activated the virtual joysticks on the smartphone invert the bob and f...

Page 32: ...trolled by tilting and tipping the smartphone 7 Use the Altitude hold mode to switch the virtual control for models with automatic altitude stabilisation 8 Button for flip function 9 Show or hide virtual joystick including trim indicators 10 Show and hide further settings 11 Switch voice control on or off The quadrocopter can be controlled with the following commands take off landing forward backw...

Page 33: ...gh space and avoid flying the quadrocopter close to people animals or obstacles The background images shown in Figs 26 and 27 only appear if the app has been activated with the quadrocopter switched off Otherwise the camera image is shown in the background Notes on FPV operation The so called FPV operation is possible thanks to the live transfer of camera images to the smartphone FPV First Person ...

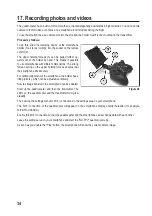
Page 34: ...ng on the upper holding forceps ensures that the smartphone sits securely For optimal alignment of the smartphone the holder has a tilting joint 4 which can be adjusted sensitively Now the image transfer to the smartphone can be enabled Start up the quadrocopter and then the transmitter The LEDs on the quadrocopter and the transmitter must glow steadily Then call up the settings menu for Wi Fi con...

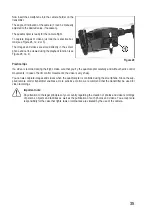
Page 35: ...you fly the quadrocopter carefully and without hectic control movements In case of hectic control movements the video is very shaky You can also capture images and videos when the quadrocopter is controlled using the smartphone Since the sup plied remote control transmitter enables a more sensitive control we recommend that the transmitter be used for video recordings Important note Pay attention ...

Page 36: ...ar on the smartphone display shortly thereafter for example WiFiUFO XXXXXX Enable this Wi Fi connection so that the quadrocopter and the smartphone can exchange data with each other Leave the settings area on your smartphone and start the GX FPV quadrocopter app As soon as you enable the Play button the smartphone will show the current camera image Press the Off button 9 to display the virtual joy...

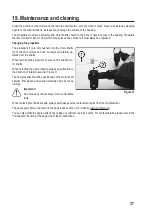
Page 37: ...y up wards from the shafts When removing the propellers ensure not to bend the mo tor shafts When selecting the new propeller always pay attention to the direction of rotation see also Figure 7 The new propeller should be positioned on the motor shaft straight from above and pushed carefully down as far as it will go Important Do not use any unnecessary force or unsuitable tools When replacing mec...

Page 38: ...ations for the heavy metals involved are Cd Cadmium Hg Mercury Pb Lead name on rechargeable batteries e g below the trash icon on the left Used rechargeable batteries can be returned to collection points in your municipality our stores or wherever re chargeable batteries are sold You thus fulfil your statutory obligations and contribute to the protection of the environment 21 Declaration of Confor...

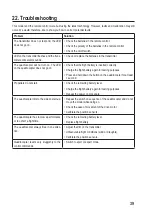
Page 39: ...harge the flight battery again for testing purposes Press and hold down the button on the quadrocopter for at least 1 second Propellers do not start Check the remaining battery level Charge the flight battery again for testing purposes Repeat the power on procedure The quadrocopter tilts to the side on start up Repeat the switch on sequence of the quadrocopter and do not move the model while doing...

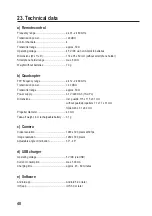
Page 40: ...Transmission power 20 dBm Transmitter range approx 30 m Power supply 3 7 V 220 mAh 1S LiPo Dimensions incl guards 115 x 115 x 31 mm without guards propellers 71 x 71 x 31 mm folded 46 x 31 x 62 mm Propeller diameter 40 mm Take off weight incl rechargeable battery 31 g c Camera Video resolution 1280 x 720 pixels at 30 fps Image resolution 1280 x 720 pixels Adjustable angle of inclination 30 45 d US...

Page 41: ...41 ...

Page 42: ...42 ...

Page 43: ...43 ...

Page 44: ...ved Reproduction by any method e g photocopy microfilming or the capture in electronic data processing systems require the prior written approval by the editor Reprinting also in part is prohibited This publication represent the technical status at the time of printing Copyright 2018 by Conrad Electronic SE 1714585_V1_1018_02_VTP_m_en ...

Reviews: