background image

REELCAMERAS.COM

© 2 0 1 3   R E E L   C A M E R A S

[ 1 7 ]

FAQ AND CUSTOMER SUPPORT

If there is a problem with your HD Slayer first consult the frequently 
asked questions. This lists the most common problems. 

If you can not find a solution then first visit the community section of the 
website at www.reelcameras.com/blog  This page is regularly updated with 
the queries sent to our customer service team and is full of hints and tips 
to improve your filming.
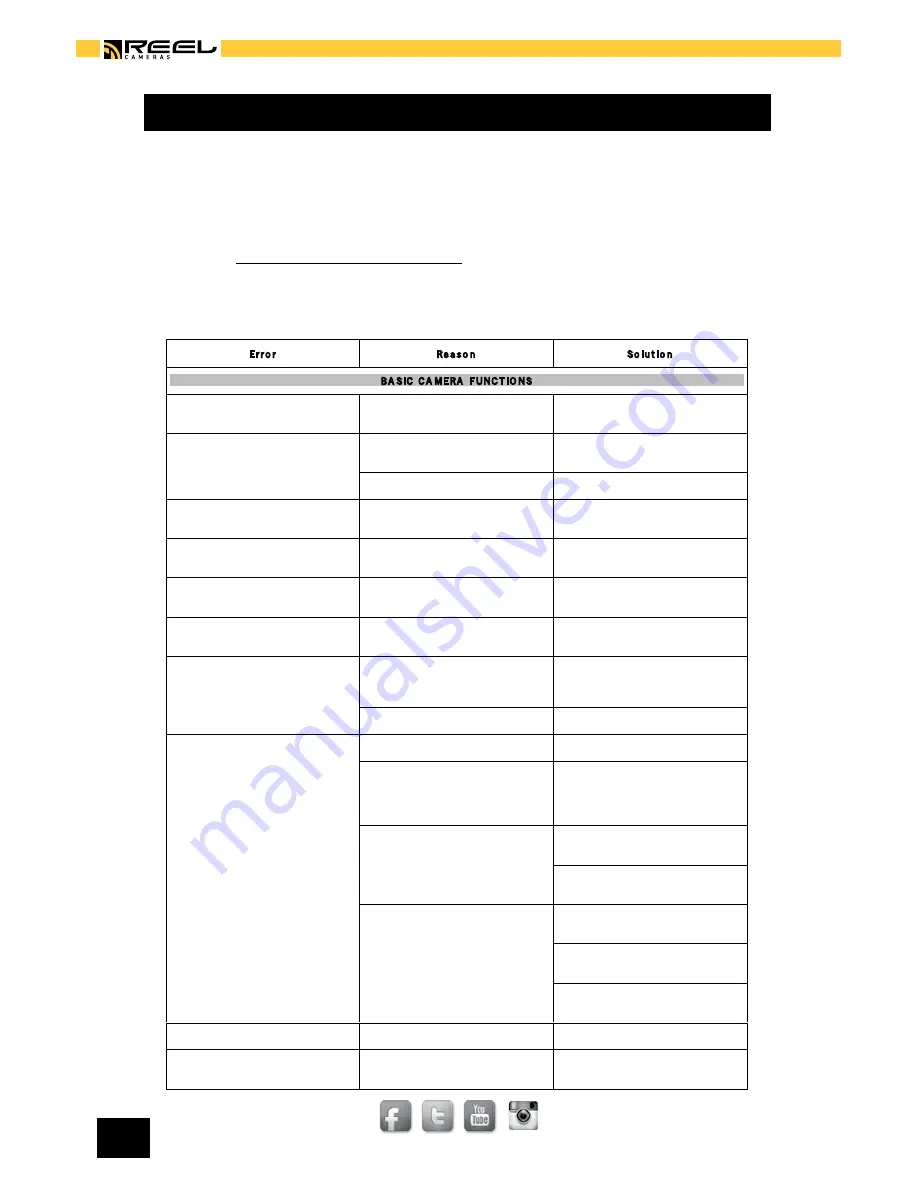
 

Er r o r  

Re a s o n  

So lu t io n  

BA SIC   C A MERA   FUNC T IO NS 

The camera turns off after start


The battery is not charged


Charge the battery with USB until 
the status light turns green


Unable to switch ON the camera


The battery has no charge


Charge the battery or connect the 
camera  to a power supply  

The battery is not inserted correctly

  Check the battery  


The SD card is defective  

Remove the SD card and turn on 
the camera  


The software has crashed


Remove the battery and wait for 10 
seconds before turning on again


The camera does  not react when 
buttons are pressed


The software has crashed


Remove the battery for 10 seconds 
and restart the camera


The camera regularly freezes and 
doesn't react  

Firmware is out of date


Update firmware by visiting 

www.reelcameras.com/downloads


The camera will not charge


The charger you are using has an 
incorrect voltage  

Use the Reel Cameras charger or 
connect the camera to a computer 
to charge  

The battery is  incorrectly inserted  

Reinsert the battery


The camera has turned itself OFF


The camera is out of battery


Recharge the battery


The camera software has crashed


Wait 10 seconds and turn the 
camera on. If this fails, remove and 
reinsert the battery before 

turning 

on  

The camera has overheated


Only use the camera in 
temperatures below 122°F


Remove the battery and wait for 
the camera to cool  

The camera has frozen at a low 
temperature   

Only use the camera in 
temperatures above 10°F


Do not subject the  camera to 
prolonged periods in snow or icy water 

Allow the camera to warm up 

before restarting


Displays shows “SD error”


Faulty memory card


Format or replace the memory card


Date and time are not displayed 

correctly


Incorrect menu settings


Change date and time in the system 

menu


ISSUES WITH RECORDING


The camera will not record


The memory card is full or faulty


Format the memory card, or insert a 

new memory card, or set Loop 

recording to ON.


No memory card is inserted 


Insert a memory card


The zoom function does not work


Video is set to record at 1080p


Change video settings and record at 

720p or lower


The video footage is out of focus


The lens is incorrectly positioned


Turn the lens until clockwise until it 

fits snugly in position


The lens has been turned to 

underwater mode


Turn the lens 95° clockwise


Artificial lights flicker during video 

footage


The camera is set to the wrong light 

frequency


Change the light frequency in the 

system menu


The video is recording upside down


Image rotation is set to 180°


Set image rotation to regular in the 

system menu


ISSUES WITH PLAYBACK


The video jerks during playback


The USB connection is too slow


Use a computer with a USB2 

connection or higher


The memory card is not writing fast 

enough


Use a branded memory card with a 

write speed of 10 or higher


The computer is too slow to play 

the video


Play the video through a TV


The data rate is too high for the 

computer


Reduce the data rate to medium or 

low in the video settings menu


My Windows PC will not play video 

files


Camera is set to record in MOV 

format and the computer does not 

have the correct software to play it


Set the camera to record in MPEG 

format.


Use Apple QuickTime to play the 

video files


ISSUES WITH MOUNTS AND ACCESSORIES


The underwater housing is fogging 

up during use


The temperature difference 

between inside and outside the case 

is causing fogging.


Use an anti-fog insert or silica gel 

inside the housing


The video jerks when using a Reel 

Camera mount


The mount is too loose


Tighten the mount so the camera 

cannot move


There is too great a distance 

between the mount and the camera


Remove other accessories so the 

camera is next to the mount


The sticky mount does not stick to 

a surface


The surface is dirty or greasy


Clean and dry the surface 

thoroughly before affixing the 

mount


Summary of Contents for HD SLAYER

Page 1: ...HD SLAYER OWNERS MANUAL ...

Page 2: ...wing Reel Camera s community and share your footage at reelcameras com community Share hints tips and skills at the Reel Camera s community base at www reelcameras com blog capture it share it relive it REELCAMERAS COM ...

Page 3: ...ng Zoom Photo recording Waterproof housing and underwater use RELIVING HD SLAYER FOOTAGE View playback video and photos Copy transfer video files MS Windows MAC Delete video and photo files UPDATING YOUR HD SLAYER Firmware updates Exchanging the lens FAQ AND CUSTOMER SUPPORT TECHNICAL DATA IMPORTANT WARNING MESSAGES AND SAFETY ADVICE 1 1 2 2 3 4 5 6 7 8 9 9 10 11 12 13 13 14 14 16 15 15 15 17 18 1...

Page 4: ... off Press and hold on button for 3 seconds until LCD screen comes on Start stop recording Press video button Capture photo Press camera button Access playback Press play button Access camera menu Press and hold M button for 3 seconds Turn LED light on off Press light button ...

Page 5: ...iety of mounts and accessories available at www reelcameras com MOUNTS AND ACCESSORIES INCLUDED Your HD slayer comes with mounts and accessories that enable you to immediately start recording like a pro Handlebar mount Helmet mount Sticky mounts PREPARING YOUR HD SLAYER RC301 RAM SUCTION CUP RC302 RAM HANDLE BAR RC303 RAM ROLL ...

Page 6: ...layer comes with a partially charged battery To charge the battery 1 Use the USB charger to connect the camera to a computer or power source 2 The status LED light will turn red to indicate the camera is charging 3 The status LED light will turn green once the camera is fully charged From empty it requires three hours of charging to get a full battery While charging you can use all the camera s fe...

Page 7: ...ally switch to the 2nd card when the 1st card is full INSERTING A MEMORY CARD 1 Lift the soft plastic cover on the side of the camera 2 Insert micro SD or MicroSDHC into either port with label facing the back of the camera The card will click into place when inserted 3 Inserted memory cards will be displayed with the card icons 1 and 2 at the bottom of the LCD screen The red screen icon indicates ...

Page 8: ...Press directional arrows to scroll between menu items Press double arrow to select individual menu item Press directional arrows to change item settings Press and hold ESC to go back one step and to exit menu To access the system settings first press and hold M button for 2 seconds to access menu mode Press M button twice more to access system settings Language English French German Spanish Italia...

Page 9: ...down Regular or Rotation 180 Image mirror Reverses the image as if looking in a mirror Regular or mirror Light Frequency When filming indoors ensure light frequency is set correctly 60Hz for North and Central Americas 50Hz for rest of the world Video System NTSC or PAL OSD Displays icons ON or OFF LED Indication Switches front LED ON or OFF Format Card Formats the card in SLOT 1 or SLOT 2 All reco...

Page 10: ...D card use time storage capacity and recording settings are displayed SCREEN ICONS ZOOM The HD Slayer has a built in 4 x zoom that enables you to get closer to the action To zoom in press and hold the camera button for three seconds You can zoom in either before or during recording To zoom out press and hold the video button for three seconds You can zoom out either before or during recording Note...

Page 11: ...ra is in the menu mode To stop recording press and release the video button The blue status LED will stop flashing and the red video icon will disappear Your HD Slayer will immediately stop recording when the battery is out of power or the memory card s are full Data will be saved before recording stops DIFFERENT VIDEO MODES Your HD Slayer has a range of video formats and options that allow maximu...

Page 12: ...a long recording to be seamlessly stored as different clips Set to 5 10 15 20 or 30 minutes Timestamp Set the timestamp ON or OFF Time lapse rec Set time lapse recording settings to OFF 1frame per second 1 frame per minute FPM 2 FPM or 6 FPM This mode allows you to record at a very slow frame rate and create time lapse sequences Loop When the memory is full the camera will record over old footage ...

Page 13: ... camera is recording video or the camera is in the menu mode For ease of use photos are stored in a separate sub folder on the SD memory card DIFFERENT PHOTO MODES In the photo menu you can select the following settings for photo recordings Photo Size 3 5 or 8 MP Photo Intervals Use this function to capture a quick burst of photos immediately after each other Set to 3 photos 5 photos or OFF Auto s...

Page 14: ...e following intervals 3 5 10 30 60 seconds We recommend the following settings for creating timelapse videos 3 seconds Scenes when you re physically moving 5 seconds Cloud movement and landscapes 10 seconds Sunsets and slow moving landscapes 30 seconds and 60 seconds Slow moving scenes where the camera is fixed in position When recording for a long period of time select auto screen off in the syst...

Page 15: ...Before use ensure that the rubber seal is clean and undamaged When using the camera in wet or humid conditions it is recommended to use anti fog pads to ensure the inside remains clear of mist UNDERWATER USE The waterproof housing can be used up to a depth of 40meters or 130feet Use beyond this depth is not recommended For optical recording underwater turn the lens counterclockwide by 95 degrees T...

Page 16: ... the arrows to select the video clip or to scroll through the photos 3 To play a video clip press the play button To pause playback press the play button again 4 You can rewind and fast forward through the video clips Press the video button to fast forward By pressing the video button you can fast forward at 2x 4x 8x or play at normal speed Press the camera button to rewind the clip Repeatedly pre...

Page 17: ...ied and deleted COMPATIBILITY WITH WINDOWS AND MAC The HD Slayer is compatible with both MS Windows and MAC operating systems and there included editing software iMovie and Windows Live Movie Maker Note When using MS Windows it is recommended to record in MPEG format as the MOV format is not supported by MS Windows Media Player The recommended media player for MOV files is Apple QuickTime Player D...

Page 18: ...ware has taken affect EXCHANGING THE LENS Reel Cameras have an easy to use interchangable lens system This gives you the ultimate flexibility with your filming and makes replacing a scratched lens easy and cheap The standard HD Slayer has a 127 lens providing a perfect blend of width and depth For ultra widescreen footage use a 170 lens Or take a 148 lens for an impressive widescreen field of view...

Page 19: ...ied and deleted COMPATIBILITY WITH WINDOWS AND MAC The HD Slayer is compatible with both MS Windows and MAC operating systems and there included editing software iMovie and Windows Live Movie Maker Note When using MS Windows it is recommended to record in MPEG format as the MOV format is not supported by MS Windows Media Player The recommended media player for MOV files is Apple QuickTime Player D...

Page 20: ...e camera The camera regularly freezes and doesn t react Firmware is out of date Update firmware by visiting www reelcameras com downloads The camera will not charge The charger you are using has an incorrect voltage Use the Reel Cameras charger or connect the camera to a computer to charge The battery is incorrectly inserted Reinsert the battery The camera has turned itself OFF The camera is out o...

Page 21: ... to 180 Set image rotation to regular in the system menu ISSUES WITH PLAYBACK The video jerks during playback The USB connection is too slow Use a computer with a USB2 connection or higher The memory card is not writing fast enough Use a branded memory card with a write speed of 10 or higher The computer is too slow to play the video Play the video through a TV The data rate is too high for the co...

Page 22: ...on 250 450 mAh depending on camera settings Weight 77 g incl battery Battery 3 7 V 900 mAh LiPo Sensor CMOS 5 MP Lens exchangeable 170 720p 127 1080p Zoom Digital 4times only NTSC Screen 1 5 38 mm TFT Ports 10 Pin Mini USB 2 0 HDMI Open Connector Board OCB bottom of the cam Operating Storage temp 10F 122F White balance Automatically ...

Page 23: ...tery pack at a temperature of between 32 and 104 deg F This product uses Li Po batteries Li Po batteries are recyclable and a valuable resource To dispose of the battery remove it and take it to a resource recovery favility Herewith we declare that this item is in accordance with the essential requirements and other relevant regulations of the directive 2004 108 EC A copy of the original declarati...

Page 24: ...capture it share it relive it REELCAMERAS COM 2 0 1 3 R E E L C A M E R A S Reel Cameras Inc www reelcameras com e mail info reelcameras com E fax 1 888 575 3443 ...

Reviews: