background image

GB

P8 – Watts control 

The  func

ti

on  of  Wa

tt

s  Control  program  is  to  allow  the  user  to  set  a  desired  workout  load  (wa

tt

s).  The  user’s  workout  load  is  controlled 

automa

ti

cally by increasing or decreasing the resistance as the user changes their stride cadence (RPM). The intensity will be reduced when 

user  increases RPM  and  the  intensity  will  be  increased  when  the  user  decreases  the RPM.    A

ft

er  the  user  has  selected  this  program P8, 

press the “ENTER” bu

tt

on to con

ti

nue the set up procedure. WATTS display shows factory default se

tti

ng  “100”. Press RESISTANCE UP/DOWN 

bu

tt

on  to  adjust  the  target  Wa

tt

s  and  press  STOP/ENTER  to  adjust  TIME.  TIME  display  shows  factory  default  se

tti

ng  “32:00”.  Press 

RESISTANCE UP/DOWN bu

tt

on to adjust the target Time and press STOP/ENTER to con

rm. Press START bu

tt

on to start the WATTS program. 

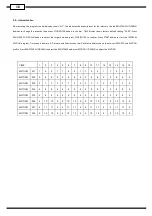
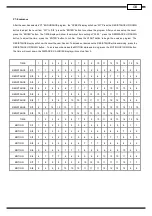
Time  counts  down  to  0,  Distance  and  Calories  count  up.  Dot  Matrix  display  shows  the  pre-set  INTENSITY  pro

le.  Press  RESISTANCE 

UP/DOWN to adjust the resistance and press MOTION UP/DOWN to adjust the mo

ti

on. 


P 9 – Target pulse main program 

After the actual pulse rate reaches the minimum target workout pulse rate and completes the warm up  section, the computer will 

go into the main program and the time will count down from the pre-set time. During the main program, the computer will detect 

the user pulse rate every 15 seconds. The RESISTANCE, DISTANCE, CALORIES will continue to count up from the “Warm up” 

section into the Target pulse Program. To increase or decrease the selected Pulse rate while exercis ing, press RESISTANCE 

UP/DOWN button. If the computer does not detect the user actual pulse rate, the computer will pause the compare func tion and 

stop increasing the RESISTANCE. The LCD will show “NO PULSE”.    If the actual pulse rate cannot reach the maximum target 

workout pulse rate, the resistance level will be increased by 1 level every 15 seconds until the pul se rate reaches the maximum 

target workout pulse rate. If the actual pulse is higher than the maximum target workout pulse rate, then the resistance will be 

reduced 1 level every 15 seconds until the actual pulse rate meets the maximum target workout pulse  rate. If the actual pulse is 

higher than the maximum target pulse rate for 3 minutes or over, the preset time counts down to the  end, the computer will stop 

the Target pulse program and then begin the COOL DOWN function. 


TIME   

1   

2   

3   

4   

5   

6   

7   

8   

9   

10    11    12    13    14    15    16   

RESISTANCE 

25 

W   

25 

W   

25 

W   

25 

W   

25 

W   

25 

W   

25 

W   

25 

W   

25 

W   

25 

W   

25 

W   

25 

W   

25 

W   

25 

W   

25 

W   

25 

W   

TIME   

1   

2   

3   

4   

5   

6   

7   

8   

9   

10    11    12    13    14    15    16   

MOTION 

1   

1   

1   

1   

1   

1   

1   

1   

1   

1   

1   

1   

1   

1   

1   

1   

Summary of Contents for DMT9.5e

Page 1: ...DMT 9 5e Computer Manual Computer Manual Reebok DMT9 5e 20100513 GB...

Page 2: ...GB A B C D E F FSLCD DISALY A B INTENSITY UP DOWN BUTTON STOP ENTER BUTTON C D START BUTTON MOTION UP DOWN BUTTON E F FAN CONTROL BUTTON...

Page 3: ...console will enter the PAUSE MODE During the PAUSE MODE if you start pedaling the machine or press the START button the console will return to the PROGRAM MODE and continue the original program Press...

Page 4: ...RT button the LCD will display En1 press theRESISTANCE UP DOWN button to En3 CONTROL MODE and then press START button the LCD will show M8 ELLIPTICAL LEVEL MPH or M7 ELLIPTICAL LEVEL KPH Select set M8...

Page 5: ...ps RESISTANCE LEVEL 8 The range of the RESISTANCE LEVEL is from L1 to L16 MOTION LEVEL 9 The range of the MOTION LEVEL is from M1 to M12 RPM DIAGRAM 5 The range of the RPMs are from 0 to150 SPEED 3 Th...

Page 6: ...5 P1 P12 Program Selecting Procedure After the age has been set up press the ENTER button to confirm the LCD will display and flash PROGRAM1 press RESISTANCE UP DOWN to select Then press the ENTER but...

Page 7: ...the end of the program when the preset target has been achieved the computer will beep P4 Fat burning program After the user has selected P4 Fat burning program the TIME display will show the workout...

Page 8: ...unt up Dot Matrix display shows the pre set INTENSITY and MOTION pro le Press RESISTANCE UP DOWN to adjust the RESISTANCE and press MOTION UP DOWN to adjust the MOTION LEVEL 1 2 3 4 5 6 7 8 9 10 11 12...

Page 9: ...me counts down to 0 Distance and Calories count up Dot Matrix display shows the pre set INTENSITY and MOTION pro le Press RESISTANCE UP DOWN to adjust the RESISTANCE and press MOTION UP DOWN to adjust...

Page 10: ...wn the DISTANCE CALORIES display will count up from 0 TIME 1 2 3 4 5 6 7 8 9 10 11 12 13 14 15 16 RESISTANCE St1 1 1 2 2 2 4 4 4 5 5 5 6 6 6 2 2 RESISTANCE St2 2 2 4 4 4 5 5 5 6 6 6 7 7 7 4 4 RESISTAN...

Page 11: ...main program and the time will count down from the pre set time During the main program the computer will detect the user pulse rate every 15 seconds The RESISTANCE DISTANCE CALORIES will continue to...

Page 12: ...ress the STOP button twice and the program will return to POWER ON P10 C1 C5 Individual custom program When the user selects P10 CUSTOM program and press s the ENTER button C 1 will display and flash...

Page 13: ...form the preset time and DISTANCE CALORIES will count up from zero When start the program press the STOP button to pause the program the program will come in POWER ON mode when the user presses the S...

Page 14: ...has been achieved the LCD display will stop the program along with a beep TIME WATT 1 2 3 4 5 6 7 8 9 10 11 12 13 14 15 RESISTANCE St1 50 55 60 65 70 100 110 120 130 140 140 140 140 130 120 RESISTANC...

Page 15: ...h the monitor strapped across the front of your body just above the chest line as shown in the drawing on the right The monitor needs a little body heat and moisture in order to work properly To ensur...

Page 16: ......

Reviews: