RECUMBENT CYCLE
OWNER`S
MANUAL
Model No.
16468201US
Xterra
Recumbent
Cycle
CAUTION:
You must read and understand this owner’s manual before operating unit. Keep this manual for future reference.
Page 1: ...RECUMBENT CYCLE OWNER S MANUAL Model No 16468201US Xterra Recumbent Cycle CAUTION You must read and understand this owner s manual before operating unit Keep this manual for future reference ...
Page 2: ...TENTS Manufacturer s Limited Warranty 2 Safety Precautions 3 Before you begin 4 Pre assembly Check List 5 Hardware Packing List 6 Assembly Instruction 7 11 Monitor Instruction 12 19 User Direction 20 Maintenance 21 22 Parts List Diagram 23 26 Trouble Shooting 27 Training Guideline 28 30 Stretching 31 32 ...
Page 3: ...tability of fitness for particular purpose are limited in duration to the first 12 months from date of purchase All other obligations or liabilities including liability for consequential damages are hereby excluded REPAIR PARTS AND SERVICE All of the parts for the cycle shown in figure can be ordered from Dyaco Canada Inc 6050 DON MURIE STREET NIAGARA FALLS ONTARIO L2G 0B3 When ordering parts the ...
Page 4: ...ensor is not a medical devise Various factors including the user s movement may affect the accuracy of the heart rate readings The pulse sensor is intended only as an exercise aid in determining heart rate trends in general 9 Keep children and pets away from this equipment at all times while exercising 10 Warm up 5 to 10 minutes before each workout and cool down 5 to 10 minutes afterward This allo...
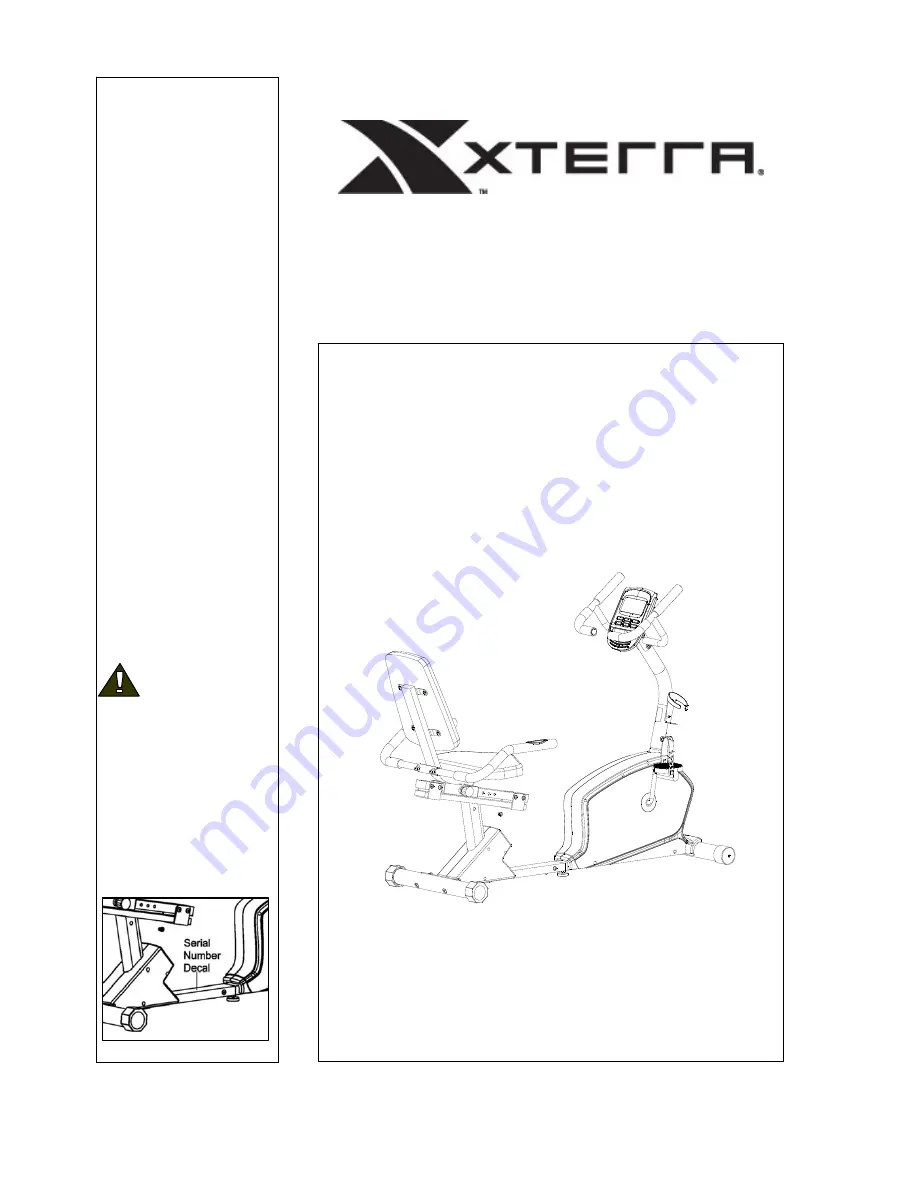
Page 5: ...able For your benefit read this manual carefully before you use the exercise bike If you have questions after reading this manual please see the front cover of this manual To help us assist you note the product model number and serial number before contacting us The model number and the location of the serial number decal are shown on the front cover of this manual Before reading further please fa...
Page 6: ...O DESCRIPTION Q TY 1 Main frame 1 3 Front stabilizer 1 6 Rear stabilizer 1 9 Front post 1 10 87 Computer Audio wire 1 1 11 Stationary handlebar R 1 12 Stationary handlebar L 1 13 Rear handlebar 1 36 37 Right Left pedal 1 40 Support tube 1 1 41 Sliding tube 1 43 Seat support bracket 1 44 Back cushion 1 45 Seat cushion 1 46 Bottle holder 1 47 Left rear support cover 1 48 Right rear support cover 1 H...
Page 7: ...ase check the hardware packing to make sure they are included Part No Description Qty Drawings 2 Allen screw M8 75 2 4 Spring washer Φ8 2 5 Curved washer Φ8 Φ20 1 5 12 21 Allen screw M8 16 30 23 Carriage bolt M10 75 2 24 Curved washer Φ10 Φ22 1 5 2 28 Carriage bolt M8 40 2 29 Domed nut M8 2 31 Domed nut M10 2 38 Flat washer Φ17 Φ8 5 6 39 Leveling pad 1 42 Quick release knob 1 88 Box wrench 1 89 Al...
Page 8: ...rt is not in the hardware kit check to see if it has been preassembled To avoid damaging parts do not use power tools for assembly STEP 1 Attach the front stabilizer 3 to the main frame 1 securing with two allen screws 2 two spring washers 4 and two curved washers 5 2 3 4 5 1 STEP 2 Connect middle extension hand pulse wire 33 with rear extension hand pulse wire 34 Attach support tube 40 to main fr...
Page 9: ...r 12 to the front post 9 Secure using two curved washers 5 and two allen screws 21 Repeat for the right stationary handlebar 11 Connect the front extension hand pulse wire 18 to the pulse wire form the computer 10 Connect the upper extension computer wire 19 to the wire from the computer 10 Tip Avoid pinching the Extension Wires and pulse wires Attach the computer 10 to the top bracket of front po...
Page 10: ...r allen screws 21 Attach the sliding tube 41 to the support tube 40 Secure using eight allen screws 21 42 41 21 43 45 1 40 21 21 21 21 41 STEP 5 Attach back cushion 44 to the seat support bracket 43 Secure using four allen screws 21 Attach rear handlebar 13 to the seat support bracket 43 Secure using two carriage bolts 28 two curved washers 5 and two domed nuts 29 Connect rear extension hand pulse...
Page 11: ...ht hand side of the cycle as you sit on it Repeat for the left pedal 37 Note The right pedal should be threaded on clockwise and the left pedal on counter clockwise Attach the left rear support cover 47 to the left side of the support tube 40 Secure using two self tapping screws 53 Attach the right rear support cover 48 to the right side of the support tube 40 Secure using two self tapping screws ...
Page 12: ...g your workout connect the MP3 with the computer 10 by using the audio wire 87 Plug adapter 71 into the power receptacle Adapter jack 71 87 10 NOW FIRMLY TIGHTEN ALL NUTS AND BOLTS YOUR UNIT IS NOW FULLY ASSEMBLED Your cycle is equipped with adjustable end caps If the unit is wobbly please turn the leveling caps See page 19 ...
Page 13: ... decrease the tension level Press DOWN to select your desired program ENTER Press to accept the desired program Press to accept the target value Press and hold for four seconds to reset all values to zero Body Fat Press to have your body fat measurement Pulse RECOVERY Press to have the recovery grade of F1 to F6 FUNCTION Time Shows your elapsed workout time up to 99 59 Counts down from your preset...
Page 14: ...he gripped pulse The computer will cease monitoring all functions except time which will commence countdown from 00 60 to 00 00 Once zero is reached the pulse function will display a grade between F1 to F6 F1 being the best and F6 being the worst reading you can receive Press the recovery button to return to the main display Note If no pulse signal input then the computer will show P on the PULSE ...
Page 15: ... key to confirm your desired Pulse 7 Press the START STOP key to begin exercise Preset Program Steps Hill Rolling Valley Fat Burn Ramp Mountain Intervals Random Plateau Fartlek Precipice Program PROGRAM 2 to PROGRAM 13 is the preset programs Users can exercise with different level of loading in different intervals as the profiles show Users may exercise in any desirous of resistance level Adjustin...
Page 16: ... desired TIME 8 The DISTANCE will flash and you can press UP or DOWN keys to setting your target DISTANCE Press ENTER key to confirm your desired DISTANCE 9 The CALORIES will flash and you can press UP or DOWN keys to setting your exercise CALORIES Press ENTER key to confirm your desired CALORIES 10 The PULSE will flash and then you can press UP or DOWN keys to set your exercise PULSE Press ENTER ...
Page 17: ...dy types divided according to the FAT calculated Type1 BODY FAT 27 Type2 27 BODY FAT 20 Type3 BODY FAT 20 The computer will show the test results of FAT PERCENT Operations 1 Use UP DOWN keys to select the BODY FAT P23 program 2 Press the ENTER key to enter your workout program 3 The HEIGHT will flash and you can press UP or DOWN keys to set your HEIGHT Press ENTER key to confirm your HEIGHT The de...
Page 18: ...RAM 1 PROGRAM 2 PROGRAM 3 PROGRAM 4 MANUAL STEPS HILL ROLLING PROGRAM 5 PROGRAM 6 PROGRAM 7 PROGRAM 8 VALLEY FAT BURN RAMP MOUNTAIN PROGRAM 9 PROGRAM 10 PROGRAM 11 PROGRAM 12 INTERVAL SRANDOM PLATEAU FARTLEK PROGRAM 13 PRECIPICE USER SETTING PROGRAM PROGRAM 14 USER 1 PROGRAM 15 USER 2 PROGRAM 16 USER 3 PROGRAM 17 USER 4 ...
Page 19: ...AM 20 75 H R C PROGRAM 21 85 H R C PROGRAM 22 TARGET H R C BODY FAT TEST PROGRAMS PROGRAM 23 BODY FAT STOP MODE BODY FAT START MODE One of the Following Six Profiles Will Display Automatically after Measuring Your BODY FAT Workout Time 40 minutes Workout Time 40 minutes Workout time 20 minutes Workout Time 40 minutes Workout Time 40 minutes Workout time 20 minutes ...
Page 20: ... straps first pull the ends of the straps off the tabs on the pedals Adjust the straps to the desired position and then press the ends of the straps onto the tabs HOW TO MOVE THE EXERCISE BIKE To move the exercise bike grasp the rear stabilizer and carefully lift it until the exercise bike can be moved on the front wheels Carefully move the exercise bike to the desired location and then lower it H...
Page 21: ... chain cover 56 Hold the chain cover 56 near the back and pull it apart slightly until the chain cover can be lifted off the ends of the crank 17 Do not pull the chain cover apart at the top or the seam may be broken 17 36 54 54 53 37 56L 53 53 53 55 56R Next locate the sensor wire 84 Turn the pulley until the magnet is aligned with the reed switch Loosen but do not remove the ST5 x 15 screw 53 Sl...
Page 22: ... slip while you are pedaling even when the resistance is adjusted to the highest level the drive belt may need to be adjusted To adjust the drive belt the right chain cover 56R must first be removed Next turn the nut 58 on clockwise to tighten the eye bolt 78 When the belt is correctly adjusted reattach the chain cover and the crank covers 78 58 ...
Page 23: ...pulley 1 18 6720118 Front extension hand pulse wire 1 19 6720119 Upper computer wire 1 20 6720120 Screw M5 10 4 21 6720121 Allen screw M8 16 30 22 6720122 End cap 60 20 2 23 6720123 Carriage bolt M10 75 2 24 6720124 Curved washer Ф10 Ф22 1 5 2 25 6720125 End cap 60 30 2 26 6720126 End cap 53 5 23 5 2 27 6720127 End cap for handlebarФ25 4 6 28 6720128 Carriage bolt M8 40 2 29 6720129 Domed nut M8 2...
Page 24: ...8 105 1 60 6720160 Flange nut 2 61 6720161 Nut M10 3 62 6720162 Bowl shaped spacer 1 63 6720163 Bearing 6000 3 64 6720164 Flywheel 1 65 6720165 Copper washer 1 66 6720166 Spring clutch 1 67 6720167 Small pulley 1 68 6720168 Bearing 6900 1 69 6720169 Flywheel axle 1 70 6720170 Bearing assembly 1 71 6720171 Adaptor 1 72 6720172 Belt 1 73 6720173 Allen screw M8 20 1 74 6720174 Powder spacer 1 75 6720...
Page 25: ...c 2014 24 DIAGRAM 87 1 2 3 4 11 21 7 14 15 5 6 7 8 8 12 13 14 15 16 17 21 21 21 21 21 21 21 5 22 22 23 24 25 25 26 26 27 27 27 27 27 28 29 30 30 31 36 37 38 38 38 39 40 41 42 43 44 45 21 5 21 5 5 9 21 5 21 5 20 10 33 32 34 18 16 19 35 46 48 47 27 50 49 50 51 52 51 52 53 53 53 53 54 ...
Page 26: ...co ca Dyaco Canada Inc 2014 25 5 4 5 4 5 4 5 4 5 3 5 3 5 3 5 3 5 3 5 3 5 3 5 5 5 5 5 3 5 4 5 6 L 5 6 R 5 7 5 8 5 9 3 3 3 2 5 8 6 0 6 0 6 1 6 2 6 3 6 4 6 5 6 3 6 3 6 6 6 7 6 8 6 9 6 1 7 0 7 0 1 7 7 2 7 3 7 4 7 5 3 8 7 6 7 7 7 8 7 9 8 0 8 1 8 2 8 3 8 4 8 5 8 6 7 1 ...
Page 27: ...efective Replace idler pulley Flywheel defective Replace Flywheel Squealing V belt slipping Adjust v belt E1 Monitor cannot read the signal change level change or level change cannot reach target position from the gear motor monitor has problem Replace monitor The connection cables from monitor to gear motor are damaged or disconnected Pins of the connector are bent or not fix well Check all compu...
Page 28: ... exert a force against resistance Strength contributes to power and speed and is of great importance to a majority of sports people Muscular Endurance is the capacity to exert a force repeatedly over a period of time e g it is the capacity of your legs to carry you 10 Km without stopping Flexibility is the range of motion about a joint Improving flexibility involves the stretching of muscles and t...
Page 29: ...radual decrease in the intensity of the exercise session Following exercise a large supply of blood remains in the working muscles If it is not returned promptly o the central circulation pooling of blood may occur in the muscles Heart Rate As you exercise so the rate at which your heart beat also increases This is often used as a measure of the required intensity of exercise You need to exercise ...
Page 30: ...d frequency and intensity The body responds better to variety and so do you In addition when you feel yourself getting stale bring in periods of lighter exercise to allow the body to recuperate and restore its reserves You will enjoy your program more and feel better for it Muscle Soreness For the first week or so this may be the only indication you have that you are on an exercise program This of...
Page 31: ...r right shoulder up toward your ear the stretch up the left side of your neck Next rotate for one count Then lift your left shoulder your head back for one count stretching your chin to up for one count as you lower your right the ceiling and letting your mouth open Rotate your shoulder head to the left for one count and finally drop your head to your chest for one count SIDE STRETCHES QUADRICEPS ...
Page 32: ... as you knees towards the floor Hold for 15 counts can and hold for 15 counts HAMSTRING STRETCHES CALF ACHILLES STRETCH Sit with your right leg extended Rest the sole of Lean against a wall with your left leg in front your left foot against your right inner thigh Stretch of the right and your arms forward Keep toward your toe as far as possible Hold for 15 counts your right leg straight and the le...