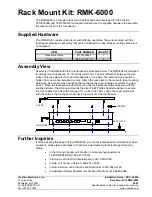
background image

Figure 10.1

A-10' Stand

B-10' Stand

B-10' Stand

3/8-16 NUT

3/8 LOCK WASHER

3/8 FLAT WASHER

A

Figure 10.2

Figure 10.3

A

MAKE SURE THAT BOTH

BRACES HAVE THE TABS

TO THE INSIDE OF THE STAND

B

STEP 2

: Attach the upper legs "B-10' Stand" to the stand platform "A-10' Stand". Attach the legs to the stand first 

by installing the bolts from the stand kit on the holes facing the front & back of the stand. Make sure you only 

tighten the bolts finger tight while installing. Next take the Mounting Brackets "A & B" out of the 6x7 Arm Kit and 

attach it to the outside of the legs as shown in Figure 10.2 & 10.3. Fasten these to the stand using the standard 

hardware out of the stand box. Make sure that both brackets are facing in towards the middle of the platform, 

see figure 10.3.  Repeat this step for the other side. 

STEP 1

: Remove all parts from the packaging and familiarize yourself with them. Find the bill of material located 

on the second page of this manual and verify that all parts are present.

-3-

Summary of Contents for RD-STD67BR

Page 1: ...l use of the product and contact Redneck Outdoor Products at 877 523 9986 for replacement of missing or defective parts NOTE Some parts of this product are manufactured to be universal in use so there may be some parts containing holes that will not be used in the assembly of this particular model To minimize confusion in the assembly process please read these instructions in their entirety before...

Page 2: ...ER 2 C SUPPORT TUBE 2 B MOUNTING BRACKET 2 A MOUNTING BRACKET 2 BILL OF MATERIALS HARDWARE 3 8 16 BOLT 1 25 LONG 6 3 8 16 NUT 4 3 8 FLAT WASHER 8 3 8 LOCK WASHER 8 3 8 16 BOLT 3 25 LONG 2 THERE WILL BE LEFT OVER HARDWARE 2 ...

Page 3: ...Make sure you only tighten the bolts finger tight while installing Next take the Mounting Brackets A B out of the 6x7 Arm Kit and attach it to the outside of the legs as shown in Figure 10 2 10 3 Fasten these to the stand using the standard hardware out of the stand box Make sure that both brackets are facing in towards the middle of the platform see figure 10 3 Repeat this step for the other side...

Page 4: ...h the tabs in each bracket as shown in figure11 2 Make sure to start the bolts with your fingers so you dont strip out the rivet nuts inside the tubes Once you have them finger tight fully tighten with a wrench STEP 4 Once all the arms are in place and secure you can finish building the rest of the stand Make sure that all bolts are tightened and secured correctly Once the blind is bolted to the p...

Reviews: