


system you are provisioning, and click Next to finish creation of the profile.
6. This completes kickstart profile creation. After completing Step 3 you should be taken to the
profile details. You may browse through the various tabs of the profile and modify the settings
as you see fit, but this is not necessary as the default settings should work well for the
majority of cases. While the interface allows you to allocate less, we strongly recommend
allocating at least 2 GB of storage for your guest system with this kickstart profile.
2.2. Provision Your Guest Systems
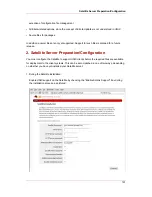
1. Log into the Satellite's web interface. Browse to your host system's profile by clicking on the
Systems tab in the top navigation bar, and click on the system's name.
2. To schedule a kickstart for a guest system, go to the Virtualization # Provisioning tab in the
host system's profile. For the Guest Name field choose guest1. For the Memory Allocation,
Virtual CPUs, and Storage fields, the default values should be fine. Feel free to change
these as desired, taking note of the advice provided for each field in the interface. For the
Kickstart Profile field, select the guest system profile we created in the last step.
3. Finally, click on the Schedule Kickstart and Finish button in the lower-right corner of the
screen. You will be taken to the Kickstart Status page where you can follow along with the
guest's kickstart progress. After ten to fifteen minutes the status screen should indicate the
kickstart successfully completed. To view your new guest, click on the Virtualization tab of
the host system's profile on the Satellite. To view a list of virtual host systems indicating
which guest systems are hosted on each, navigate to Systems # Systems # Virtual
Systems.
Note
If you do not see the Initiate a kickstart for a Xen guest message on the
Kickstart Status page shortly after scheduling the kickstart of the guest, you
may be missing
osad
on your host.
Host systems require the
osad
package in order to be responsive to commands
sent from the Satellite, such as start, pause, resume, and shutdown. If
osad
is
not installed and running, the host system will not receive these commands from
the web interface for 2.5 hours, or the next time that the RHN daemon runds.
You can check whether or not
osad
is installing and running by checking the
OSA Status field in the host system's profile on the Satellite. If the field does not
exist or indicates a failure of that the system has not contact Satellite in several
minutes, then you will need to install
yum
(using the command
yum install -y
osad
) before you can successfully provision a guest on the host.
Provision Your Guest Systems
183
Summary of Contents for NETWORK SATELLITE 5.1.0 - CHANNEL MANAGEMENT
Page 1: ...Red Hat Network Satellite Reference Guide 5 1 0 5 1 ISBN Publication date ...
Page 2: ...Red Hat Network Satellite ...
Page 4: ...Red Hat Network Satellite ...
Page 12: ...xii ...
Page 22: ...8 ...
Page 35: ...Figure 2 11 Available Package Updates Available Package Updates 21 ...
Page 52: ...38 ...
Page 74: ...Figure 5 15 Text Mode Welcome Screen Chapter 5 Red Hat Network Registration Client 60 ...
Page 176: ...162 ...
Page 202: ...188 ...
Page 220: ...206 ...
Page 300: ...Your Preferences 71 Index 286 ...


