background image

Chapter 3. Installing Red Hat Enterprise Linux WS

41

You should make the root password something you can remember, but not something that is easy for

someone else to guess. Your name, your phone number,

qwerty

,

password, root

,

123456

, and

anteater

are all examples of bad passwords. Good passwords mix numerals with upper and lower case letters

and do not contain dictionary words:

Aard387vark

or

420BMttNT

, for example. Remember that the

password is case-sensitive. If you write down your password, keep it in a secure place. However, it is

recommended that you do not write down this or any password you create.

Note

Do not use one of the example passwords offered in this manual. Using one of these passwords

could be considered a security risk.

Note

The root user (also known as the superuser) has complete access to the entire system; for this rea-

son, logging in as the root user is best done

only

to perform system maintenance or administration.

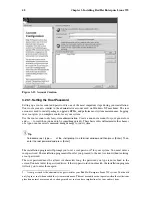
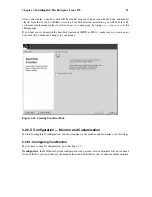
3.20.2. Setting Up User Accounts

If you choose to create a user account now, you will have an account to log in to once the installation

has completed. This allows you to safely and easily log into your computer without having to be root

to create your user account.
Enter an account name. Then enter and confirm a password for that user account. Enter the full name

of the account user and press

Add

. Your account information will be added to the account list, and the

user account fields will be cleared so that you can add another user.

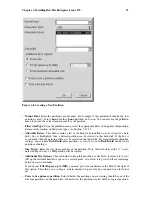
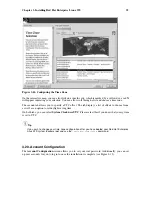
Figure 3-16. Creating a User Account

Choose

New

to add a new, non-root, user. Enter the user’s information and use the

Add

button to add

the user to the account list.
You can also

Edit

or

Delete

the user accounts you have created and no longer want.

Summary of Contents for ENTERPRISE LINUX WS 2.1 -

Page 1: ...Red Hat Enterprise Linux WS 2 1 Red Hat Enterprise Linux WS Installation Guide...

Page 2: ...rohibited unless prior permission is obtained from the copyright holder Red Hat Red Hat Network the Red Hat Shadow Man logo RPM Maximum RPM the RPM logo Linux Library PowerTools Linux Undercover RHmem...

Page 3: ...Red Hat Enterprise Linux WS 19 3 9 Install Options 19 3 10 Disk Partitioning Setup 20 3 11 Automatic Partitioning 21 3 12 Partitioning Your System 23 3 13 Partitioning with fdisk 29 3 14 Boot Loader I...

Page 4: ...66 B 5 Questions for Technical Support 68 C Troubleshooting Your Installation of Red Hat Enterprise Linux WS 69 C 1 You are Unable to Boot Red Hat Enterprise Linux WS 69 C 2 Trouble Beginning the Inst...

Page 5: ...Sometimes a command contains words that would be displayed in a different style on their own such as filenames In these cases they are considered to be part of the command so the entire phrase will be...

Page 6: ...ick on the Back button to return to the webpage you last viewed computer output When you see text in this style it indicates text displayed by the computer on the command line You will see responses t...

Page 7: ...this installation class unless you are sure you have no data you need to save 2 How to Use This Manual This manual focuses on a CD ROM based installation so it is ideal for users both new and old who...

Page 8: ...I 2003 01 31T11 13 0400 That way we will know exactly which version of the guide you have If you have a suggestion for improving the documentation try to be as specific as possible when de scribing it...

Page 9: ...ng Red Hat Enterprise Linux WS Table of Contents 1 Steps to Get You Started 1 2 System Requirements Table 9 3 Installing Red Hat Enterprise Linux WS 11 4 Installing Red Hat Enterprise Linux WS via Tex...

Page 10: ......

Page 11: ...most convenient form Because of these partnerships you might find that your Red Hat Enterprise Linux WS product may not have been actually produced by Red Hat If your product has a different ISBN numb...

Page 12: ...mputer must have enough unpartitioned1 disk space for the installation of Red Hat Enter prise Linux WS You must have one or more partitions that may be deleted thereby freeing up enough disk space to...

Page 13: ...n a local CD ROM installation Your BIOS may need to be changed to allow booting from your CD ROM drive For more information about editing your BIOS see Section 3 2 1 1 4 1 Alternative Boot Methods If...

Page 14: ...your CD ROM is drive d C d D cd dosutils D dosutils rawrite Enter disk image source file name images boot img Enter target diskette drive a Please insert a formatted diskette into drive A and press E...

Page 15: ...es give you the option of simplifying the installation process with some potential for loss of configuration flexibility or retaining flexibility with a slightly more complex installation process Next...

Page 16: ...unted as swap is created A 2738 MB ext partition A partition of at least 2094 MB mounted as home A 384 MB partition mounted as A 259 MB partition mounted as var This partitioning scheme offers a reaso...

Page 17: ...he amount of hard drive space and memory you have available these values may differ slightly The size of the swap partition is determined by the amount of RAM in your system and the amount of space av...

Page 18: ...8 Chapter 1 Steps to Get You Started...

Page 19: ...a 1 2 GB partitions map of partitions and mount points ex dev hda1 home dev hda2 fill this in once you know where they will reside memory amount of RAM installed on your system ex 64 MB 128 MB CD ROM...

Page 20: ...our numbers separated by dots ex 10 0 2 245 one or more name server IP addresses DNS one or more sets of dot separated numbers ex 10 0 2 1 domain name the name given to your organization ex for Red Ha...

Page 21: ...dialog boxes of the installation process Several different kinds of diagnostic messages are available to you in addition to providing a way to enter commands from a shell prompt The installation progr...

Page 22: ...diskette drive and reboot or boot using the CD ROM if your computer supports booting from it Your BIOS settings may need to be changed to allow you to boot from the diskette or CD ROM Tip To change yo...

Page 23: ...nstallation instructions please refer to Chapter 4 If you are having trouble booting into the graphical installation program you can try to boot using the no framebuffer nofb boot option At the boot c...

Page 24: ...ethod What type of installation method do you wish to use The following installation methods are available CD ROM If you have a CD ROM drive and the Red Hat Enterprise Linux WS CD ROM you can use this...

Page 25: ...will continue to the next stage of the installation process see Section 3 5 Note To abort the installation process at this time reboot your machine and then eject the boot diskette or CD ROM You can...

Page 26: ...r b first IDE controller slave c second IDE controller master d second IDE controller slave If you have a third and or fourth controller continue assigning letters in alphabetical order going from con...

Page 27: ...ed by default If you do not wish to use them select Disable dead keys Tip The following example will help you determine if you need dead keys enabled An example of a dead key is the backspace H key on...

Page 28: ...bVariant nodeadkeys EndSection By default the keyboard layout for various languages which use dead keys should have them enabled unless the nodeadkeys option is present 3 7 Mouse Configuration Choose...

Page 29: ...of Red Hat Enterprise Linux WS become root then use the usr sbin mouseconfig command from a shell prompt To configure your mouse to work as a left handed mouse reset the order of the mouse buttons To...

Page 30: ...0 Disk Partitioning Setup Partitioning allows you to divide your hard drive into isolated sections where each section behaves as its own hard drive Partitioning is particularly useful if you run more...

Page 31: ...ally choose either the Disk Druid or fdisk recommended for experts only parti tioning tool Figure 3 5 Disk Partitioning Setup If you chose to manually partition using Disk Druid refer to Section 3 12...

Page 32: ...titions created by other operating systems such as Windows 95 98 NT 2000 Caution If you select this option all data on the selected hard drive s will be removed by the installation program Do not sele...

Page 33: ...not meet your needs Click Next once you have made your selections to proceed 3 12 Partitioning Your System If you chose automatic partitioning and did not select Review please skip ahead to Section 3...

Page 34: ...sts of three numbers representing the number of cylinders heads and sectors as reported by the hard disk and the model of the hard drive as detected by the installation program 3 12 2 Disk Druid s But...

Page 35: ...Type This field shows the partition s type for example ext2 ext3 or vfat Mount Point A mount point is the location within the directory hierarchy at which a volume exists the volume is mounted at thi...

Page 36: ...such as on a separate hard drive A root partition 350 MB 3 2 GB this is where the root directory will be located In this setup all files except those stored in boot are on the root partition A 350 MB...

Page 37: ...on that hard disk By using different checkbox settings you can have Disk Druid place partitions as you see fit or let Disk Druid decide where partitions should go Size Megs Enter the size in megabyte...

Page 38: ...c links etc It provides the ability to assign long file names up to 255 characters Versions prior to Red Hat Enterprise Linux WS 2 1 used ext2 filesystems by default ext3 The ext3 filesystem is based...

Page 39: ...sk command screen If you do not know what command to use type m at the prompt for help When you are finished making partitions type w to save your changes and quit You will be taken back to the origin...

Page 40: ...chose to install a boot loader GRUB or LILO you must determine where it will be installed You may install your boot loader in one of two places The master boot record MBR The recommended place to inst...

Page 41: ...this limit If the installation program has not already detected this extension from your BIOS you should select the Force use of LBA32 not normally required option Every bootable partition is listed i...

Page 42: ...B or LILO to be installed in your Linux root partition 3 14 3 SMP Motherboards GRUB and LILO This section is specific to SMP motherboards only If the installation program detects an SMP moth erboard o...

Page 43: ...ou created and entering in your network information as prompted you now have the opportunity as shown in Figure 3 11 to do so If you have multiple devices you will see a tab for each device You may sw...

Page 44: ...ct your network administrator for assistance Tip Even if your computer is not part of a network you can enter a hostname for your system If you do not take this opportunity to enter a name your system...

Page 45: ...allowed DNS replies DHCP so any network interfaces that use DHCP can be properly configured If you choose High your firewall will not allow the following Active mode FTP passive mode FTP used by defau...

Page 46: ...local network but are connected to the Internet via a PPP dialup you can check eth0 and any traffic coming from your local network will be allowed Selecting eth0 as trusted means all traffic over the...

Page 47: ...ackage for this option to be useful Other ports You can allow access to ports which are not listed here by listing them in the Other ports field Use the following format port protocol For example if y...

Page 48: ...setting will revert to the default only the language you selected for use during the installation will be installed 3 19 Time Zone Configuration You can set your time zone by selecting your computer s...

Page 49: ...offsets to choose from as well as an option to set daylight saving time On both tabs you can select System Clock uses UTC Please select this if you know that your system is set to UTC Tip If you wish...

Page 50: ...r system Tip To become root type su at the shell prompt in a terminal window and then press Enter Then enter the root password and press Enter The installation program will prompt you to set a root pa...

Page 51: ...o known as the superuser has complete access to the entire system for this rea son logging in as the root user is best done only to perform system maintenance or administration 3 20 2 Setting Up User...

Page 52: ...both to determine for yourself which you prefer You can select components which group packages together according to function for example GNOME KDE or Software Development individual packages or a com...

Page 53: ...ws you to see all of the packages in an alphabetical listing on the right of the screen To sort alphabetically click on the Package tab To sort packages by size click on the Size MB tab To select an i...

Page 54: ...s another package which you have not selected to install the program presents a list of these unresolved dependencies and gives you the opportunity to resolve them see Figure 3 19 The Unresolved Depen...

Page 55: ...he available X servers Figure 3 20 Video Card Setup Next enter the amount of video memory installed on your video card If you are not sure please consult the documentation accompanying your video card...

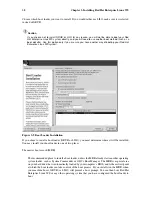
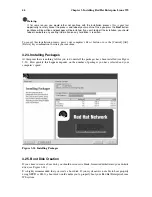
Page 56: ...button or use the Control Alt Delete key combination to restart your machine 3 24 Installing Packages At this point there is nothing left for you to do until all the packages have been installed see F...

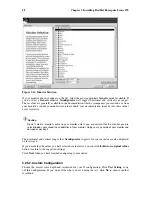
Page 57: ...the boot disk instead of GRUB or LILO make sure you create a new boot disk if you make any changes to your kernel Figure 3 22 Creating Your Boot Disk 3 26 X Configuration Monitor and Customization In...

Page 58: ...ur monitor unless you are certain that the monitor you are selecting does not exceed the capabilities of your monitor Doing so may overclock your monitor and damage or destroy it The horizontal and ve...

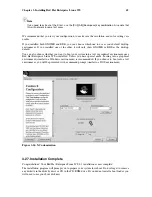
Page 59: ...u want to boot your system into a text or graphical environment once Red Hat Enterprise Linux WS is installed Unless you have special needs booting into a graphical environment similar to a Windows en...

Page 60: ...party boot loader a boot disk would enable you to properly boot your Red Hat Enterprise Linux WS system You should see one or more screens of messages scroll by Eventually you should see a login prom...

Page 61: ...This information will help prevent any surprises during the installation You can find most of this information in the documentation that came with your system or from the system s vendor or manufactur...

Page 62: ...ion program 4 1 3 Network related Information If you are connected to a network be sure you know the following IP address usually represented as a set of four numbers separated by dots such as 10 0 2...

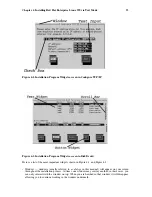
Page 63: ...list of the most important widgets shown in Figure 4 1 and Figure 4 2 Window windows usually referred to as dialogs in this manual will appear on your screen throughout the installation process At tim...

Page 64: ...get it may cause the widget to change color or you may only see the cursor itself positioned in or next to the widget In Figure 4 1 the cursor is positioned on the OK button Figure 4 2 shows the curso...

Page 65: ...contain any references to SCSI or network cards This is normal these devices are supported by modules that are loaded during the installation process Note that the command to start a serial installat...

Page 66: ...ection 3 7 Welcome Screen Section 3 8 Installation Type Section 3 9 Disk Partitioning Setup Section 3 10 Automatic Partitioning Section 3 11 fdisk Section 3 13 Hostname Configuration Section 3 16 Fire...

Page 67: ...n To verify the ISO images are intact prior to performing an installation use an md5sum program many md5sum programs are available for various operating systems An md5sum program should be available o...

Page 68: ...od dialog Figure 4 4 NFS Setup Dialog Enter the fully qualified domain name or IP address of your NFS server For example if you are in stalling from a host named eastcoast in the domain redhat com ent...

Page 69: ...the directory containing the RedHat installation files for your architecture For example if the FTP site contains the directory mirrors redhat i386 RedHat enter mirrors redhat i386 If everything has b...

Page 70: ...e of the directory there containing the RedHat installation files for your architecture For example if the HTTP site contains the directory mirrors redhat i386 RedHat enter mirrors redhat i386 If ever...

Page 71: ...ble of Contents A Removing Red Hat Enterprise Linux WS 63 B Getting Technical Support 65 C Troubleshooting Your Installation of Red Hat Enterprise Linux WS 69 D An Introduction to Disk Partitions 77 E...

Page 72: ......

Page 73: ...ist but they do not exist problem The best way to remove non DOS partitions is with a tool that understands partitions other than DOS You can do this with the installation media by typing linux expert...

Page 74: ...64 Appendix A Removing Red Hat Enterprise Linux WS...

Page 75: ...w of Red Hat Support Note Refer to the service level agreement at http www redhat com support sla for more information on how the Red Hat technical support staff can assist you Red Hat provides instal...

Page 76: ...vailable If you are new to Linux a book that covers Linux basics will be invaluable We can recommend several titles The Official Red Hat Linux Getting Started Guide Using Linux by Bill Ball Linux Clea...

Page 77: ...Using the login name and password you created during the customer profile please log in at the Red Hat Support website at http www redhat com support If you created a new customer profile once you ac...

Page 78: ...ing storm hit my area Any changes you made to your system for example I added a new hard drive and used Partition Wizzo to add Linux partitions Other information that may be relevant to your situation...

Page 79: ...erning signal 11 errors refer to http www bitwizard nl sig11 C 1 2 Are You Unable to Boot from a Network Boot Disk If you are experiencing difficulties in getting the network boot disk you made to boo...

Page 80: ...nstallation instructions please refer to Chapter 4 C 2 2 Problems with Booting into the Graphical Installation The Red Hat Enterprise Linux WS installation program uses frame buffers by default Howeve...

Page 81: ...C 3 3 Other Partitioning Problems If you are using Disk Druid to create partitions but cannot move to the next screen you probably have not created all the partitions necessary for Disk Druid s depen...

Page 82: ...uct go to http www redhat com apps activate C 4 Problems After Installation C 4 1 Trouble With the Graphical GRUB Screen If for some reason you need to disable the graphical boot screen you can do so...

Page 83: ...t remember your user account password you must become root To become root type su and enter your root password when prompted Then type passwd username This allows you to enter a new password for the s...

Page 84: ...e would look similar to the following NOTICE You have a boot partition This means that all kernel paths are relative to boot default 0 timeout 30 splashimage hd0 0 grub splash xpm gz title Red Hat Lin...

Page 85: ...can be found in the Official Red Hat Linux Reference Guide in chapter Boot Process Init and Shutdown If the sndconfig application does not help you may need to select the Enable sound server startup...

Page 86: ...76 Appendix C Troubleshooting Your Installation of Red Hat Enterprise Linux WS...

Page 87: ...is section also discusses the partition naming scheme used by Linux systems sharing disk space with other operating systems and related topics D 1 Hard Disk Basic Concepts Hard disks perform a very si...

Page 88: ...ystems make things like directories and files possible these tradeoffs are usually seen as a small price to pay It is also worth noting that there is no single universal filesystem As Figure D 3 shows...

Page 89: ...Figure D 4 shows 14 of the previously empty blocks are now holding data However by simply looking at this picture we cannot determine exactly how many files reside on this drive There may be as few as...

Page 90: ...ld support larger drives with a greater capacity but the overhead imposed by the filesystem to track files became excessive The solution to this problem was to divide disks into partitions Each partit...

Page 91: ...that the partition contains a bootable operating system or some combination of the three Table D 1 contains a listing of some popular and obscure partition types along with their numeric values Parti...

Page 92: ...partitions would not be enough As disk drives continued to grow it became more and more likely that a person could configure four reasonably sized partitions and still have disk space left over There...

Page 93: ...4 Making Room For Red Hat Enterprise Linux WS There are three possible scenarios you may face when attempting to repartition your hard disk Unpartitioned free space is available An unused partition i...

Page 94: ...k drive see Section D 1 4 3 Next we will discuss a slightly more common situation D 1 4 2 Using Space from an Unused Partition In this case maybe you have one or more partitions that you do not use an...

Page 95: ...ype installed on that partition it will need to be reinstalled as well Be aware that some computers sold with pre installed operating systems may not include the CD ROM media to reinstall the original...

Page 96: ...ee space at the end of the partition Figure D 11 Disk Drive Being Compressed This step is crucial Without it the location of your data could prevent the partition from being resized to the extent desi...

Page 97: ...s step implied it may or may not be necessary to create new partitions However unless your resizing software is Linux aware it is likely you will need to delete the partition that was created during t...

Page 98: ...operating system or while setting up partitions during a custom installation D 1 5 Partition Naming Scheme Linux refers to disk partitions using a combination of letters and numbers which may be conf...

Page 99: ...ating systems is available in several HOWTOs and Mini HOWTOs available on the Red Hat Enterprise Linux WS Documentation CD in the HOWTO and HOWTO mini directories In particular the Mini HOWTOs whose n...

Page 100: ...stored in boot reside on the root partition Because of this it is in your best interest to maximize the size of your root partition A 1 0 GB root partition will permit the equivalent of a Workstation...

Page 101: ...CSI IDs will work Partition Completely Below Cylinder 1023 No matter which of the above configurations apply the partition that holds boot must be located entirely below cylinder 1023 If the partition...

Page 102: ...92 Appendix D An Introduction to Disk Partitions...

Page 103: ...ion that might require drivers not included on the Red Hat Enterprise Linux WS CD ROMs or boot disk if you created an installation boot disk to begin the install process Note If an unsupported device...

Page 104: ...stallation program to load that driver disk and use it during the installation process Note A driver disk is different than a boot disk If you require a boot disk to begin the Red Hat Enterprise Linux...

Page 105: ...d problems with 16 bootable 14 54 IDE 15 unrecognized problems with 16 installation from 15 other 15 SCSI 15 class installation 20 clock 38 configuration clock 38 GRUB 30 hardware 51 LILO 30 network 3...

Page 106: ...ts 78 partition introduction 80 partition types 81 partitioning of 77 hard drive install 57 hardware compatibility 2 configuration 51 hostname configuration 33 how to use this manual iii HTTP installa...

Page 107: ...uration 30 installation 29 partitioning related issues 90 removing 63 SMP motherboards 32 Linux like OS creating installation diskette with 4 LOADLIN 32 M manuals 1 MBR installing boot loader on 30 mo...

Page 108: ...th CD ROM 3 Red Hat Enterprise Linux WS components 1 support technical See technical support swap 25 custom auto partition 7 swap partition See partition swap SYSLINUX 32 System Commander 32 system re...

Page 109: ...am 3 user accounts creation 41 setting up 41 user interface installation program 11 text mode installation 52 V video configuration 52 virtual consoles 11 W Workstation disk space 2 installation 5 ins...

Page 110: ......
Reviews: