background image

9

3

MAIN MENU - 

MENU PRINCIPALE

Nel 

menu principale

 vengono riportate le informazioni 

principali di funzionamento.

Attraverso  i tasti 

 e 

 è possibile scorrere all’ interno del 

menu. L’ultima informazione visualizzata resterà attiva fino a 

quando non verrà nuovamente premuto uno dei due tasti di 

scorrimento.

All’interno del 

menu principale

 è possibile impostare il set di 

temperatura e umidità in modalità manuale.

I campi modificabili manualmente sono distinguibili dalla 

comparsa della scritta 

“Edit”

 in prossimità del numero pagina 

del menu.

The 

main menu

 reports the main operating information.

The  

 and  

 keys allow to browse through the menu. The 

most recent information displayed will remain active until one of 

the two scroll keys is pressed again.  

In the 

main menu

 it is possible to set the temperature and humidity 

setpoint values in manual mode.

The fields that can be edited manually feature the word “

Edit

” near 

the menu page number.

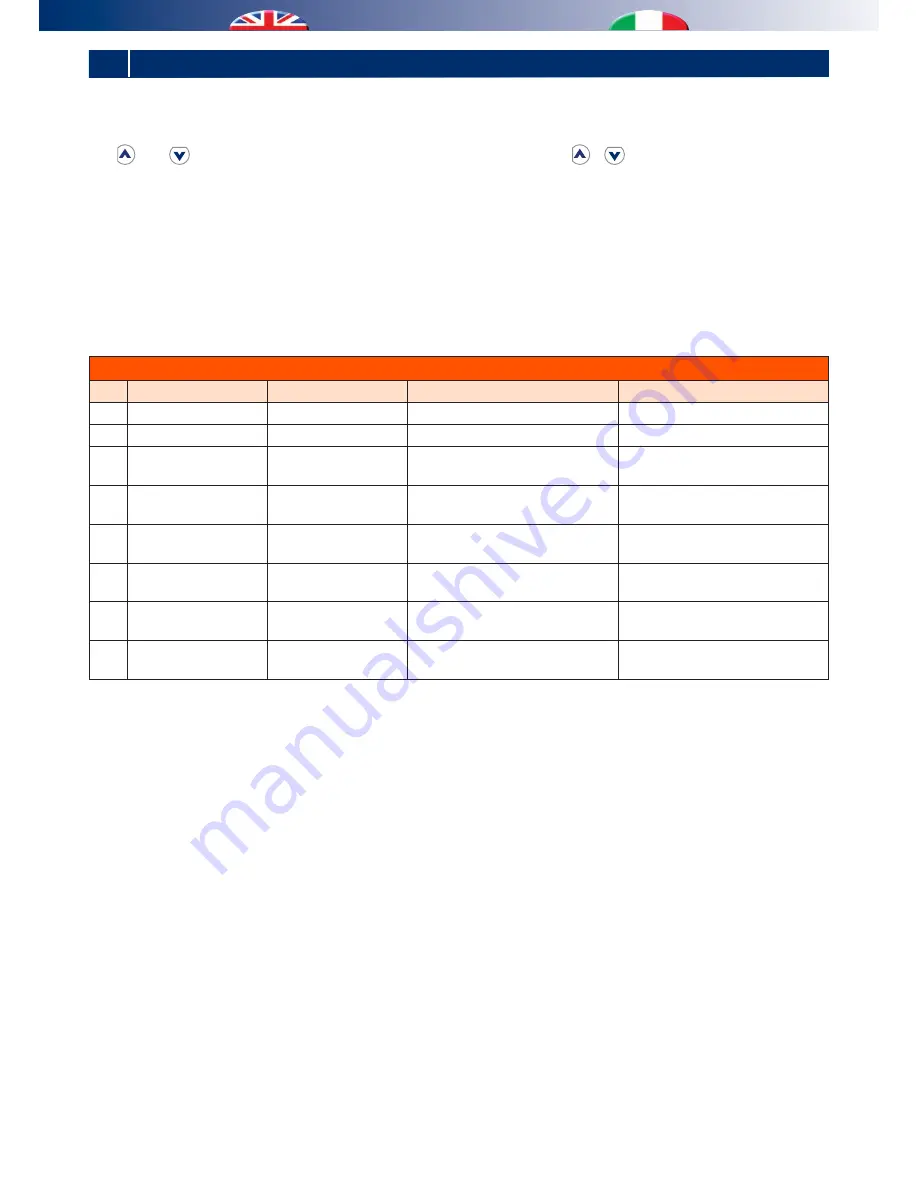
MAIN MENU - MENU PRINCIPALE

Pag.

Label

Etichetta

Description

Descrizione

1-8

RoomManual.Temp

Temp.Amb.Man

Manual temperature setpoint value 

Set point manuale di temperatura

2-8

RoomManual.Hum

Umid.Amb.Man

Manual humidity setpoint value 

Set point manuale di umidità

3-8

RoomTemperature

Temp.Amb

Room temperature detected by the 

probe

Temperatura ambiente rilevata 

dalla sonda

4-8

RoomHumidity

Umid.Amb

Room humidity detected by the 

probe 

Umidità ambiente rilevata dalla 

sonda

5-8

RoomCalc.Temp

Temp.Amb.Calc

Temperature setpoint used for the 

adjustment

Set point temperatura in uso per la 

regolazione

6-8

RoomCalc.Hum

Umid.Amb.Calc

Humidity setpoint used for the 

adjustment 

Set point umidità in uso per la 

regolazione

7-8

External.Temp

Temp.Esterna

Outdoor temperature detected by 

the probe (if connected)

Temperatura Esterna rilevata dalla 

sonda (se collegata)

8-8

Delivery.Temp

Temp.Mandata

Delivery temperature detected by the 

probe (if connected)

Temperatura di mandata rilevata 

dalla sonda (se collegata)

Summary of Contents for TRIO COMFORT

Page 1: ...Regulation Regolazione TRIO COMFORT EmbeddedChrono Thermo Humidistat Crono TermoUmidostato ad incasso INSTRUCTIONSFORUSE ISTRUZIONI PER L USO ...

Page 2: ......

Page 3: ...opriate separate waste collection for subsequent sending of the disused equipment for recycling treatment and compatible environmentaldisposalcontributestopreventingpossiblenegativeeffects on the environment and favours recycling of the materials of which the equipment is composed The abusive disposal of the product by the user leads to the application of the penalties envisaged by current regulat...

Page 4: ...la copia dei parametri al giorno successivo la navigazione fra i 3 livelli di set Pressione prolungata del tasto 5 sec Dal menu principale si ha l accesso al menu utente ESC Press the key briefly To exit editing Reset To go back to the upper menu From the main menu in a field that cannot be edited it allows to edit parameters in the operating menu Pressione breve del tasto Per uscire dalle operazi...

Page 5: ...DESCRIZIONE DISPLAY In fase di modifica le presenti icone risulteranno a luce lampeggiante La modalità Automatica è inibita During the editing stage these icons are flashing Automatic mode cannot be selected 1 3 OPERATING MENU ICONS ICONE MENU FUNZIONAMENTO Icon Icona Description Descrizione System ON Indicazione funzionamento impianto in modalità ON System OFF Indicazione funzionamento impianto i...

Page 6: ...remere il tasto fino al raggiungimento dell icona lampeggiante desiderata Usare i tasti e per cambiare il valore impostato e selezionare quello desiderato Con il tasto si conferma la scelta e si ritorna al menu principale On the main screenshot the user can switch the device on off entering the function menu by shortly pressing the key Press the key until you reach the desired flashing icon Use ke...

Page 7: ...a pressione breve del tasto Premere il tasto fino al raggiungimento dell icona lampeggiante desiderata Usare i tasti e per cambiare il valore impostato e selezionare quello desiderato Con il tasto si conferma la scelta e si ritorna al menu principale ESTATE INVERNO n b Per passare da impianto modalità Estate a impianto modalità Inverno eseguire la stessa procedura di cambio stagione This function ...

Page 8: ...UMIDITY TemperatureandHumiditycanbecontrolledintwodifferentways dependingontheactivationoftherelevantprogramming through the following parameters ON PRG T to activate temperature programming see chapter 5 1 ON PRG H to activate humidity programming see chapter 5 2 If parameters are set at 0 0 programming is off control will be carriedoutalldaylong 24h day accordingtothevaluesmanually set by the us...

Page 9: ...tedmanuallyfeaturetheword Edit near the menu page number MAIN MENU MENU PRINCIPALE Pag Label Etichetta Description Descrizione 1 8 RoomManual Temp Temp Amb Man Manual temperature setpoint value Set point manuale di temperatura 2 8 RoomManual Hum Umid Amb Man Manual humidity setpoint value Set point manuale di umidità 3 8 RoomTemperature Temp Amb Room temperature detected by the probe Temperatura a...

Page 10: ... pressione breve 1 short press Room Temp detected by the probe C Temp Ambiente rilevata dalla sonda C Room humidity detected by the probe C Umidità Ambiente rilevata dalla sonda C 08 04 13 12 08 Temp Amb Pg 3 8 26 4 08 04 13 12 08 Umid Amb Pg 4 8 36 0 Temperature setpoint currently used C Temp di set attualmente in uso C Humidity setpoint currently used Umidità di set attualmente in uso 08 04 13 1...

Page 11: ...ort press 1 pressione breve 1 short press Air Temp detected by the external probe C Temp Ambiente rilevata dalla sonda esterna C 08 04 13 12 08 Temp Esterna Pg 7 8 16 6 Back to main page Ritorno alla maschera principale 08 04 13 12 08 Temp Amb Man Pg 1 8 E 21 2 Temp Esterna External Temp Temp Mandata Delivery Temp Temp Amb Man RoomManual Temp ...

Page 12: ...Temp Amb Man RoomManual Temp Temp Amb Man RoomManual Temp Temp Amb Man RoomManual Temp Temp Amb Man RoomManual Temp MODIFICA DEL SET TEMPERATURA C Per accedere alla modifica del campo eseguire una pressione breve del tasto Usare i tasti e per cambiare il valore impostato e selezionare quello desiderato Con il tasto si conferma la selezione Enter e si ritorna alla schermata principale Se invece si ...

Page 13: ...n RoomManual Hum Umid Amb Man RoomManual Hum Umid Amb Man RoomManual Hum MODIFICA DEL SET UMIDITÀ Per accedere alla modifica del campo eseguire una pressione breve del tasto Usare i tasti e per cambiare il valore impostato e selezionare quello desiderato Con il tasto si conferma la selezione Enter e si ritorna alla schermata principale Se invece si desidera tornare alla schermata precedente senza ...

Page 14: ...a in ambiente Etichetta Umid Amb DISPLAY OF ROOM TEMPERATURE C Onthemainscreenshot shortlypressthekey twice todisplay the air temperature measured in the room Label RoomTemperature DISPLAY OF ROOM HUMIDITY On the main screenshot shortly press the key 3 times to display the air humidity measured in the room Label RoomHumidity 08 04 13 12 08 Temp Amb Man Pg 1 8 E 21 2 Pressione breve 2 volte Short p...

Page 15: ...atica ON PRG U 1 0 ilvaloredisetvisualizzatosaràcorrispondente al set point impostato nella programmazione Prg Umid N b IfthedeviceissetinManualmode ON PRG T 0 0 thedisplayed value refers to the manual temperature setpoint RoomManual Temp IfthedeviceissetinManual Automaticmode ON PRG T 1 0 the displayed value refers to the value set in the programming Tmp Prog N b IfthedeviceissetinManualmode ON P...

Page 16: ...ione INVERNO 30 C nella stagione ESTATE DISPLAY OF THE VALUE C On the main screenshot shortly press the key 7 times to display the outdoor temperature detected by the sensor Label Delivery Temp If the system is NOT provided with delivery probe the display will show 99 0 DISPLAY OF THE VALUE C On the main screenshot shortly press the key 6 times to display the outdoor temperature detected by the se...

Page 17: ...RG H ON PRG U It allows to only activate the humidity programming Pe r m e t t e d i a t t i v a r e l a s o l a programmazione dell umidità ON I ON I It activates the integration function Attiva la funzione dell integrazione Delta Integrat Delta Integr It allows to change the integration activation threshold Permette di variare la soglia di intervento dell integrazione Triocomf Vs Triocomf Vs Sof...

Page 18: ...are il valore corrente e accedere alla fase di modifica Incrementareodiminuireilvaloredicontrastotramitepressioni brevi dei tasti o e confermare successivamente con una pressione breve del tasto Con il tasto si ritorna alla schermata precedente CHANGE OF DISPLAY CONTRAST You can increase and decrease the contrast on the display On the main screenshot long press the key 5 sec to enter the user s me...

Page 19: ...hrono3 Chrono4 Date Prog Umid Configurazione X Reset V Enter Crono3 Crono4 Data 4 2 DATE DATA IMPOSTAZIONE DELLA DATA Dalla schermata principale premere a lungo il tasto 5 sec per entrare nel menu utente Raggiungere il campo Data mediante pressioni brevi 5 volte del tasto e confermare con il tasto Incrementare o diminuire i valori tramite pressioni brevi dei tasti o Per confermare e spostarsi al p...

Page 20: ...ibile aumentare e diminuire il contrasto del display Dalla schermata principale premere a lungo il tasto 5 sec per entrare nel menu utente Raggiungere il campo Ora mediante pressioni brevi 6 volte del tasto e confermare con il tasto Incrementare o diminuire i valori tramite pressioni brevi dei tasti o Per confermare e spostarsi al parametro successivo usare il tasto Con il tasto si ritorna alla sc...

Page 21: ...TTIVA 1 0 indica integrazione ATTIVA Dalla schermata principale premere a lungo il tasto 5 sec per entrare nel menu utente Raggiungere il campo ON I mediante pressioni brevi 9 volte del tasto e confermare con il tasto per visualizzare il valore corrente e accedere alla fase di modifica Attivare o disattivare la programmazione mediantel usodeitasti o econfermaresuccessivamente conunapressionebreved...

Page 22: ...Tmp Prog Hum Prog Chrono3 Use and to to browse through the menu Selection Tmp Prog to set the temperature Hum Prog to set the humidity Press to confirm your choice and access the programming page In particular it is possible to Set the various level for each time slot in all the days of the week Copythesettingsofthedayshownandpasteitintothefollowing day Change the parameter of the editable level a...

Page 23: ...able levels are displayed with the option of editing them if allowed Vengono visualizzati i valori dei 3 livelli disponibili con la possibilità di modificarne il valore se consentito 4 The parameters of the time slot being edited are displayed E g 15 16 means that the parameters for the time slot from 3pm to 4pm is displayed Vengono visualizzati i parametri della fascia oraria in fase di modifica ...

Page 24: ...1 0 indica programmazione ATTIVA Dalla schermata principale premere a lungo il tasto 5 sec per entrare nel menu utente Raggiungere il campo ON PRG T mediante pressioni brevi 8 volte del tasto e confermare con il tasto per visualizzare il valore corrente e accedere alla fase di modifica Attivare o disattivare la programmazionemediantel usodeitasti o econfermare successivamente con una pressione bre...

Page 25: ...e NON ATTIVA 1 0 indica programmazione ATTIVA Dalla schermata principale premere a lungo il tasto 5 sec per entrare nel menu utente Raggiungere il campo ON PRG U mediante pressioni brevi 9 volte del tasto e confermare con il tasto per visualizzare il valore corrente e accedere alla fase di modifica Attivare o disattivare la programmazionemediantel usodeitasti o econfermare successivamente con una ...

Page 26: ...a Impostaz Copia Liv 18 19 On Lun Edita Edit Chrono Copy Levels 18 19 On Mon Edit Cambia Orario Copia Liv On Lun Edita 18 19 Scheduler Copy Levels On Mon Edit 18 19 Ad ogni pressione breve si passa al giorno successivo Each short press means to shift the date onward Ad ogni pressione breve si passa all ora successiva Each short press means to shift the hour onward Ad ogni pressione breve si passa ...

Page 27: ...azioni visualizzate sul giorno successivo Each short press copies the settings from the previous day Cambia Livelli Copia 18 19 On Lun Edita Liv Change Levels Copy 18 19 On Mon Edit Levels Inver Livello 1 Copia Liv Edita 12 0 Winter Level 1 Copy Levels Edit 12 0 Estate Livello 2 Copia Liv Edita 27 0 Summer Level 2 Copy Levels Edit 27 0 29 5 30 0 12 0 12 5 29 5 30 0 12 0 12 5 29 5 30 0 12 0 12 5 Es...

Page 28: ...ambia Impostaz Copia Liv 18 19 On Lun Edita Edit Chrono Copy Levels 18 19 On Mon Edit Cambia Orario Copia Liv On Lun Edita 18 19 Scheduler Copy Levels On Mon Edit 18 19 Ad ogni pressione breve si passa al giorno successivo Each short press means to shift the date onward Ad ogni pressione breve si passa all ora successiva Each short press means to shift the hour onward Ad ogni pressione breve si pa...

Page 29: ...azioni visualizzate sul giorno successivo Each short press copies the settings from the previous day Cambia Livelli Copia 18 19 On Lun Edita Liv Change Levels Copy 18 19 On Mon Edit Levels Inver Livello 1 Copia Liv Edita 40 0 Winter Level 1 Copy Levels Edit 40 0 Estate Livello 2 Copia Liv Edita 60 0 Summer Level 2 Copy Levels Edit 60 0 79 5 80 0 40 0 40 5 79 5 80 0 40 0 40 5 79 5 80 0 40 0 40 5 Es...

Page 30: ... dell icona lampeggiante desiderata Confrontare il numero di allarme visualizzato con le tabelle riepilogative di seguito riportate Con il tasto si ritorna al menu principale From the main screenshot enter the operating menu by shortly pressing the key Press the key until you reach the desired flashing icon Compare the alarm number shown with the one reported in the chart below By using the key yo...

Page 31: ......

Page 32: ...9100308 01 07 2014 ...

Reviews: