background image

3

Copyright © 2020 RCA Communications Systems   

www.RCACommunicationsSystems.com

Communications Systems

RDR26x0 Series Professional

Digital Two-Way Radios

INSTRUCTION MANUAL

Preparing Your Radio for Initial Use Setting Up Your Charger

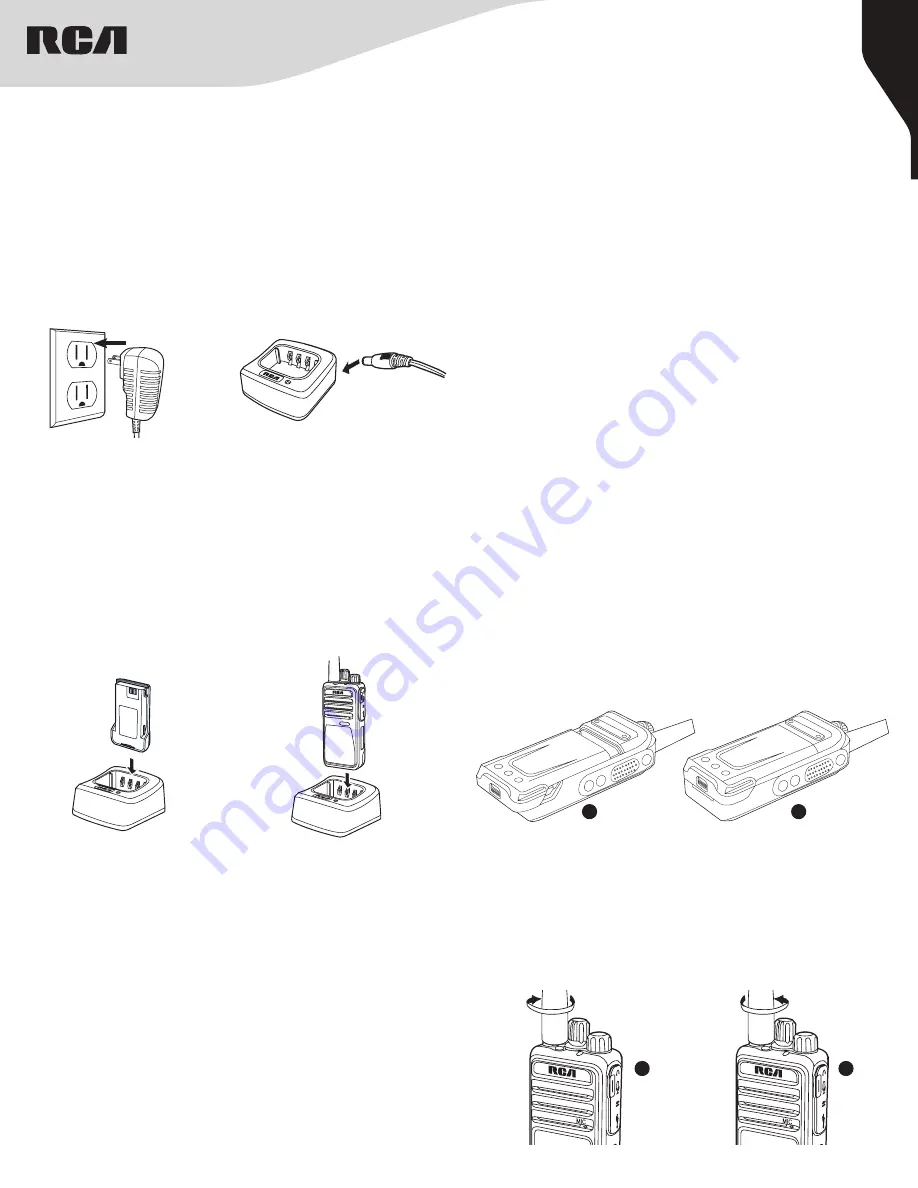
1.  Plug the adapter’s AC connector into the AC outlet socket. (see 

image A) 

2. Plug the adapter’s DC connector into the DC socket on the back of 

the charger. (see image B) 

3. Place the radio with the battery attached, or the battery alone, in the 

charger. (see image C) 

4. Make sure the battery contact is touching the charging terminals. 

The charging process begins when the red LED light illuminates. 

5. The green LED light will illuminate approximately two hours later, 

indicating the battery is fully charged.

Battery Storage

1.  Fully charge the battery before storing it for an extended period of 

time to avoid battery damage due to over-discharge. 

2. Recharge a battery after three months storage to avoid reduced 

battery capacity due to over-discharge. 

3. When storing a battery, keep it in a dry place at room temperature.

Attaching the Battery

1.  Place the battery on the back of the radio. (See Figure 1) 
2. Press the battery down (See Figure 2) until the battery clicks into 

place. 

Note:

 If the battery is not securely locked, remove it and 

reattach it.

Attaching / Removing the Antenna

1.  With the radio turned off, set the antenna in its receptacle and turn 

clockwise until it is screwed down. (See Figure 3) 

2. To remove the antenna, turn the radio off and turn the antenna 

counterclockwise. (See Figure 4)

Note:

 Same for all RDR26x0 Series Radios.

Battery Information
Charging the Battery

Your radio is powered by a Lithium-Ion (Lilon) battery. To avoid damage 

and comply with warranty terms, charge the battery using only an 

original RCA charger, exactly as described in the charger user guide. 

When the charger’s LED illuminates red, it is an indication that the 

battery is being correctly charged. When the LED illuminates green, 

the battery charge is complete. 

Note:

 Charge a new battery 12 to 14 hours before initial use for best 

performance. Maximum battery capacity is normally achieved after 

two or three full charge / discharge cycles.

Caution:

 To reduce the risk of injury, use only batteries specified by 

RCA Communications Systems. 


– To avoid risk of personal injury, do not dispose of batteries in a fire. - 

Dispose of batteries according to local recycling regulations. Do not 

dispose as household waste. 


– Never attempt to disassemble the battery. 


– When charging a battery, keep it at a temperature between 41°F ~ 

104°F (5°C ~ 40°C) to ensure a full charge. Temperatures outside 

this range significantly reduce battery life. The operating time (talk-

time and standby time) is noticeably shorter than normal, replace 

the battery. 


– Before charging a battery attached to a radio, turn the radio off to 

ensure a full charge. Never leave a radio on while in the charger, as 

it can damage both the battery and the radio; the charger is not a 

radio stand. 

Image A

Image B

Image C


– Do not cut off the power supply or remove battery while charging.


– Never charge a battery that is wet. Dry it with soft cloth prior 

charging. 


– The battery will eventually weaken. When the operating time (talk-

time and standby time) becomes noticeably shorter than normal, 

replace the battery. 


– Battery performance greatly decreases at temperatures below -4°F 

(-20°C). Having a spare battery is always necessary in extremely 

cold environments. A cold battery may work again when it returns to 

room temperature, so keep it for later use. 


– Dust on the battery contact may cause the battery not to work or 

charge properly. Use a clean dry cloth to wipe it before attaching 

the battery to the radio. 


– Batteries with damaged contacts can be extremely dangerous. Any 

battery with damage to one or more contacts should be replaced 

immediately and not used under any circumstances.

3

4

2

1

RDR2620

Summary of Contents for RDR260 Series

Page 1: ...up Individual Call with One Touch Access Button 7 Emergency Operation 7 Initiating Responding to Emergency Alarm 7 Exiting Emergency Mode 7 Advanced Features 7 Radio Check RDR2650 RDR2680 7 Sending a Radio Check 7 Remote Monitor 8 Initiating Remote Monitor 8 Contacts Setting RDR2650 RDR2680 8 Making a Group Call from Contacts 8 Making an Individual Call from Contacts 8 Call Log Feature Accessing t...

Page 2: ... Battery 1800 mAh CH2601 Desktop Rapid Charger PS2601 Power Supply BC2600 Belt Clip Antenna ANH3500U W UHF models ANH3500V W VHF models RDR2620 Handheld Radio RDR2680 Handheld Radio RDR2650 Handheld Radio RCA RDR26x0 Series Overview 1 Antenna 7 Microphone 13 Side Button 2 Programmable 2 Top Button Programmable 8 Display RDR2650 RDR2680 14 Side Button 3 Programmable 3 Channel Knob 9 Limited Keypad ...

Page 3: ...ger s LED illuminates red it is an indication that the battery is being correctly charged When the LED illuminates green the battery charge is complete Note Charge a new battery 12 to 14 hours before initial use for best performance Maximum battery capacity is normally achieved after two or three full charge discharge cycles Caution To reduce the risk of injury use only batteries specified by RCA ...

Page 4: ...ncryption on or off VOX On Off Toggles Voice Activated Function on or off Lone Worker On Off Toggles Lone Worker feature On or Off on per channel basis Zone Toggle Only RDR2680 Toggles between Channel Zone 1 and Channel Zone 2 Battery Indicator Only RDR2650 RDR2680 Indicates battery charge level low medium or high Push To Talk PTT Button The PTT button on the side of the radio has two main functio...

Page 5: ...RDR2650 RDR2680 Call Icons RDR2650 RDR2680 Sent Item Icons RDR2650 RDR2680 LED Indicator Entire RDR26x0 Series Audio Tones Entire RDR26x0 Series Display Icons The LCD display shows radio status text entries and menu entries The following are icons that appear on the radio s display Received Signal Strength Indicator RSSI The number of bars displayed represents the radio signal strength and is only...

Page 6: ...idual Call A Private Call is a call from an individual radio to another individual radio There are two types of Individual Calls The first type is when a radio presence check is performed prior to setting up the call while the other sets up the call immediately When you receive a Private Call 1 The LED blinks green 2 The first line of the display shows the subscriber alias or ID and the RSSI icon ...

Page 7: ...t setting Disabled Radio cannot transmit alarm signal but can receive alarm from other radios Each alarm has the following types Regular Radio transmits an alarm signal and shows audio and or visual indicators Silent Radio transmits an alarm signal without any audio or visual indicators There will be no response call from the target radio until you press the PTT button to initiate the call Silent ...

Page 8: ...on 5 Release the PTT button to listen when any user in the group responds the LED blinks green You see Group Call icon the group ID and that user s ID on your display 6 If there is no voice activity for a programmed period of time the call ends Note If Talk Permit function is enabled wait for the Talk Permit Tone to finish and then speak clearly into the microphone Making an Individual Call from C...

Page 9: ...end and press or to the required alias or ID and press to send the message or press or to Manual Dial press button input subscriber ID and press button 8 The display shows Text Message Subscriber Group Alias or ID confirming your message is being sent 9 If the message is sent successfully a tone sounds and the display shows Message Sent OR if the message cannot be sent a high tone sounds and the d...

Page 10: ...0 1 Press to access the menu 2 Press or to navigate to Messages and press to select 3 Press or to navigate to Sent Items and press to select 4 Press or to navigate to the desired message and press button You can select one of the following options while viewing a sent text message Resend Forward Edit Delete To perform any of the function press again while viewing the message To perform any of the ...

Page 11: ...ED lights up solid green while the radio is transmitting and blinks green rapidly when the radio is receiving an ongoing privacy enabled transmission You can preprogram 16 groups privacy encryption keys by software press programmed Privacy button to Turn On or Turn Off Privacy You can also turn on and off the Privacy through the Menu of the radio RDR2650 RDR2680 1 Press to access the menu 2 Press ...

Page 12: ... lights up red 2 Release PTT button to listen Note If you do not respond within the hang time period the radio continues scanning other channels groups Scan Instructions and Methods When a scan is initiated your radio cycles through the programmed scan list for the current channel looking for voice activity The LED blinks red and you see the Scan icon on the display RDR2650 RDR2680 There are two w...

Page 13: ...press to select 4 Press or to navigate to VOX and press to select 5 If the display shows VOX On Press to enable VOX display shows VOX On If the display shows VOX Off Press to disable VOX and display shows VOX Off Controlling the Display Backlight RDR2650 RDR2680 You can enable or disable the radio s display backlight as needed The setting also affects the Menu navigation buttons and keypad backlig...

Page 14: ...hows Turn On press to enable the Introduction Screen and the display shows Intro Screen On If the display shows Turn Off press to disable the Introduction Screen and the display shows Intro Screen Off Turning the LED Indicator On or Off RDR2650 RDR2680 You can enable and disable the LED Indicator if needed 1 Press to access the menu 2 Press or to navigate to Utilities and press to select 3 Press o...

Reviews: