Chapter 3: Playing Files
25
Highlight
Play
and press SELECT to play the current audio file selected.
Highlight
Exit
and press SELECT to return to the last viewed Audio menu.
Audio Playback Screen
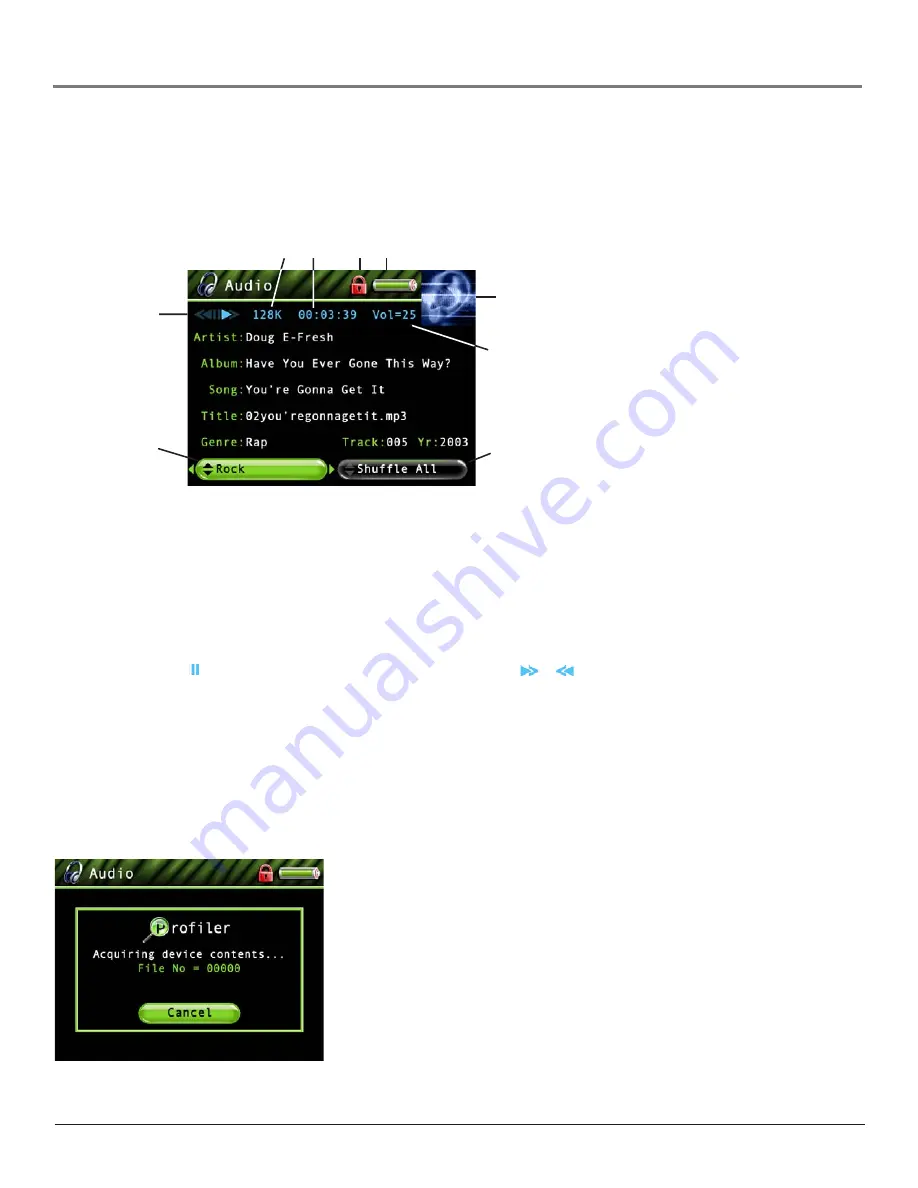
The following screen is an example of what an audio playback screen might look like.
Artist, Album, Song, Title, Genre, Track and Yr (Year)-
Displays the ID3 tag information contained in the file, if
available. If no ID3 tag information is available, the field will display
Unknown
.
1
Encoded Bit-rate
– Indicates the bit-rate the audio file was encoded in when created.
2
Elapsed time–
When you’re playing music, the amount of time that the track has played appears.
3
Lock icon-
Displayed when CONTROLS HOLD on the bottom of the unit is switched on (button lock on).
4
Battery Indicator
- Indicates how much power remains on the battery. Go to page 17 for more information on battery
indicator levels.
5
Playback Mode
- During playback, the play icon arrow is highlighted (as in graphic above). When you pause
playback, the pause ( ) icon is highlighted. During forward or reverse playback, the
or
icons are highlighted.
6
Audio Equalizer Preset setting (
Rock
)
– For more information about Audio Equalizer Preset settings, go to page 14.
(Feature currently not available. Visit http://www.rca.com/lyra-avdownloads for the latest software and updates).
7
Preview Window
– During Audio Playback mode, the preview window displays the ID3 cover art (if available)
associated with the current audio file being played. If no cover art is available, the Audio mode preview window
graphic will be displayed.
8
Volume level indicator
–
There are 33 steps in the volume control. Press the volume up/down buttons to increase or
decrease the volume. The volume level bar is displayed on screen when increasing or decreasing the volume.
9
Mode (
Shuffle All
) –
Displays current playback mode (Normal, Repeat, Shuffle, etc.). For more information about
playback mode settings, go to page 14. Highlight the tab and press the up or down arrow to change the mode setting.
1
2
3
4
5
6
7
8
9
Using the Embedded Audio Profiler
The embedded audio profiler allows you to profile (sort) audio contents stored on the hard drive
without having to connect to a computer. To profile audio content using the embedded audio
profiler:
1.
From the Audio menu, press the down arrow button to highlight
Profile Contents
and press
SELECT.
2.
The
Do you want to re-profile the audio contents
message is displayed. Select
Yes
to begin
profiling. Select
No
to cancel.
3.
During the profiling process, status messages are displayed on-screen. If any errors occur
during the process, an error message is displayed.
4.
Once the profiling is complete, the Audio menu is displayed. The audio contents displayed
in the available sorting categories reflect the actual audio files stored on the Lyra’s hard drive.


