Chapter 2: Installation
2-21
In
st
alla
ti
o
n
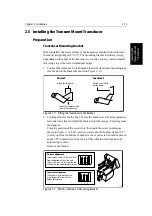
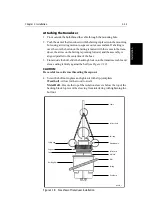
Figure 2-15: Cutting the Fairing
CAUTION:
The arrow on the fairing always points forward towards the bow. Be sure
to orient the fairing on the band saw so the angle cut matches the intended
side of the hull.
3. Place the fairing on the table so the cutting guide rests against the fence.
The arrow/blunt end will point toward you for installation on the port side
and away from you for installation on the starboard side of the boat. The
fairing must be between ¼ – ½ " (6–12 mm) at the thinnest spot (see
Figure 2-12).
WARNING:
Always wear safety goggles and a dust mask when drilling.
4. Recheck steps 1 through 3, then cut the fairing.
5. Shape the fairing to the hull as precisely as possible with a rasp or power
tool.
Seating
CAUTION:
Never pull, carry, or hold the transducer by the cable because doing so
can sever internal connections.
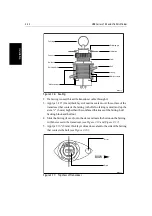
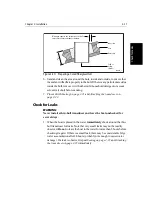
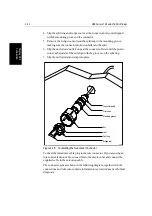
1. Remove one safety ring, retaining pin, cap nut, and hull nut from the trans-
ducer. Grasp the paddle wheel insert by the pull ring and pull slowly
upwards (see Figure 2-16).
Cutting guide
Fence
Band saw table
Bow end for
installation
on port side
Deadrise
angle
4860_1
Summary of Contents for HSB L760
Page 2: ......
Page 30: ...1 18 HSB Series L755 and L760 Fishfinder Database Lists...
Page 76: ...2 46 HSB Series L755 and L760 Fishfinder Transmitted Data...
Page 114: ...3 38 HSB Series L755 and L760 Fishfinder Review Your Passage Plan...
Page 128: ...4 14 HSB Series L755 and L760 Fishfinder MOB...
Page 196: ...8 8 HSB Series L755 and L760 Fishfinder Worldwide Support...
Page 200: ...A 4 HSB Series L755 and L760 Fishfinder Appendix A Specifications...
Page 206: ...B 6 HSB Series L755 and L760 Fishfinder Appendix B Using the Auxiliary Junction Box...
Page 212: ...C 6 HSB Series LCD Color Display Appendix C C MAP Chart Card Features...


