background image

Chapter 2: Advanced Operation

13

Chapter 2: Advanced Operation

2.1 How do I follow a route set on a Chartplotter?

CAUTION:  Safety in Track mode
Track mode provides accurate track keeping even in complex 
navigational situations. However, it is still the skipper’s 
responsibility to ensure the safety of their boat at all times 
through careful navigation and frequent position checks. Track 
mode assists precise navigation and removes the tasks of 
compensating for wind and tidal drift. However, you MUST still 
maintain an accurate log with regular plots.

In Track mode, the SmartPilot maintains a route between waypoints created on a 
navigation system. It makes any course changes necessary to keep your boat on 
course, automatically compensating for tidal streams and leeway.

Track mode is available only if you have connected the SmartPilot to a suitable 
navigation system providing SeaTalk or NMEA information. 

(See SmartPilot 

Commissioning Guide for connection details)

Your SmartPilot system can receive route information from:
• a SeaTalk navigation instrument or chartplotter.
• a navigation system transmitting data in NMEA 0183 format.

How do I activate Track mode?

CAUTION:  Make suitable preparations for entering track mode
When you enter Track mode, the SmartPilot will bring the boat 
onto the track in a controlled way. The closer the boat is to the cor-
rect heading and track, the quicker it will settle the boat onto the 
new course. To avoid an unexpected turn, align the boat approxi-
mately with the required track before entering Track mode.

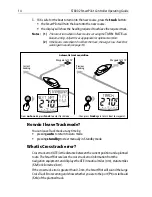
Starting with the SmartPilot in AUTO mode and your chartplotter following a 
route.
1. Press 

track

 to enter Track mode.

2. Wait for the warning to sound.

The display will show the bearing to the next planned waypoint and the direc-
tion in which the boat will turn to reach this waypoint. 

Summary of Contents for SmartPilot ST8002

Page 1: ...ST8002 SmartPilot Controller Operating Guide Document reference 81271 1 Date December 2005...

Page 2: ...Raymarine Ltd Raymarine AST Advanced Steering Technology AutoAdapt AutoLearn AutoRelease AutoSeastate AutoTack AutoTrim FastTrim GyroPlus RayGyro RayPilot and WindTrim are trademarks of Raymarine Ltd...

Page 3: ...Guide This handbook Contains a detailed description of the SmartPilot s features and functions Warranty To register your new Raymarine product please take a few minutes to fill out the warranty card...

Page 4: ...ack using a navigation aid always maintain a log and make regular positional plots Navigation sig nalscanproducesignificanterrorsundersomecircumstancesandtheautopi lot will not be able to detect these...

Page 5: ...en it went to press However Raymarine cannot accept liability for any inaccuracies or omissions it may contain In addition our policy of continuous product improvement may change specifications withou...

Page 6: ...iv ST8002 SmartPilot Controller Operating Guide...

Page 7: ...e display tell me 4 1 3 Using the SmartPilot to steer your boat 5 CAUTION Maintain a permanent watch 5 How do I automatically steer to a heading 5 How do I return to hand steering 5 How do I change co...

Page 8: ...ppens when I get to the end of the route 17 2 2 Using Wind Vane mode sail boats 18 What is Wind Vane mode 18 Wind information 18 True and apparent wind 18 WindTrim 18 How do I select Wind Vane mode 18...

Page 9: ...checks 28 CAUTION Do not dismantle SmartPilot products 28 Cleaning the display 28 CAUTION Avoid damage when cleaning 28 EMC advice 29 Product support 29 World wide web 29 Telephone help line 29 Help u...

Page 10: ...viii ST8002 SmartPilot Controller Operating Guide...

Page 11: ...ntain a locked heading Track The SmartPilot steers the boat to maintain a track between two way points created on a navigation aid WindVane TheSmartPilotsteerstheboattomaintainacourserelativetoa true...

Page 12: ...t Commissioning Guide 1 2 Using the control unit Switching on and off All the time that power is applied to the SmartPilot controller you can use the disp button to switch the instrument off and on as...

Page 13: ...the main single button functions there are several dual button operations D6337 2 mode rotary control mode Press to scroll through calibration parameters Press to adjust response and gain track Press...

Page 14: ...he rudder as measured by the rudder position sensor Autopilot mode indicators Rudder position indicator GyroPlus indicator appears if a yaw sensor is connected to the autopilot Variable text area up t...

Page 15: ...uired heading 2 Pressauto The SmartPilot is now in AUTO mode and will steer to the chosen heading shown on the display This mode is often known as point and shoot How do I return to hand steering Pres...

Page 16: ...safely clear of the obstacle reverse the previous course change for example turn the rotary control clockwise Can I use the SmartPilot to power steer my boat The SmartPilot has an inbuilt Power Steer...

Page 17: ...ower steer mode is active 3 Usetherotary controltosteertheboat Therudderpositionisdisplayedin the bar at the bottom of the display How do I quickly center the rudder To quickly center the rudder in po...

Page 18: ...occur Note Youwilllosethese temporary changes toresponse level whenever thesystemis poweredoff YoucanmakepermanentadjustmentsinUserCalibration Seepage23 This determines the default power up response l...

Page 19: ...ased power consumption and drive unit activity Response Level 3 AutoSeastate off yaw damping This setting provides the tightest possible course keeping by introducing counter rudder yaw damping You ca...

Page 20: ...ou can usually significantly improve course keeping by improving the sail balance Note TheSmartPilotalsoclears the warning if theheading recoversorif youchange course 1 5 Can I adjust the display ligh...

Page 21: ...u have made to the lighting level How do I adjust the contrast To set the display contrast level 1 With the autopilot in Standby mode press the disp button for one second to access the LAMP screen 2 P...

Page 22: ...12 ST8002 SmartPilot Controller Operating Guide...

Page 23: ...you have connected the SmartPilot to a suitable navigation system providing SeaTalk or NMEA information See SmartPilot Commissioning Guidefor connection details Your SmartPilot system can receive rou...

Page 24: ...t any time by pressing auto to return to Auto mode pressing standby to steer manually in Standby mode What is Cross track error Crosstrackerror XTE isthedistancebetweenthecurrentpositionandaplanned ro...

Page 25: ...you still have full control from the keypad You can make a dodge maneuver by using the rotary control to select the desired course change On making a dodge maneuver the autopilot will revert to AUTO m...

Page 26: ...e to the next waypoint 1 Check that it is safe to turn onto the new track 2 Press the track button This will cancel the Waypoint Advance warning and turn the boat towards the next waypoint Note Ifyoud...

Page 27: ...Man Overboard MOB function see page 22 When the warning sounds the SmartPilot continues on its current heading but displays the bearing to the next waypoint the direction the boat will turn to take up...

Page 28: ...lative to either an apparent or true wind angle in Wind Vane mode Thedefaultsettingisapparentwind Ifrequired youcan changethistotruewind in User Calibration see page 23 WindTrim In Wind Vane mode the...

Page 29: ...the rotary control anti clockwise the locked wind angle and locked heading will both change the autopilot will then adjust the locked heading as required to maintain the new wind angle Note Becausetu...

Page 30: ...ot correct for short term changes such as gusts In gusty and unsteady inshore conditions it is best to sail a few degrees fur ther off the wind so that changes in wind direction can be tolerated 2 3 H...

Page 31: ...of five characters or less are displayed together with the page name as shown by screen A below waypoint names of more than five characters alternate with the page name as shown by screen B below if...

Page 32: ...all available calibration settings see SmartPilot Commissioning Guide Note Many of the settings aresailboat specificand will only bedisplayed if your vessel typeis setto SAILBOAT How do I access User...

Page 33: ...indtrimsettingswill resultin asystem thatismoreresponsive to wind changes Response level ThissetsthedefaultSmartPilotresponselevelsetting Theresponselevelcontrols the relationship between course keepi...

Page 34: ...ot activity This conserves power but may compromise short term course keeping accuracy Screen Text Options RESPONSE 1 AutoSeastate on Automatic deadband The SmartPilot will gradually ignore repetitive...

Page 35: ...ry data from other instruments check cabling Display shows rotating dashes Compasscalibration in progress see SmartPilot Commissioning Guide Displayed compass heading doesnotagreewiththe boat s compas...

Page 36: ...not apply to S1G S2G and S3G systems You cannot enter Seatrial Calibration Seatrialcalibrationlockison turnoffthecalibration protection feature in Dealer Calibration seeSmartPi lotCommissioning Guide...

Page 37: ...utoLearn not completed successfully Failure codes 1 AutoLearn has not been carried out default setting 2 AutoLearn failed usually due to manual interruption 4 AutoLearn failed probably due to drive or...

Page 38: ...when cleaning Take care when cleaning the display Avoid wiping the display screen with a dry cloth as this could scratch the screen coating If necessary use only a mild detergent Never use chemical or...

Page 39: ...being affected by external influences In general this will not damage the equipment but it can lead to spurious resetting action or momentarily may result in faulty operation Product support Raymarin...

Page 40: ...tware information press and hold standby for 4 seconds after 2 seconds you will see the DISPLAY CAL screen then after another 2 seconds you see controller software version press disp to display the co...

Page 41: ...nce 31 Product details table For future reference you may want to use this table to record serial and software information for your SmartPilot Serial Number Software Version SmartPilot Controller Smar...

Page 42: ...32 ST8002 SmartPilot Controller Operating Guide...

Page 43: ...ata and up to 15 data pages LCD illumination 3 brightness levels off 15 contrast levels Input connections SeaTalk x2 and NMEA 0183 Output connections SeaTalk x2 CE approvals conforms to 89 336 EC EMC...

Page 44: ...t of rudder the autopilot applies to try to prevent the boatfromyawingoffcourse Highercounterruddersettingsresult inmore rudder being applied CR pump Constant Running hydraulic pump DC Direct current...

Page 45: ...autopilotwill apply tocorrect course errors The higher the setting the more rudder will be applied SeaTalk SeaTalk is Raymarine s proprietary communication system It links the prod ucts to provide a s...

Page 46: ...36 ST8002 SmartPilot Controller Operating Guide...

Page 47: ...oTack 10 23 C Contrast 11 Controller Specifications 33 Course changes 5 Cross track error Explanation 14 LARGE XTE warning 14 Current limit alarm 27 D Data pages 20 Display Contrast 11 Illumination 10...

Page 48: ...e 29 Settings AutoTack 23 Gybe inhibit 23 Response level 23 User calibration 22 Wind type 23 WindTrim 23 Shallow alarm 22 SmartPilot Disengaging 5 Engaging 5 Functions 1 Specifications 33 Standby Mode...

Reviews: