


Installation and configuration
Page 38
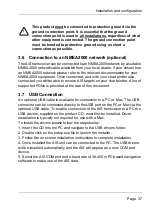
If the USB connection is removed from the PC or Mac during use
you must reset the connection before further use. To reset the
connection, disconnect then reapply power to the AIS before
closing and relaunching any PC or Mac applications using the
USB connection. Finally, reconnect the USB cable between the
PC or Mac and the AIS transceiver
3.8 Turning the AIS transceiver on
The AIS transceiver does not have an On / Off switch and will operate
immediately that power is applied to the unit.
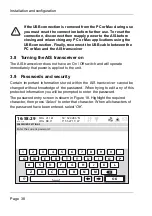
3.9 Passwords and security
Certain important information stored within the AIS transceiver cannot be
changed without knowledge of the password. When trying to edit any of this
protected information you will be prompted to enter the password.
The password entry screen is shown in Figure 18. Highlight the required
character, then press
‘Select’
to enter that character. When all characters of
the password have been entered, select
‘OK’.
!
16:58:29
SOG 21.1kt
UTC + 1h
COG 88.0°
50° 32.0286’ N
0° 55.2715’ W
PASSWORD SETTINGS
Enter the current password:
1
2
3
4
5
6
7
8
9
0
.
Q
W
E
R
T
Y
U
I
O
A
Z
X
C
V
B
N
M
!?
OK
P
S
D
F
G
H
J
K
L
Summary of Contents for 4250031
Page 1: ......
Page 2: ......
Page 10: ...Table of contents Page 8...
Page 18: ...Notices Page 16...
Page 20: ...Introduction Page 18...
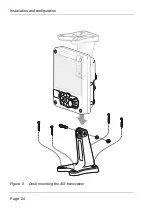
Page 26: ...Installation and configuration Page 24 Figure 5 Desk mounting the AIS transceiver...
Page 42: ...Installation and configuration Page 40...
Page 43: ...Installation and configuration Page 41...
Page 44: ...Installation and configuration Page 42...
Page 45: ...Installation and configuration Page 43...
Page 46: ...Installation and configuration Page 44...
Page 47: ...Installation and configuration Page 45...
Page 48: ...Installation and configuration Page 46...
Page 49: ...Installation and configuration Page 47...
Page 50: ...Installation and configuration Page 48...
Page 73: ...Operation Page 71...
Page 74: ...Operation Page 72...
Page 75: ...Operation Page 73...
Page 76: ...Operation Page 74...
Page 77: ...Operation Page 75...
Page 78: ...Operation Page 76...
Page 79: ...Operation Page 77...
Page 80: ...Operation Page 78...
Page 102: ...Technical information Page 100...
Page 114: ...Technical specification Page 112...
Page 118: ...Installation record Page 116...
Page 119: ......
Page 120: ...a brand by 201 0895 1...


