


Junction box accessory
Page 101
7 Junction box accessory
7.1 What’s in the box
Please ensure all items are present and if any of the items are missing please
contact your dealer.
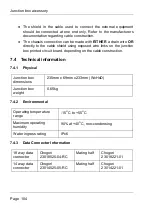
Figure 35 Junction box - What’s in the box
7.2 Installation
The junction box should be mounted within 2m of the AIS transceiver, to
ensure that the cable can be run without compromising its performance.
●
Connect the two extension cables between the AIS transceiver and
the junction box.
●
Remove the lid of the junction box using a 3mm Allen key. Route your
accessory cables through the waterproof cable glands and find the
appropriate terminal blocks to fix them to.
●
Use the connector wiring diagrams shown in Figure 12. and Figure
14. as your guide.
●
Secure the ground / screen / shield of the accessory cables to the
metallic strips of the junction box or to the appropriate connection on
the terminal block.
Quick start
guide
18 way
extension cable
14 way
extension cable
Junction
box
Self-tapping screws
Summary of Contents for 4250031
Page 1: ......
Page 2: ......
Page 10: ...Table of contents Page 8...
Page 18: ...Notices Page 16...
Page 20: ...Introduction Page 18...
Page 26: ...Installation and configuration Page 24 Figure 5 Desk mounting the AIS transceiver...
Page 42: ...Installation and configuration Page 40...
Page 43: ...Installation and configuration Page 41...
Page 44: ...Installation and configuration Page 42...
Page 45: ...Installation and configuration Page 43...
Page 46: ...Installation and configuration Page 44...
Page 47: ...Installation and configuration Page 45...
Page 48: ...Installation and configuration Page 46...
Page 49: ...Installation and configuration Page 47...
Page 50: ...Installation and configuration Page 48...
Page 73: ...Operation Page 71...
Page 74: ...Operation Page 72...
Page 75: ...Operation Page 73...
Page 76: ...Operation Page 74...
Page 77: ...Operation Page 75...
Page 78: ...Operation Page 76...
Page 79: ...Operation Page 77...
Page 80: ...Operation Page 78...
Page 102: ...Technical information Page 100...
Page 114: ...Technical specification Page 112...
Page 118: ...Installation record Page 116...
Page 119: ......
Page 120: ...a brand by 201 0895 1...


