Calibration and discharging residual material
9
88
14.
End calibration test. Switch off the PTO shaft and tractor engine and lock
them to prevent unauthorised starting.
15.
Mount the spreading discs. Make sure that the left and right spreading discs
are not reversed.
18.
Check that there is clearance between the spreading vanes and the outlet by
turning the spreading discs by hand.
19.
Re-mount the calibration test chute and the adjustment lever at their specified
locations at the machine.
NOTICE
The pins on the spreading disc holders have different positions on the left and
right side. The correct spreading disc is the one that fits precisely into the
spreading disc holder.
16.
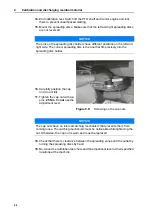
Carefully position the cap
nut (do not tilt).
17.
Tighten the cap nut with ap-
prox.
25 Nm
. Do
not
use the
adjustment lever.
Figure 9.8:
Screwing on the cap nuts
NOTICE
The cap nuts have an internal catching mechanism that prevents them from
coming loose. The catching mechanism must be noticeable while tightening the
nut. Otherwise, the cap nut is worn and must be replaced.
Summary of Contents for MDS 14.2
Page 8: ...Intended use 1 2...
Page 28: ...Safety 3 22...
Page 38: ...Technical data 4 32...
Page 42: ...Axle load calculation 5 36...
Page 44: ...Transportation without tractor 6 38...
Page 86: ...Machine settings 8 80...
Page 96: ...Calibration and discharging residual material 9 90...
Page 110: ...Important information on spreading 10 104...
Page 114: ...Faults and possible causes 11 108...
Page 146: ......

