background image

Battery Backup

Connection

SmartRescue 5 & 10 Installation

Page 3

• 120v power

• Determine communication

 • 

Dedicated analog phone line from POTS, PBX, central office, or digital phone line

 • 

VoIP: 

Requires use of RATH® model 2100-VOIP to connect SmartRescue to VoIP phone system

 • 

Internal Intercom (no offsite calling):

 Requires RATH® model 2100-LINESIM

 • 

Cellular:

 Call RATH® at 800-451-1460

• Twisted, shielded, 22 or 24 AWG wire cabling to connect each Emergency Phone to the SmartRescue

Pre-Installation Requirements

Step 1:

Remove the front cover from the SmartRescue and mount the 

SmartRescue back box to the wall using suitable mounting screws 

(not included).

Step 2:

Punch out the conduit knockouts for the analog phone line and 

phone cabling runs.

Step 3:

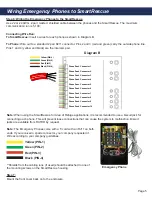
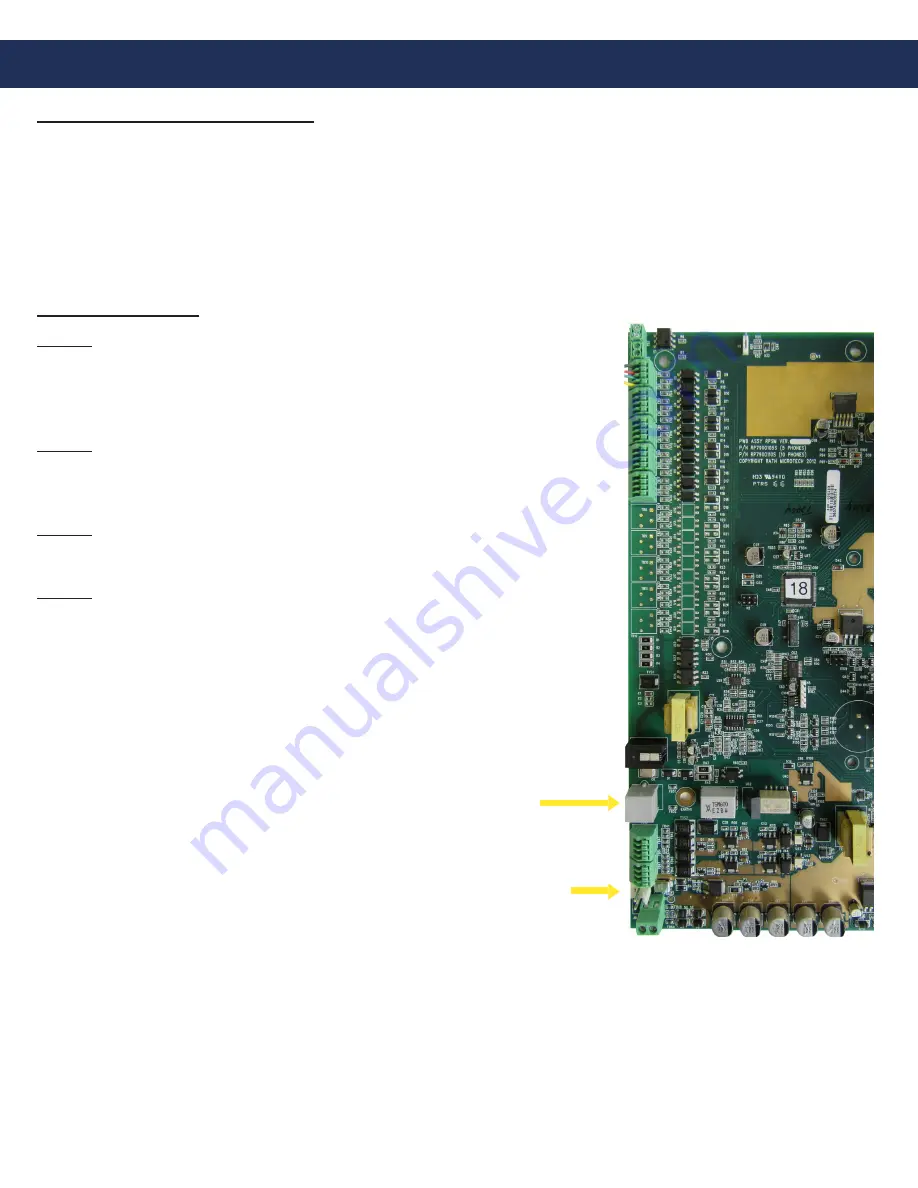
Connect an analog phone line to the outside phone line 

(Diagram A).

Step 4:

Connect the backup battery cable to the battery terminal (battery 

included) 

(Diagram A).

Note:

 If using a 2300-630SM Sub-Master, see page 11.

Installation Steps

Diagram A

Outside Phone

Line

Summary of Contents for SmartRescue 10

Page 1: ...SmartRescue 5 10 Installation Operations Manual N56W24720 N Corporate Circle Sussex WI 53089 800 451 1460 www RATHCommunications com RP8500510 Ver 3 02 19 Made in the USA 3 Year Warranty...

Page 2: ...ons Thank you for your business The RATH Team N56W24720 N Corporate Circle Sussex WI 53089 800 451 1460 www RATHCommunications com Table of Contents SmartRescue 5 10 Installation Powering the SmartRes...

Page 3: ...24 AWG wire cabling to connect each Emergency Phone to the SmartRescue Pre Installation Requirements Step 1 Remove the front cover from the SmartRescue and mount the SmartRescue back box to the wall u...

Page 4: ...d 120vac outlet Option 2 Hard Wired Transformer Connect the hot wire of the 120vac to the L screw Connect the neutral wire of the 120vac to the N screw Connect the ground wire of the 120vac to the gro...

Page 5: ...5 Phone Push Connector 6 Phone Push Connector 7 Phone Push Connector 8 Phone Push Connector 9 Phone Push Connector 10 Supplied by RATH Supplied by RATH GROUND Yellow PIN 1 Green PIN 2 Red PIN 3 Black...

Page 6: ...from the phone to the power output screws on the transformer Option 2 Power Directly from Elevator Car Elevator applications only Connect 24vac or 24vdc from power supply to power wiring harness on p...

Page 7: ...Page 7 Plug In Transformer...

Page 8: ...DISCONNECT CALL TO RESCUE SERVICES RESCUE SERVICES OPERATION 1 SOLID LIT LED PHONE SUB MASTER OR RESCUE SERVICES INDICATES CALL IN PROGRESS 2 SLOW BLINKING LED INDICATES CALL ON HOLD 3 LIFT HANDSET 4...

Page 9: ...r 2 i For no message press 1 3 Enter 0 c Press 6 Record wait for beep speak your message Stop d To program frequency of message press 1 3 Enter ___ 1 Plays message once 2 Plays message twice this is s...

Page 10: ...e call Note If the call is answered at the SmartRescue available ring on subsequent calls will not be heard until the system timer resets 1 minute 4 Emergency Phone places a call into the SmartRescue...

Page 11: ...1 Press 2 Phone 2 Press 3 Phone 3 Press 4 Phone 4 Press 5 Phone 5 If you wish to speak to all phones press 0 Press 1 Phone 6 Press 2 Phone 7 Press 3 Phone 8 Press 4 Phone 9 Press 5 Phone 10 Wiring Dia...

Page 12: ...ogram Emergency Phones to Consolidator Mode Elevator Industry Only Note Consolidator Mode allows you to have up to ten SmartPhones on a single telephone line and toggle between them from an outside ca...

Page 13: ...d the backup battery is connected properly to the SmartRescue board SmartRescue LEDs stay on Wires may be crossed Verify wiring from the SmartRescue to the SmartPhone is correct Two way communication...

Reviews: