background image

Operation Manual

(5)

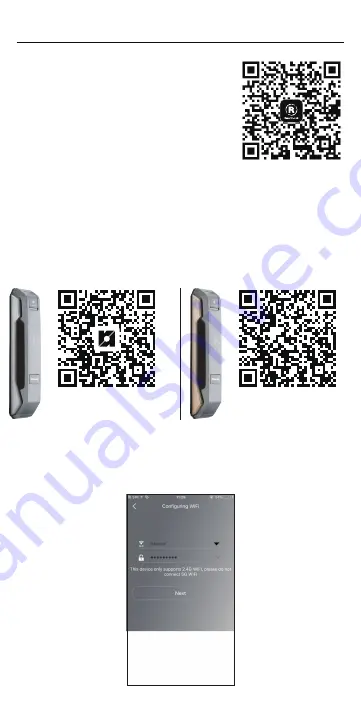
Please scan this QR code 

for adding RSL-VF03GY

Please scan this QR code 

for adding RSL-VF03GD

Scan this QR code 

to download the APP

1.Install the Rasonic APP : Scan the QR 
code on the right, or download the APP 
“Rasonic” from “Google Play” or “Apple 
Store”. After installation, register a new 
account and log in accordingly.

2. Add a device: When adding a device, the door lock and your 
phone must be connected to the same WIFI network.

3. Install the battery on the finger vein lock, open the “Rasonic” 
APP, click Settings -> Add Device.

4. After scanning the QR code, click WIFI configuration

5. Enter the WIFI password and click Next

12. Bind Device

Summary of Contents for RSL-VF03

Page 1: ...Model RSL VF03 Operation Manual ...

Page 2: ...cked while going out Pay attention to avoid water seeping into the product The product may be interfered in wireless communication which may affect the operation of the product This product can be used by children and people with physical sensory or mental capabilities or people who lack of experience and relevant knowledge but they must accept the supervision of the person responsible for safety ...

Page 3: ...ase do not rub it rinse your eyes with clean water immediately and go to hospital for treatment otherwise it will hurt your eyes If the battery emits peculiar smell heat discoloration deforma tion or use storage or any abnormality during charging immediately remove the battery from the device or charger and stop using it If the battery electrode is dirty wipe it with a dry cloth before use otherwi...

Page 4: ...or Opening Direction Settings open the left door 1 open the right door 2 2 Set up auto lock When door is closed and locked enter 0 administrator password 5 and confirm set up success see operation manual 3 Gyroscope auto lock settings 3 Change the administrator account s password see operation manual 4 Administrator Account Settings The default adminis trator password is 123456 4 An proper registr...

Page 5: ...ing direction first after installa tion When restored to factory settings the administrator password will be restored to 123456 and all user information will be cleared Operation Manual 2 3 Set Successfully Enter 1 Restore to factory settings 3 Door opening direction 5 Motor torque settings 0 Security level 1 Open the door left 2 Open the door right Authentication Authority administrator s passwor...

Page 6: ... vice versa Suggested value is 5 When it is set as 0 gyroscope is turned off and will require completely manual locking If the gyroscope fails to lock users can press and hold the lock button for 5 seconds to refresh its data When user opens the door again smart lock will detect door closing positions again and save the data for future auto locking functions Note gyroscope lock threshold should be...

Page 7: ...or s finger used for finger vein entry should not be registered again when adding other users otherwise there is a certain probability that the administrator s finger vein entry will be judged as an ordinary user 1 Enter 1 Add New User 2 Delete User 0 Change administrator password Authentication Authority administrator s password or finger vein 0 Changed administrator settings successfully Register...

Page 8: ... Factory Settings When administrator forgets the login information users can unplug the battery press the pause button on the lock and hold Install the battery until the message restore factory settings is displayed Release the pause button and you should hear factory settings restored successfully This method has the same function as the following steps 1 User Management 2 System Settings 3 Netwo...

Page 9: ...6 times Added new user successfully Insert new 6 digit password and press repeat password entry for 2 times 6 Add New User Operation process The initial administrator password is 123456 if changed from 123456 to other all registered door lock users will be deleted If any step fails during the operation please go back to the first step and try again 1 User Management 2 System Settings 3 Network Set...

Page 10: ...fault administrator password is 123456 if changed from 123456 to other all registered door lock users will be deleted If any step fails during the operation please go back to the first step and try again Enter the user number and press the key to end repeat twice Deleted user successfully 1 User Management 2 System Settings 3 Network Settings 4 Set volume 5 Lock delay time 0 Lock Threshold ...

Page 11: ... s password or finger vein Enter 0 2 and press to end 0 Muted 1 Normal Volume 2 Maximum Volume Set Successfully 5 Enter Authentication Authority administrator s password or finger vein Enter 1 99 and press key to end 1 second 99 seconds Set Successfully 1 User Management 2 System Settings 3 Network Settings 4 Set volume 5 Lock delay time 0 Lock Threshold 1 User Management 2 System Settings 3 Network...

Page 12: ... to end Set successfully Enter 1 Restore to factory settings 3 Door opening direction 5 Motor torque settings 0 Security level Enter 0 7 And press to end Authentication Authority administrator s password or finger vein Set Successfully 2 0 Enter 1 Restore to factory settings 3 Door opening direction 5 Motor torque settings 0 Security level Enter 1 3 And press to end Authentication Authority adminis...

Page 13: ...he APP Rasonic from Google Play or Apple Store After installation register a new account and log in accordingly 2 Add a device When adding a device the door lock and your phone must be connected to the same WIFI network 3 Install the battery on the finger vein lock open the Rasonic APP click Settings Add Device 4 After scanning the QR code click WIFI configuration 5 Enter the WIFI password and cli...

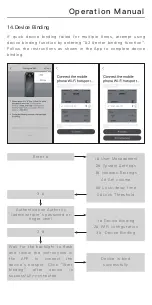
Page 14: ...nd please go back to step 3 and retry the binding process 6 Door lock setting 3 1 Enter 1 Device Binding 2 WIFI configuration 3 Device Binding Device is bind successfully Device enters binding mode When backlight flashes click next in the APP Authentication Authority administrator s password or finger vein 1 User Management 2 System Settings 3 Network Settings 4 Set volume 5 Lock delay time 0 Lock Th...

Page 15: ...PP Click home Link WIFI Scan the QR code and follow the instructions accordingly 2 After entering the WIFI password click Next 3 When you hear the prompt tone tick the box and click Next 13 Switching WIFI 2 3 scan the QR code by the app to switch WiFi ...

Page 16: ...3 2 Enter Device enters WIFI configuration mode When backlight flashes click Next in the APP Authentication Authority administrator s password or finger vein Door lock setting 1 Device Binding 2 WIFI configuration 3 Device Binding WIFI configuration successful 1 User Management 2 System Settings 3 Network Settings 4 Set volume 5 Lock delay time 0 Lock Threshold ...

Page 17: ...inding 3 3 Enter 1 Device Binding 2 WIFI configuration 3 Device Binding Device is bind successfully Wait for the backlight to flash and follow the instructions in the APP to connect the device s hotspot Click Start binding after device is successfully connected Authentication Authority administrator s password or finger vein 1 User Management 2 System Settings 3 Network Settings 4 Set volume 5 Lock d...

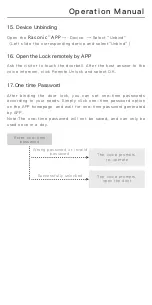
Page 18: ...5 Device Unbinding Ask the visitor to touch the doorbell After the host answer to the voice intercom click Remote Unlock and select OK 16 Open the Lock remotely by APP After binding the door lock you can set one time passwords according to your needs Simply click one time password option on the APP homepage and wait for one time password generated by APP Note The one time password will not be save...

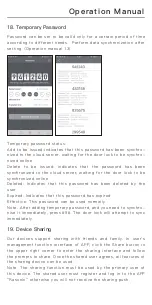
Page 19: ...he user Expired Indicates that this password has expired Effective This password can be used normally Note After adding temporary password and you need to synchro nise it immediately press 9 The door lock will attempt to sync immediately 18 Temporary Password Our devices support sharing with friends and family In user s management function interface of APP click the Share button in the upper right...

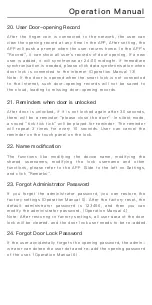
Page 20: ...d tick tick tick will be played for reminder The reminder will repeat 3 times for every 10 seconds User can cancel the reminder on the touch panel on the lock 21 Reminders when door is unlocked The functions like modifying the device name modifying the shared usernames modifying the lock username and other functions please refer to the APP Slide to the left on Settings and click Remarks 22 Name mo...

Page 21: ...des If the WIFI configuration fails please check whether the WIFI password is correct and whether WIFI network is connected This device only supports 2 4G band WIFI please ensure that the connected WIFI is 2 4G band Also please ensure that the distance between the device mobile phone and router is within 1 meter Warm reminder The manual lock button manual unlock button pause activate auto lock but...

Page 22: ...es not cover the repair or replacement of accessories external cables or cabinet etc Additional charges shall be levied if services are required Please present the official invoice and the guarantee certificate with the sales point s chop or the redemption center s chop for free maintenance For enquiries please call Shun Hing Electric Service Centre Limited hotline at 2406 5666 Free guarantee serv...

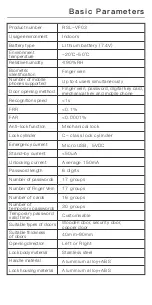
Page 23: ...umber of temporary passwords Temporary password valid time Password length Suitable types of doors Lock housing material Opening direction Lock body material Handle material RSL VF03 Lithium battery 7 4V 20 50 90 RH Finger vein Up to 4 users simultaneously Finger vein password digital key card mechanical key and mobile phone 1s 0 1 0 0001 Mechanical lock C class lock cylinder Micro USB 5VDC 50uA A...

Page 24: ...5666 Fax 2408 0316 Website http www shesc com 信興電器服務中心有限公司 SHUN HING ELECTRIC SERVICE CENTRE LTD 香港新界葵涌勝耀街2號信興中心1樓 九龍尖沙咀東部麼地道67號半島中心B座9樓 香港天后琉璃街7號柏景中心22樓 澳門慕拉士大馬路193 199號南嶺工業大廈5樓I座 Customer Service Centre 1 F Shun Hing Centre 2 Shing Yiu Street Kwai Chung N T 9 F Block B Peninsula Centre 67 Mody Road Tsim Sha Tsui Kowloon 22 F Parkview Centre 7 Lau Li Street Tin Hau Hong Kong Avenida de Venceslau ...

Reviews: