background image

PAGE 6 OF 8 


OCG0036


R&G Racing 

Unit 1, Shelleys Lane, East Worldham, Alton, Hampshire GU34 3AQ. 

Tel: +44 (0)1420 89007 Fax +44 (0)1420 87301 

www.rg-racing.com 

Email: 

[email protected]


OUTILS REQUIS 


• 

Petit tournevis cruciforme 

• 

Clé à molette 7mm 

• 

Clé Allen 2.5mm


• 

Pinces


VALEURS DE SERRAGE 

M4 BOULON = 8Nm


M5 BOULON = 

1

2Nm


M6 BOULON = 

1

5Nm


M8 BOULON = 20Nm


M

1

0 BOULON = 40Nm


M12 BOULON = 40Nm


ARTICLE NO.


DESCRIPTION


QTE


ARTICLE 1


PROTECTION REFROIDISSEUR D’HUILE (OCG0036) 

ARTICLE 2


4mm x 10 BOULONS 

ARTICLE 3


M4 RONDELLE 

ARTICLE 4


4mm ECROUS 

ARTICLE 5


MOUSSE AUTOCOLLANTE 

ARTICLE 6


PETIT COLLIER DE SERRAGE


4


LEGENDE 

NOTICE DE MONTAGE 


• 

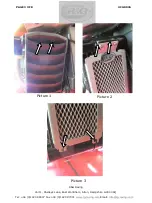
La  première  étape  consiste  à  retirer  la  protection  du  refroidisseur  d'huile  en  plastique 

d'origine, comme indiqué sur la photo 1, en retirant les vis noires à l'aide d'un tournevis cru-
ciforme, puis en retirant les inserts en plastique. Soulevez le cache et retirez-le de la moto. 

• 

Avant d’installer la  protection sur la  moto,  coupez  la  bande de mousse fournie en mor-

ceaux de 10 mm de large et collez-les à l’arrière du cadre de protection du refroidisseur, de 
sorte qu’ils se placent entre la protection du refroidisseur et le refroidisseur. 

• 

Alignez la protection refroidisseur et insérez un boulon avec une rondelle dans le trou de 

boulon illustré à la photo 2, puis une rondelle et un écrou, avant de serrer. 

• 

La dernière étape consiste à fixer le bas de la protection en plaçant une attache de câble 

dans  la  protection  et  le  refroidisseur,  puis  en  coupant  l'excédent  d'attache  restant,  comme 
indiqué sur la photo 3. 


ISSUE 1 05/09/2019 (BG) 

Summary of Contents for OCG0036

Page 1: ...ld components onto bolts these rubber washers can be thrown away THIS KIT CONTAINS THE ITEMS PICTURED AND LABELLED OVER PAGE SOME PARTS MAY BE SHOWN FOR CLARITY OF INSTRUCTIONS ONLY DO NOT PROCEED UNTIL YOU ARE SURE ALL PARTS ARE PRESENT PLEASE READ ALL INSTRUCTIONS BEFORE PROCEEDING IF IN ANY DOUBT WHEN FITTING OUR PRODUCTS CONSULT ONE OF OUR DEAL ERS OR HAVE FITTED BY A QUALIFIED TECHNICIAN Fitt...

Page 2: ...OLS REQUIRED Small philips screwdriver 7mm A F Spanner 2 5mm allen key pliers GENERAL TORQUE SETTINGS M4 BOLT 8Nm M5 BOLT 12Nm M6 BOLT 15Nm M8 BOLT 20Nm M10 BOLT 40Nm M12 BOLT 40Nm ITEM NO DESCRIPTION QTY ITEM 1 OIL COOLER GUARD OCG0036 1 ITEM 2 4mm x 10 LONG BUTTON HEAD BOLTS 2 ITEM 3 M4 WASHER 4 ITEM 4 4mm NYLOC NUTS 2 ITEM 5 ADHESIVE FOAM 4 ITEM 6 SMALL CABLE TIE 4 LEGEND ...

Page 3: ... G Racing Unit 1 Shelleys Lane East Worldham Alton Hampshire GU34 3AQ Tel 44 0 1420 89007 Fax 44 0 1420 87301 www rg racing com Email info rg racing com PAGE 3 OF 8 OCG0036 Picture 1 Picture 2 Picture 3 ...

Page 4: ...quality and suitable for its particular purposes Where R G fits the Prod ucts or undertakes other services it shall exercise reasonable skill and care and rectify any fault free of charge unless the workmanship has been disturbed The Buyer is responsible for ensuring that the warranty on the motorcycle is not affected by the fitting of the Products On return of any defective Products R G shall at ...

Page 5: ...ONDELLES DOIVENT ÊTRE JETÉES LE KIT CONTIENT LES ARTICLES EN PHOTO ET ETIQUETTES SUR LA PAGE LES PARTIES PRESENTÉES PEUVENT ETRE UNIQUEMENT REPRESENTATIVES POUR LA CLARTE DES INSTRUCTIONS NE PAS PROCÉDER AU MONTAGE AVANT DE VOUS ÊTRES ASSURE QUE TOUTES LES PIECES SOIENT PRÉ SENTES SVP LIRE L ENSEMBLE DE LA NOTICE AVANT DE PROCÉDER AU MONTAGE EN CAS DE DOUTE LORS DU MONTAGE CONSULTEZ UN DE NOS REVE...

Page 6: ...refroidisseur d huile en plastique d origine comme indiqué sur la photo 1 en retirant les vis noires à l aide d un tournevis cru ciforme puis en retirant les inserts en plastique Soulevez le cache et retirez le de la moto Avant d installer la protection sur la moto coupez la bande de mousse fournie en mor ceaux de 10 mm de large et collez les à l arrière du cadre de protection du refroidisseur de ...

Page 7: ...n an den Schrauben Diese Plastik Unterlegscheiben werden nicht für den Einbau benötigt ALLE KIT TEILE SIND UNTEN ABGEBILDET UND GEKENNZEICHNET DIE ABGEBILDETEN TEILE DIENEN LEDIGLICH ZUR ERKLÄRUNG ÜBERPRÜFEN SIE DASS ALLE TEILE VORHANDEN SIND BEVOR SIE MIT DER MONTAGE BEGINNEN LESEN SIE DIE MONTAGEANLEITUNG KOMPLETT DURCH BEVOR SIE ANFANGEN WENN SIE UNSICHER SIND BEI DER MONTAGE DIESES PRODUKTES B...

Page 8: ...chutz aus Kunststoff wie in Abbildung 1 abgebildet indem Sie die schwarzen Schrauben mit einem Kreuzschlitzschraubenzieher lösen und entfernen und die Kunststoffeinlagen entfernen Die Abdeckung nach oben heben um sie vom Motorrad zu entfernen Bevor Sie den Kühlerschutz anbringen schneiden Sie die mitgelieferten Schaumstoffstreifen in 10 mm breite Streifen und kleben Sie diese auf der Rückseite des...

Reviews: