background image

PAGE 4 OF 8 


OCG0036


R&G Racing 

Unit 1, Shelleys Lane, East Worldham, Alton, Hampshire GU34 3AQ. 

Tel: +44 (0)1420 89007 Fax +44 (0)1420 87301 

www.rg-racing.com 

Email: 

[email protected]


FITTING INSTRUCTIONS 


• 

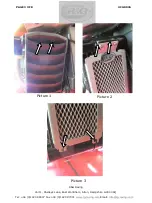
First step is to remove the original plastic oil cooler guard as shown in  picture 1 by re-

moving the black screws using a philips screwdriver and then remove the plastic inserts, Lift 
the cover upwards and away from the bike to remove. 

• 

Before fitting guard to the bike cut the foam strip provided into 10mm wide pieces and 

stick them to the back of the cooler guard frame, so that they sit between the cooler guard 
and the cooler. 

• 

Align the cooler guard and insert a bolt with a washer through the bolt hole shown in pic-

ture 2 and then a washer and nut and tighten. 

• 

The  final  step  is  to  secure  the  bottom  of  the  guard  by  placing  a  cable  tie  through  the 

guard and cooler and trimming the excess tie left over as shown in picture 3. 


ISSUE 1 05/09/2019 (BG) 

CONSUMER NOTICE 

The  catalogue  description  and  any  exhibition  of  samples  are  only  broad  indications  of  the  Products  and  R&G  may 

make  design  changes  which  do not  diminish  their  performance  or  visual  appeal  and  supplying them  in  such  state 
shall conform to the order. The Buyer acknowledges no representation or warranty (other than as to title) has been 
given or will apply to the Products other than those in R&G’s order or confirmation and the Buyer confirms it has cho-

sen the Products as being of merchantable quality and suitable for its particular purposes. Where R&G fits the Prod-
ucts or undertakes other services it shall exercise reasonable skill and care and rectify any fault free of charge unless 

the workmanship has been disturbed.  The Buyer is responsible for ensuring that the warranty on the motorcycle is 
not affected by the fitting of the Products. On return of any defective Products R&G shall at its option either supply a 

replacement  or  refund  the  purchase  money  but  shall  not  be  liable  if  the  Products  have  been  modified  or  used  or 
maintained otherwise than in accordance with R&G’s or manufacturer’s instructions and good engineering practice or 
if the defect arises from accident or neglect. Other than identified above and subject to R&G not limiting its liability 

for causing death and personal injury, it shall not be liable for indirect or consequential loss and otherwise its liability 
shall be limited to the amounts paid by the Buyer for the Products or the fitting or service concerned. These terms do 
not affect the Buyer’s statutory rights. 


R&G RACING RETURNS POLICY (NON-FAULTY GOODS) 

Returns must be pre-authorised (if not pre-authorised the return will be rejected). Goods may only be returned direct 

to us if they were purchased direct from us (customer must prove if necessary).  Otherwise to be returned to original 

vendor. Goods must be in re-sellable condition, in the opinion of R&G Racing. All returns are subject to a 25% re-
stocking and handling fee (25% of the gross value exc. P&P – at the prevailing price at time of purchase). The cus-

tomer  must  pay  any  and  all  carriage  charges.  No  returns  of  discontinued  products,  unless  within  14  days  of  pur-

Summary of Contents for OCG0036

Page 1: ...ld components onto bolts these rubber washers can be thrown away THIS KIT CONTAINS THE ITEMS PICTURED AND LABELLED OVER PAGE SOME PARTS MAY BE SHOWN FOR CLARITY OF INSTRUCTIONS ONLY DO NOT PROCEED UNTIL YOU ARE SURE ALL PARTS ARE PRESENT PLEASE READ ALL INSTRUCTIONS BEFORE PROCEEDING IF IN ANY DOUBT WHEN FITTING OUR PRODUCTS CONSULT ONE OF OUR DEAL ERS OR HAVE FITTED BY A QUALIFIED TECHNICIAN Fitt...

Page 2: ...OLS REQUIRED Small philips screwdriver 7mm A F Spanner 2 5mm allen key pliers GENERAL TORQUE SETTINGS M4 BOLT 8Nm M5 BOLT 12Nm M6 BOLT 15Nm M8 BOLT 20Nm M10 BOLT 40Nm M12 BOLT 40Nm ITEM NO DESCRIPTION QTY ITEM 1 OIL COOLER GUARD OCG0036 1 ITEM 2 4mm x 10 LONG BUTTON HEAD BOLTS 2 ITEM 3 M4 WASHER 4 ITEM 4 4mm NYLOC NUTS 2 ITEM 5 ADHESIVE FOAM 4 ITEM 6 SMALL CABLE TIE 4 LEGEND ...

Page 3: ... G Racing Unit 1 Shelleys Lane East Worldham Alton Hampshire GU34 3AQ Tel 44 0 1420 89007 Fax 44 0 1420 87301 www rg racing com Email info rg racing com PAGE 3 OF 8 OCG0036 Picture 1 Picture 2 Picture 3 ...

Page 4: ...quality and suitable for its particular purposes Where R G fits the Prod ucts or undertakes other services it shall exercise reasonable skill and care and rectify any fault free of charge unless the workmanship has been disturbed The Buyer is responsible for ensuring that the warranty on the motorcycle is not affected by the fitting of the Products On return of any defective Products R G shall at ...

Page 5: ...ONDELLES DOIVENT ÊTRE JETÉES LE KIT CONTIENT LES ARTICLES EN PHOTO ET ETIQUETTES SUR LA PAGE LES PARTIES PRESENTÉES PEUVENT ETRE UNIQUEMENT REPRESENTATIVES POUR LA CLARTE DES INSTRUCTIONS NE PAS PROCÉDER AU MONTAGE AVANT DE VOUS ÊTRES ASSURE QUE TOUTES LES PIECES SOIENT PRÉ SENTES SVP LIRE L ENSEMBLE DE LA NOTICE AVANT DE PROCÉDER AU MONTAGE EN CAS DE DOUTE LORS DU MONTAGE CONSULTEZ UN DE NOS REVE...

Page 6: ...refroidisseur d huile en plastique d origine comme indiqué sur la photo 1 en retirant les vis noires à l aide d un tournevis cru ciforme puis en retirant les inserts en plastique Soulevez le cache et retirez le de la moto Avant d installer la protection sur la moto coupez la bande de mousse fournie en mor ceaux de 10 mm de large et collez les à l arrière du cadre de protection du refroidisseur de ...

Page 7: ...n an den Schrauben Diese Plastik Unterlegscheiben werden nicht für den Einbau benötigt ALLE KIT TEILE SIND UNTEN ABGEBILDET UND GEKENNZEICHNET DIE ABGEBILDETEN TEILE DIENEN LEDIGLICH ZUR ERKLÄRUNG ÜBERPRÜFEN SIE DASS ALLE TEILE VORHANDEN SIND BEVOR SIE MIT DER MONTAGE BEGINNEN LESEN SIE DIE MONTAGEANLEITUNG KOMPLETT DURCH BEVOR SIE ANFANGEN WENN SIE UNSICHER SIND BEI DER MONTAGE DIESES PRODUKTES B...

Page 8: ...chutz aus Kunststoff wie in Abbildung 1 abgebildet indem Sie die schwarzen Schrauben mit einem Kreuzschlitzschraubenzieher lösen und entfernen und die Kunststoffeinlagen entfernen Die Abdeckung nach oben heben um sie vom Motorrad zu entfernen Bevor Sie den Kühlerschutz anbringen schneiden Sie die mitgelieferten Schaumstoffstreifen in 10 mm breite Streifen und kleben Sie diese auf der Rückseite des...

Reviews: