background image

A

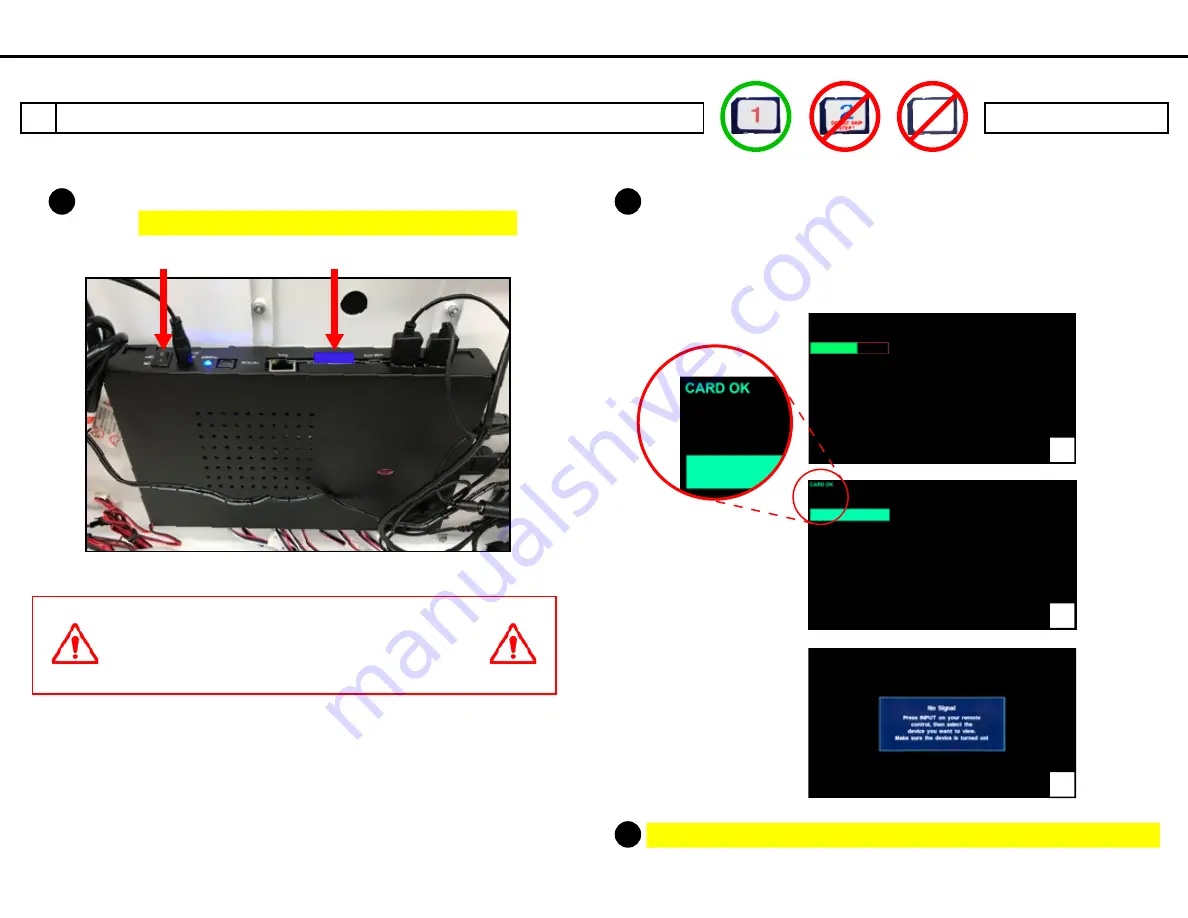
Put 

SD card 1

 in the media player and push it until it 

clicks.  Then switch media player power switch to 

ON

.

B

Monitor screen will be black with a progress bar that will 
progress until 

CARD OK

 is shown (

~5 minutes).

  Speakers 

may make a popping noise during this process.  After 

CARD OK

 is shown, screen will show 

No Signal

, meaning 

the update is complete.

C

Turn media player power switch to

 OFF

 and remove 

SD card 1

.

UPDATING MEDIA PLAYER SOFTWARE --- 

SD CARD 1

DO NOT INTERRUPT POWER 

DURING THE UPDATE OR MEDIA 

PLAYER MAY BECOME UNUSABLE

power switch

SD card

update will
take ~5 mins

CARD OK
screen

No SIgnal
screen = 
update
complete

O

ption C

VPP
-P77329

O

ve

rD

ry

ve

Refr

esh

7.9.17

2

1

2

3

SD Card

Option C

SD Card 1

SD Card 2

2 of 15

Rand McNally OverDryve Display ME-01 - Refresh Option C

19607-1   P77343   7-9-17

Summary of Contents for ME-01

Page 1: ...el applied AND TAPE 1 Option C VPP P77329 OverDryve Refresh 7 9 17 DO NOT DISCARD BUBBLE WRAP DO NOT DISCARD FLAT RETURN SHIPPING CARTON SET ITEMS ASIDE FOR LATER REUSE SD Card Option C envelope envelope SD Card 1 Tape Flat Carton labels already applied SD Card 2 6 5 VPP SD_UPDATE DO NOT DISCARD SD CARD OPTION C BEST BUY RETURNS BEST BUY RETURNS Powered OverDyve 7C pod assembly Dummy OverDyve TND ...

Page 2: ...ot shown leaving it plugged in and powered C Remove back panel by removing screws to expose the media player Blue light on media player confirms it is powered D Switch media player power to OFF Remove existing SD card by pushing it down and then pulling it out Discard this SD card REMOVING DISPLAY FROM GONDOLA TWO PEOPLE REQUIRED media player media player power switch SD card 1 TWO PEOPLE REQUIRED...

Page 3: ...will show No Signal meaning the update is complete C Turn media player power switch to OFF and remove SD card 1 UPDATING MEDIA PLAYER SOFTWARE SD CARD 1 DO NOT INTERRUPT POWER DURING THE UPDATE OR MEDIA PLAYER MAY BECOME UNUSABLE power switch SD card update will take 5 mins CARD OK screen No SIgnal screen update complete Option C VPP P77329 OverDryve Refresh 7 9 17 2 1 2 3 SD Card Option C SD Card...

Page 4: ...USABLE power switch SD card POWER ON LOADING Make yourself at home updating APK please wait Complete please turn off power Power OFF media player within 5 minutes after seeing this screen 3 1 4 5 6 2 3 UPDATING MEDIA PLAYER SOFTWARE SD CARD 2 Option C VPP P77329 OverDryve Refresh 7 9 17 C Turn media player power switch to OFF and remove SD card 2 SD Card Option C SD Card 1 SD Card 2 3 of 15 Rand M...

Page 5: ...nnector highlighted in red Then remove the cigarette lighter adapter from the power connector Leave it until later step 5X screws remove this cable tie leave this cable tie unplug cigarette lighter adapter from power connector remove product securing bracket product securing bracket REMOVING EXISTING OVERDRYVE 7 POD ASSEMBLY 4 Existing OverDryve 7 pod assembly 19607 1 P77343 7 9 17 Rand McNally Ov...

Page 6: ...ove 2 screws to remove OverDryve 7 pod then place it behind adjacent pods as shown below 2X screws place behind adjacent pods route adapter out through hole remove OverDryve 7 pod and set aside for later step remove cigarette lighter adapter 19607 1 P77343 7 9 17 5 of 15 Rand McNally OverDryve Display ME 01 Refresh Option C ...

Page 7: ...n through hole C On back of display plug in OverDryve 7C cigarette lighter adapter into power connector Ensure power connection by red light on cigarette lighter adapter red light when powered plug cigarette lighter adapter into power connector INSTALLING NEW OVERDRYVE 7C POD ASSEMBLY 5 New OverDryve 7C pod assembly 19607 1 P77343 7 9 17 6 of 15 Rand McNally OverDryve Display ME 01 Refresh Option ...

Page 8: ...e sure wire is not being smashed before snug tightening the screw Attach other screw and before final tightening ensure wire is not being smashed by pod make sure wires are not smashed make sure wires are not smashed 19607 1 P77343 7 9 17 Rand McNally OverDryve Display ME 01 Refresh Option C 7 of 15 ...

Page 9: ... behind dash mount pod to disengage pod from the display Lay pod on top surface of display until later step A Dash mount pad is on right side of display shown highlighted in yellow 2X screws lay pod down until later step 19607 1 P77343 7 9 17 8 of 15 Rand McNally OverDryve Display ME 01 Refresh Option C ...

Page 10: ... place it on its back NOTE take care that loose dash mount pod is handled gently when tilting D Remove screws from the bottom panel to expose button wiring Place bottom panel and screws aside for later reuse TWO PEOPLE REQUIRED 1 person shown for clarity 19607 1 P77343 7 9 17 9 of 15 Rand McNally OverDryve Display ME 01 Refresh Option C ...

Page 11: ...h mount pod through bottom of display and set aside unscrew plastic nut remove plastic nut place aside for re use remove button place aside for re use 1 2 3 remove 4 acorn nuts on dash mount pod Removing Buttons Removing Dash Mount remove dash mount discard all other parts place dash mount aside for later steps 4 5 6 front back remove acorn nuts remove dash mount unscrew plastic nut remove plastic...

Page 12: ... PB10 B Re attach bottom cover and tilt display back upright C Attach Dummy OverDryve TND 740 pod with screws ensuring button is centered in hole before tightening TWO PEOPLE REQUIRED 1 person shown for clarity attach with screws ensure button is centered before tightening 1 2 3 slide through opening hang pod on lip connect PB10 to PB10 19607 1 P77343 7 9 17 11 of 15 Rand McNally OverDryve Display...

Page 13: ...or Housing Graphic Option C new Button Graphic Option C new Monitor Housing Graphic Option C F Remove existing magnetic button graphic and discard Attach new Button Graphic Option C button graphic 19607 1 P77343 7 9 17 12 of 15 Rand McNally OverDryve Display ME 01 Refresh Option C ...

Page 14: ...rking correctly call support number on bottom of instruction sheet for troubleshooting UPDATING MEDIA PLAYER CONTENT SD CARD Option C power switch SD card 8 B Monitor screen will change a few times and when completed will start playing the looping video 2 minutes POWER ON screen LOADING screen spinning progress bar looping video 1 2 3 4 SD Card Option C SD Card 1 SD Card 2 TEST EXPERIENCE BEFORE C...

Page 15: ...ED A Assemble flat carton using tape Wrap OverDryve 7 pod and dash mount in bubble wrap place in carton and seal carton with tape Leave carton with shipping manager for carrier pickup PACK AND SHIP RETURN PARTS prepaid return shipping carton provided 7 pack OverDryve 7 pod and dash mount in carton bubble wrap seal carton using tape take carton to shipping dock and leave for carrier pickup BEST BUY...

Page 16: ...COMPLETED DISPLAY REFRESH ensure OverDryve 7C is powered and demo is running 19607 1 P77343 7 9 17 15 of 15 Rand McNally OverDryve Display ME 01 Refresh Option C ...

Reviews: