background image

Remove Cap

1

Insert

2

Replace Cap

3

Attachment

Bracket

Extension

Arm

2

mounting

bracket

gutter

1

WR2-48 Wireless Sensor

8

Sensor Mounting 

Instructions

This section provides detailed ins-
tructions on how to install the sensor.

Sensor Bracket Assembly 

Components

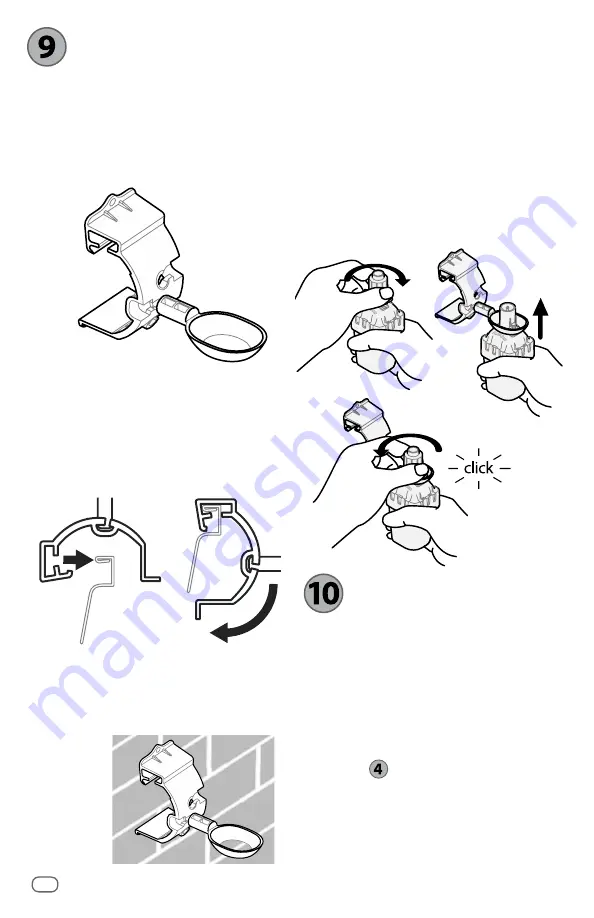
Attaching the bracket to a 
gutter

Slide the top portion of the attachment 
bracket over the lip of the gutter. Rotate the 
bracket downward over the gutter as shown 
in the following installation steps.

Attaching the bracket to a 
flat surface

Use the supplied hardware to mount the 
attachment 
bracket to a 
flat surface 
such as a wall 
or fence.

Installing the Sensor in the 
attachment bracket

To insert the Sensor in the attachment 
bracket you must first remove the Sensor 
cap. Hold the sensor body in one hand; 
gently twist the cap with your other hand. 
Slide the neck of the sensor up through the 
opening of the extension arm. Reinstall the 
cap. A clicking sound indicates that the two 
latches on the sensor body have fully re-
engaged the cap.

Using Multiple 

Controller 

Interface Units

Up to four (4) Controller Interface units can 
be paired to one (1) sensor.

1. 

Ensure all Controller Interface Units are 
powered up.

2. 

Synchronize the Sensor to the first 
Controller Interface in accordance with 
Section 

 .

3. 

As you approach the second Controller 
Interface, remove the battery cassette 
from the Sensor. Push both arrow 
buttons simultaneously on the second 
Controller Interface. Wait 5 seconds. 

Summary of Contents for WR2RFC-48

Page 1: ...WR2 48 Wireless Sensor User Manual Manual del usuario...

Page 2: ...Synchronize the Sensor and Controller Interface 5 Programming the Set Points 6 Rainfall Set Point 6 Temperature Set Point Rain Freeze Sensor only 6 Programming Irrigation Modes 6 Saving Resetting and...

Page 3: ...r purchase of the WR2 Wireless Sensor Now in accordance with California Executive Order B 29 15 prohibiting the application of potable water to outdoor landscapes during and within 48 hours after meas...

Page 4: ...tive irrigation cycle during a rain event l l Enhanced antenna array provides superior signal reliability that overcomes most line of sight obstructions l l Automatically prevents irrigation for 48 ho...

Page 5: ...wer to the irrigation controller b b NOTE Ensure the sensor switch on the irrigation controller panel is in the active position Controllers with no sensor inputs with or without pump start master valv...

Page 6: ...nt Select from six 6 set points ranging from 1 8 3mm to 1 2 13mm A set point closer to the top of the icon allows for more precipitation to occur before irrigation is suspended Rainfall Indicator Illu...

Page 7: ...d irrigation mode after 72 hours Note X and trip indicator will be displayed when returning to programmed irrigation mode if set points are satisfied Synchronize the Sensor and Controller Interface Af...

Page 8: ...eft or right arrow on keypad to navigate to the Rainfall Indicator icon 2 WhentheRainfall Indicatoriconflashes pressthe button onthekeypadtoset programmingdetails Eachpressofthebutton adjuststhesetpoi...

Page 9: ...cancel Select the Sensor Location The communication range for the WR2 Wireless Sensor is 700 feet 213 4 meters l l A blinking light on the bottom of the Sensor indicates signal strength for 20 minute...

Page 10: ...ensor in the attachment bracket To insert the Sensor in the attachment bracket you must first remove the Sensor cap Hold the sensor body in one hand gently twist the cap with your other hand Slide the...

Page 11: ...tery life or signal strength After the WR2 Wireless Sensor is in operation A sensor that does not communicate battery life signal strength to the Controller Interface is no longer paired 1 First check...

Page 12: ...Is Declared Manufacturer s Name Manufacturer s Address Equipment Description Equipment Class Model Numbers 2004 10S EC 1999 5 EC EN55014 1 2006 EN55022 2006 EN55014 2 1997 Al 2001 EN61000 4 2 EN61000...

Reviews: