background image

9

© Copyright 2021. All rights reserved.

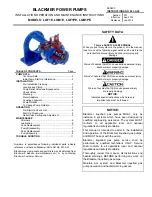
PUMP PRIMING & STARTUP

IL1278

Priming Plug

with Pressure

Gauge

Outlet Pipe

Inlet

Pipe

Air Relief Plug

IL1279

Priming Plug with 

          Pressure Gauge

Air Relief Plug

Fig 2

Fig 1

IL1280

Air Relief 

Hole

Outlet Pipe

Open Union

Air Relief 

Plug

Pipe Tee

Fig 4

Fig 3

IL1288

Priming Plug with 

         Pressure Gauge

Water 

Level

Pipe Tee

Closed

Open

Fig 6

Fig 5

  CAUTION:  

All pumps must be primed by 

filling the pump cavity with water before they 

are first operated. This may take several gallons 

of water, as the entire inlet line will be filled in 

addition to the pump cavity. The longer the inlet 

line, the more water is required for priming.
1.  Disconnect the 1-1/2 in. outlet union and 

separate the pipe.

2.  Remove the air relief plug on top of pump and 

the 1-1/4 in. priming plug with pressure gauge 

or plug. Refer to Pump Preparation Step 5

.

3.  Slowly

 fill pump cavity until water comes out 

of air relief hole on top of the pump.

4.  Replace air relief plug and continue adding 

water to pump cavity until water comes out of 

the open outlet pipe at the open union.

5.  Wait 10 minutes to see if water level drops 

below the pipe tee. If level drops, check foot 

valve. If level stays constant, replace the 

priming plug.

6.  Reconnect 1-1/2 in. union on outlet pipe. 

Open the ball valve (turn handle to line up 

with pipe), and then turn on breaker to start 

pump.

  IMPORTANT: 

 If the pump fails to prime 

within five minutes:

7. 

Turn the power off at the break box. Check 

all pipe connections for leaks, making sure 

all connections are water and air tight. 

Check the inlet pipe for any sagging, making 

sure the inlet pipe is in a straight line to the 

pump. Watch for leaks or a milky color in 

the discharged water, which indicated an air 

leak. Re-prime if necessary, following steps 

1 through 6 above. Reset breaker at the 

breaker box.

  IMPORTANT: 

 If the pump hums instead of 

pumping or turns off repeatedly, shut pump off 

immediately. Check voltage. Pump is wired to 

run on 230 volts. If the pump cuts out or stops, 

you may be attempting to connect to 115 volts. 

See PUMP ELECTRICAL INSTRUCTIONS to 

see how to correctly change the motor voltage to 

115 volts.

Summary of Contents for BPUMP1-5HP

Page 1: ...WARNING ELECTRICAL SHOCK ALERT Follow all local electrical and safety codes as well as the National Electrical Code NEC and the Occupational Safety and Health Act OSHA ELECTRICAL SHOCK ALERT Replace...

Page 2: ...not included 1 Priming Plug with Pressure Gauge Used instead of a priming plug alone Helps determine if the pump is primed indicates if the pump is operating properly and what kind of pressure is in...

Page 3: ...e water as long as the pump is within 25 vertical feet of the water source Horizontal Distance The horizontal distance is the horizontal measurement between the pump inlet and the water source This di...

Page 4: ...op of the pump 2 Glue a 6 in piece of 1 1 2 in pipe into the adaptor 3 Glue a 1 1 2 in tee to the pipe 4 Glue a 1 1 2 in slip x 1 1 4 in adaptor to the top opening of the 1 1 2 in tee 5 Thread in a 1...

Page 5: ...n in the well 14 Glue a 90 elbow when the inlet pipe is in line with the inlet port of the pump For Surface Water Installations For surface water installations follow steps 11 and 12 above and then 15...

Page 6: ...o the female portion of the 1 1 2 in union 5 Glue 1 1 2 in ball valve to the other end of the 6 in piece of pipe 6 Connect the 1 1 2 in outlet pipe to the sprinkler system by gluing in additional sect...

Page 7: ...aces or chemicals ELECTRICAL SHOCK ALERT The pump must be properly grounded using the proper wire cable with ground ELECTRICAL SHOCK ALERT Always disconnect pump from electricity before performing any...

Page 8: ...Connect green ground wire to green grounding screw Re install rear motor cover to pump To change from 230 V to 115 V 6 The motor of pump is dual voltage and can run on either 115 volts or 230 volts In...

Page 9: ...and continue adding water to pump cavity until water comes out of the open outlet pipe at the open union 5 Wait 10 minutes to see if water level drops below the pipe tee If level drops check foot val...

Page 10: ...wise to remove from shaft 4 Use a screwdriver to remove the rotary seal B Pry the ceramic seal and rubber gasket from the recess of the mounting bracket Fig 1 CAUTION Be careful not to damage the moto...

Page 11: ...ak in inlet line 1 Repair or replace inlet line Use thread tape and pipe sealing compound 2 Vertical lift too high 2 Reduce vertical lift install foot valve and prime 3 Insufficient inlet pressure or...

Page 12: ...placement Part Kits 1 1 1 1 1 1 Standard hardware item NOTE Motor assembly not available as a replacement part PRODUCT SPECIFICATIONS Model HP Suction Lift Ft Discharge Pressure PSI Shut Off Pressure...

Reviews: