background image

15.6 Installing 

and 

Removing 

Expansion 

Ports


The procedure for installing expansion ports is as follows. 


1.  Remove the controller from the housing. 


See 15.2 “Removing and Installing Controllers”. 


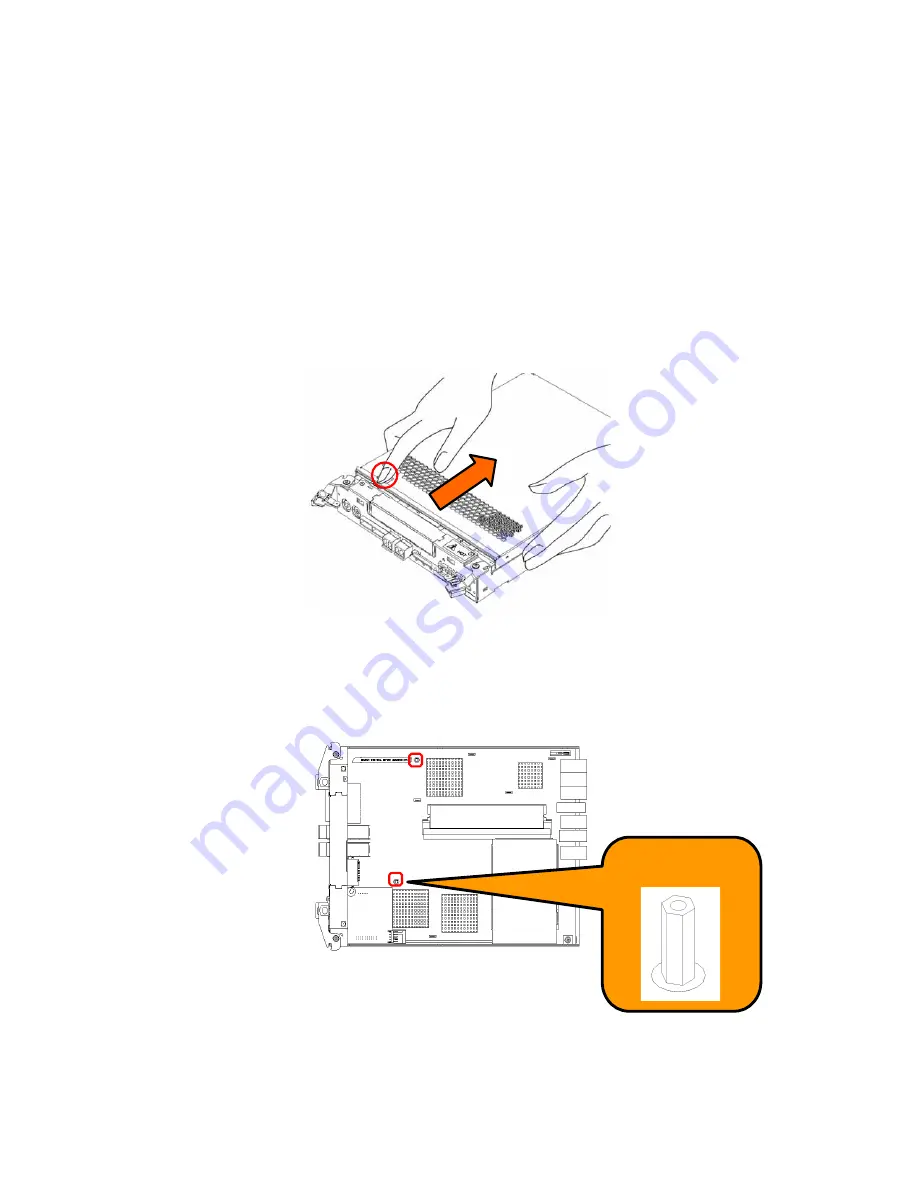
2.  Remove the cover of the controller. 


Remove the cover by sliding it while pressing the lock (indicated in red in figure below). 


3.  The following shows the surface of the controller and the location of the expansion port 

spacer. 


Confirm the location of the expansion port spacer. 


Magnification 

of Spacer 


132 

Summary of Contents for Xanadu

Page 1: ...UTION and WARNING statements whenever necessary RAID CONFIDENTIAL AND PROPRIETARY All rights reserved by RAID Inc This document must be used solely for the purpose for which it was furnished by RAID I...

Page 2: ...uire separate setup by maintenance personnel Chapters 7 through 14 of this manual describe facilities that are restricted to Windows and Linux environments To use them in another operating system envi...

Page 3: ...e is applicable to the program products of the following versions RAID Storage Manager Ver5 1 or later RAID Storage BaseProduct Ver5 1 or later 3 The following terms in this guide refer to the corresp...

Page 4: ...Storage Software Data Replication User s Manual Function Guide Snapshot User s Manual Function Guide RAID Storage Software Snapshot User s Manual Function Guide 5 In this document the capacity is cal...

Page 5: ...es an NF5021 xE60x extended SAS SATA disk enclosure Disk drive Denotes a hard disk drive with an exclusive tray NF5021 xM6xxx SAS drive NF5021 xM8xxx SATA drive SATA is referred to as ATA in the softw...

Page 6: ...ates that there is a risk of injury and or loss of assets Risks and necessary actions to reduce risks are indicated individually by the following symbols Indicates that smoking and or ignition may occ...

Page 7: ...ter or other object that generates heat Doing so could cause failure fire or electric shock Do not handle the disk array unit with wet hands Doing so could cause electric shock Do not set up the disk...

Page 8: ...tage could cause electric shock smoke or fire Insert the plug of the power cord of the disk array unit or extended BBU in an outlet securely Provide sufficient slack in the power cord so that excessiv...

Page 9: ...ling the disk array unit follow the documentation in the Disk Array Unit Installation Guide The Disk Array Unit Installation Guide is included in the accompanying CD Because the disk array unit is pre...

Page 10: ...dating its firmware Be sure that it does not become powered off during a firmware update Do not power off the disk array unit or the host unit or reset the host unit if the ACTIVE FAULT LED green or o...

Page 11: ...01 and 02 of the disk array unit while the power to the unit is off Moreover do not turn off the power if more than one of the drives at locations 00 01 and 02 are removed If you remove drives data m...

Page 12: ...r off sequence Power outages for example Performance may deteriorate while charging the battery of the disk array unit Reason Fast writing in which a cache is used is not done unless the battery is fu...

Page 13: ...objects on it Treat optical fiber cables with care and respect Rough treatment of optical fiber cables could cause deterioration of characteristics or mechanical damage line disconnection How to trea...

Page 14: ...y objects on it Cautions concerning UPS Constructing a system configuration in which a UPS is used allows the system to operate stably even if an accidental power interruption or momentary AC power ou...

Page 15: ...y in your disk array unit to inform the user that a hazardous situation may arise when operating the disk array unit Do not intentionally remove or damage any of the labels If you find any labels tota...

Page 16: ...Power Supply Controller xv...

Page 17: ...Battery xvi...

Page 18: ...Disk Enclosure xvii...

Page 19: ...Extended Battery Backup Unit Extended Battery Backup Unit Power Supply xviii...

Page 20: ...item 3 above 5 This unit is not intended to be installed in installations or equipment associated with human life such as medical equipment atomic installations or equipment aviation and space equipme...

Page 21: ...user oriented information below is also available Since this is necessary information that is important for installation and stable operation be sure to check it Title Content Setup Guide Contains the...

Page 22: ...View 18 3 2 4 Power Supply 19 3 2 5 Adapter 20 3 3 Extended BBU 22 3 3 1 Front View 22 3 3 2 Rear View 22 4 Installation 24 4 1 Mounting Disk Array Unit and Disk Enclosures on Rack 24 4 2 Installatio...

Page 23: ...List Command 65 8 2 1 Prior to Setup 65 8 2 2 Installation 65 8 3 Installation of ControlCommand 67 8 3 1 Prior to Setup 67 8 3 2 Installation 67 9 Collection of Host Information on Business Server 69...

Page 24: ...ng and Removing Expansion Ports 132 15 7 Changing DIP Switches 136 16 Troubleshooting 138 16 1 Troubleshooting According to Device Conditions 138 16 2 LED Checks 143 16 3 Troubleshooting in Initializa...

Page 25: ...l the controller and cache are not made redundant Caches are double written between controllers so that even if one controller fails data is preserved in the cache of another controller Notes In the X...

Page 26: ...This page is intentionally left blank...

Page 27: ...ver Connection of LAN cables Connection of controller to extended BBU Connection of power cables Chapter 6 Turning On Off Unit Power Turning on the unit power Chapter 7 8 Installation of Storage Manag...

Page 28: ...ddresses to assign to the disk array unit as there are connection ports Also prepare the subnet mask and gateway address after confirming them with the network administrator Phillips screwdriver No 1...

Page 29: ...in the business server this task is not necessary Install the host bus adapter in the business server according to the host bus adapter and business server user s manuals c Installing the host bus ad...

Page 30: ...ojections such as power supplies and controllers The carton is designed to transport precision equipment Do not discard the carton because it will be needed when returning the unit to the factory for...

Page 31: ...This page is intentionally left blank 8...

Page 32: ...Front View viewed when front panel is removed 2 SERVICE LED 1 POWER LED 3 Disk drive Dummy tray 4 ACTIVE FAULT LED 1 POWER LED green The POWER LED illuminates to indicate normal operation 2 SERVICE L...

Page 33: ...ance battery backup failure write data may have been lost Blinking OFF Power off sequence in progress OFF OFF Powered off 3 Disk drive Dummy tray A single disk array unit can be equipped with 12 disk...

Page 34: ...y Blinking HDD low power state Orange Lighting Abnormal status 3 1 3 Rear View 1 Power supply PS1 1 Power supply PS0 2 Controller CONT1 2 Controller CONT0 1 Power supplies PS0 PS1 A single disk array...

Page 35: ...ing indicates a temperature abnormality inside the power supply or that a controller has not been installed in the housing This LED is effective when AC power is being supplied to either PS0 or PS1 4...

Page 36: ...or The LAN connector is used to connect the controller to Storage Manager or a LAN for SNMP There is a LINK LED left and an ACTIVE LED right on the connector LINK LED LNK green The LINK LED indicates...

Page 37: ...host connection port is for connecting the disk array unit to a host Without an expansion port there are two ports per controller With an expansion port there are four ports per controller There is a...

Page 38: ...U connector is for connecting the disk array unit to an extended BBU 10 Modem connector The modem connector is for connecting the disk array unit to a modem for optional remote maintenance 11 Ejector...

Page 39: ...when front panel is removed 2 SERVICE LED 1 POWER LED 4 ACTIVE FAULT LED 3 Disk drive Dummy tray 1 POWER LED green The POWER LED illuminates to indicate normal operation 2 SERVICE LED orange The SERVI...

Page 40: ...x4 x5 x6 x7 x8 x9 xA xB The symbol x in the table indicates the disk enclosure number x 1 to F hexadecimal 4 ACTIVE FAULT LED green orange A single ACTIVE FAULT LED is installed for each disk drive d...

Page 41: ...ply PS0 2 Adapter ADP1 2 Adapter ADP0 1 Power supplies PS0 PS1 A single disk enclosure is equipped with two power supplies Supply AC power to both of the power supplies 2 Adapters ADP0 ADP1 A single d...

Page 42: ...o indicate that AC power is being supplied to the unit 3 POWER FAULT LED orange The POWER FAULT LED illuminates to indicate that the power supply excluding the fan is faulted 4 FAN FAULT LED orange Th...

Page 43: ...er 3 SAS connector The SAS connector is for connecting the adapter to a disk array device or disk enclosure There are two ports per adapter There is a FAULT LED left and a LINK LED right below each co...

Page 44: ...4 PS FAULT CLEAR The switch can be used to clear the fault status of the corresponding power supply 5 Ejectors The ejectors are used to install or remove the adapter 21...

Page 45: ...g fan 1 Receptacle Connect the power cable that comes with the disk array unit to the receptacle to supply AC power 2 AC switch The AC switch is the switch for turning AC power to the extended BBU on...

Page 46: ...6 is not connected normally to the body of the DAC unit Blinking The BBU FAULT LED blinks when the battery exchange period is up Please exchange the BBU within the prescribed interval 6 BBU OUT connec...

Page 47: ...perform the tasks of mounting the units on a rack Mount disk enclosures disk array unit and extended BBU in that order from the top If adding an extended BBU reserve space to mount the extended BBU 1...

Page 48: ...ear support Rear Inner rail tabs 1U delimiting mark 3 Mate the bottom of the rail to a 1U delimiting mark on the front support of the rack and insert the two rail projections Racks may be square holed...

Page 49: ...pport Round holed rack 5 Affix the inner rail by inserting M5 screws in the cable clamps in two center screw holes in the rear support of the rack Make the cable clamp installation direction as shown...

Page 50: ...ld perform the tasks of mounting a unit in a rack Because the units are heavy watch out for pinched fingers or other injuries Do not drop a unit 8 From the front of the rack affix the unit Affix the u...

Page 51: ...details 4 Repeat steps 2 and 3 for each additional disk drive A disk drive is an electronic component When handling one take measures against static electricity such as using a wrist strap If you do...

Page 52: ...rtion in the direction of the arrow and the open the lever 40 degrees while it is pushed 2 Insert the drive in the unit With the lever opened 40 degrees insert the disk drive perpendicular to the fron...

Page 53: ...4 Close the lever Close the lever all the way 5 The installation task is complete Close the lever Complete 30...

Page 54: ...Push the circled portion in the direction of the arrow and open the lever 40 degrees while it is pushed 2 Hold the lever and move the disk drive about 10 cm 3 With both hands hold the sides and under...

Page 55: ...ray unit When AC operating mode is disabled the facility to control power using ESMPRO cannot be used since power to the control circuits on the controller is not on To use the facility for power cont...

Page 56: ...unlocked state Shows key in locked state Front panel installation procedure 1 To install the mask first unlock it by turning the key to the horizontal position 2 Mate the mask to the top and bottom l...

Page 57: ...el removal procedure 1 Release the lock by turning the key clockwise 2 Pull the right side toward you by pivoting the left end detach the left side and pull the entire mask toward you Procedure 1 Proc...

Page 58: ...100VAC 3 m 2 5 BBU CONT connection cable 2 6 Warranty 1 7 List of Included Items 1 Rear rail common to left and right Front mask Extended battery backup unit Cage nut 6 Mounting screw 6 Enclosure Rear...

Page 59: ...atching the sheet metal in it The figure to the right shows the positions in which to install cage nuts in the support in the rear left side of the rack Install cage nuts on the left and right sides b...

Page 60: ...l in the gutters along the side of the enclosure and slide it forward Gutter Rear rail d Affix the rear rail to the rack using two mounting screws Also affix a rear rail on the right side of the enclo...

Page 61: ...install the front mask mate the springs on back of the front mask to the edges of the enclosure cutouts and push in To remove the front mask press the top and bottom or left and right sides of the fro...

Page 62: ...pecified by RAID To connect the disk array unit and disk enclosures always use the DE cables that come with the disk enclosures 2 Maximum length of FC cable Host Interface Maximum Cable Length 1 Gbps...

Page 63: ...plemented in the DAC The figure below shows how to connect disk enclosures and the DE numbers and PD numbers Model XANADU BETA VERSION DE 0F PD F0 to FB DE 07 PD 70 to 7B DE 0E PD E0 to EB DE 06 PD 60...

Page 64: ...DE in the order 1 DE 08 2 DE 01 3 DE 09 The order of DE configuration is shown below DE 0D PD D0 to DB 11 10 DE 05 PD 50 to 5B DE 0C PD C0 to CB 9 8 DE 04 PD 40 to 4B DE 0B PD B0 to BB 7 6 DE 03 PD 30...

Page 65: ...sample recommended connection a path redundant configuration in combination with PathManager The sample recommendation requires two host bus adapters to be installed in the host Two LC LC cables are...

Page 66: ...ble into a host connection port HPx of a disk array unit controller CONT0 or CONT1 until a click is heard The connectors at both ends of the FC cable are the same Connect the other connector of the FC...

Page 67: ...ed for the disk array unit through LAN by using the management software Storage Manager Storage Manager is required for using RAID Storage Connect separately purchased shielded LAN cables to the LAN p...

Page 68: ...nager use individually to make them redundant and use them via Ether HUB LAN port for iSM LAN connector LAN port for iSM LAN connector CONT1 CONT0 Figure 5 5 2 Rear View of Controller Board LAN port f...

Page 69: ...e unit 1 Mount the extended BBU directly below the disk array unit Disk array unit Extended BBU1 Extended BBU0 BBU input connector Controller CHARGE BBU BBU Cable BBU output connecter Extended BBU 2 C...

Page 70: ...re power cables as in Connection procedure Be sure to connect power supply PS0 and power supply PS1 Check power connections of all installed disk enclosures 3 Turn off the AC switches of extended BBU...

Page 71: ...the power of the disk array unit Wait until the RDY LEDs start blinking at 1 second intervals before turning on the power of the business server Power on procedure 1 Push each disk array securely to...

Page 72: ...he AC cable clamp connect the power cable and loosely lock the clamp 2 Move the clamp in the direction of the arrows and fix the clamp securely at a point close to the base of the plug AC cable Put on...

Page 73: ...of the disk array unit and disk enclosures The following procedure turns on the power of the disk array unit 6 1 Power on Procedure Since the AC operating mode is functioning in the shipped state pow...

Page 74: ...the DC power in the unit 3 The power of the disk array unit and of disk enclosures is turned off within ten minutes All LEDs other than those on the power supplies go off and the fans stop rotating 4...

Page 75: ...er controller You need not press both 2 Wait until the RDY LED blinks at 1 second intervals This takes about two minutes The disk array unit performs self test and initialization If the disk array uni...

Page 76: ...8 hours from the battery being discharged until it is fully charged When it is not fully charged fast writing that uses the cache Cache Fast Write is not done which lowers performance Since the cache...

Page 77: ...nd copies it to cache memory The startup time of the disk array unit in this case is delayed approximately 10 minutes per TB of update differences Notes on using DynamicDataReplication RemoteDataRepli...

Page 78: ...age system volume The storage system volume is configured on disk drives If storage system information in cache memory is volatilized due to power off in which the disk array unit battery backup time...

Page 79: ...power control means For details check with your sales agent UPS No UPS coordination Unspecified This is for countering momentary power interruption Since there is no UPS coordination the cache cannot...

Page 80: ...BBU 4 Disk enclosure 5 Management server ESMPRO only There is no designated AC power off sequence for multiple disk enclosures 1 Business server UPS With SNMP card ESMPRO AC 2 FC switch UPS With SNMP...

Page 81: ...rver by following the instructions in the screens Refer to the Storage Manager Installation Guide for details You will find the manual on the Storage Manager CD The procedure for using Storage Manager...

Page 82: ...ments in which the host information collection command iSMcc_hostinfo and iSM Host Agent Service can be used 7 2 2 Installation Install the volume list command by following the procedure below Refer t...

Page 83: ...trolCommand on Windows CD By installing ControlCommand the functions below become available ReplicationControl ReplicationControl DisasterRecovery Cannot be used on D1 series or D3 series units SnapCo...

Page 84: ...ng a limit on used capacity and making it impossible to use more than the set limit 2 This is a facility for making it impossible to save a file of a specific file name extension After installing Cont...

Page 85: ...age Manager Installation Guide for details You will find the manual on the Storage Manager CD 1 Login as root 2 Insert the Storage Manager CD on the management server For servers on which the CD canno...

Page 86: ...izard to perform initialization disk array IP settings are not needed b Set the user to specify when connecting from the Storage Manager client When using the initialization wizard to perform initiali...

Page 87: ...is stored If there is not sufficient free capacity change the directory for storing the operation log default value opt iSMsvr etc log Specify the p option to encrypt the user password value specifie...

Page 88: ...nd by following the procedure below Refer to the Storage Manager Installation Guide for details You will find the manual on the Storage Manager CD 1 Login with root authority or switch to root authori...

Page 89: ...ng the rpm command rpm ivh cdrom VOLLIST LINUX iSMVOL iSMvol rpm 6 Installation is complete when the message below is output Installation completed 7 Unmount the CD Unmount using the umount command um...

Page 90: ...ure below Refer to the ControlCommand on Linux Installation Guide for details You will find the manual on ControlCommand on Linux CD By installing ControlCommand the functions below become available R...

Page 91: ...of the following software is installed iSMrpl ReplicationControl iSMrcd ReplicationControl DisasterRecovery iSMsc SnapControl iSMvol Storage Manager volume list command iSMccs ControlCommandSet or Co...

Page 92: ...you are setting up a disk array in a system that has already been in operation or if a business server contains a Linux OS collect host information using the methods shown in 9 1 and 9 2 1 Configurat...

Page 93: ...sed to output a file The logical disk can be created and assigned to the business server by reading the output file using the Storage Manager initialization wizard refer to 10 Logical disk binding in...

Page 94: ...ation collection command iSMcc_hostinfo command confirm that message iSM11770 is output and that host information collection succeeded The processor number is output in aaaa in the message and an inte...

Page 95: ...he host information collection command iSMcc_hostinfo command confirm that message iSM11770 is output and that host information collection succeeded The processor number is output in aaaa in the messa...

Page 96: ...ust the former and the term Storage Manager client Win GUI is used to indicate just the latter The Storage Manager client runs only in a Windows environment For details refer to the Storage Manager In...

Page 97: ...ll the Storage Manager client by following the procedure below For details refer to the Storage Manager Installation Guide Refer to the Storage Manager CD for the above manual Perform the following se...

Page 98: ...ick the Add button Uncheck Require server verification https for all sites in this zone Figure 10 2 2 Trusted Site Setting Screen 4 Click the OK button to close the screen 2 Set the security level of...

Page 99: ...ure 10 2 3 Internet Options Screen 3 Under ActiveX controls and plug ins set Run ActiveX controls and plug ins to Enable Figure 10 2 4 Security Setting Screen 4 Click the OK button to close the screen...

Page 100: ...cking of Internet Explorer or program name of Web browser used in firewall setup beforehand 4 If use via a proxy server has been specified in setup of the Web browser being used connection may fail In...

Page 101: ...is not created in the start menu or on the desktop For an overwritten installation or if the Storage Manager client Win GUI was installed previously on the same PC a shortcut to start the Storage Man...

Page 102: ...o the Storage Manager server succeeded a login screen is displayed Figure 10 3 1 Login Screen 1 User Name Input a user name registered at setup on the Storage Manager server To perform initial setup t...

Page 103: ...wn in Figure 10 3 2 and makes it possible to change the settings for operations following login Refer to the User s Manual for details Figure 10 3 2 Login Screen Detail When you click the OK button th...

Page 104: ...to Start Selecting File Initialization Wizard from the menu bar starts the initialization wizard Figure 11 1 1 Starting the Initialization Wizard After the initialization wizard starts make settings b...

Page 105: ...connections Refer to 3 Disk array connection confirmation for details Select the setting method Refer to 4 Setting method specification for details Specify the host information collection method Refe...

Page 106: ...en The start screen of the initialization wizard is displayed Figure 11 1 2 Initialization Wizard Start Screen Check its contents and proceed to the next screen Clicking Cancel closes the initializati...

Page 107: ...for another disk array Only disk arrays that are connected to the same network as the management server can be retrieved To retrieve disk arrays use the User Datagram Protocol UDP and use port number...

Page 108: ...ds after displaying the dialog shown in Figure 11 1 4 Figure 11 1 4 Message Box If there is a communication error in the network environment the initialization wizard terminates after displaying the d...

Page 109: ...figuration for each series Confirm that the respective connection lines are correct Check its contents and proceed to the next screen Clicking Cancel closes the initialization wizard Clicking Back ret...

Page 110: ...n created if another disk array was initialized previously Refer to 12 Setup completion regarding saving the initialize wizard file Pay heed to the following points when using an initialize wizard fil...

Page 111: ...cking the Next button displays the settings confirmation screen 11 Settings Confirmation Clicking the Cancel button terminates the initialization wizard To initialize the same disk array run the initi...

Page 112: ...mpletely new installation and the host business server is a Windows platform as indicated in Chapter 9 1 Does not perform automatic collection of host information For system configurations that do not...

Page 113: ...cognize volume remains ON enabled Temporarily set it to OFF disabled through Setting Host Recognize Volume mode in Individual Setting Depending on the host recognition volume this may affect tasks on...

Page 114: ...isk array from the Storage Manager server by specifying an IP address that is set For the IP address of a controller specify a valid value other than 10 1 0 0 through 10 1 0 255 or 0 0 0 0 To not spec...

Page 115: ...ddress has not been set correctly monitoring by Storage Manager is not possible If error message 05068 is displayed refer to 16 3 1 Changing Network Settings for Monitoring Disk Arrays from Storage Ma...

Page 116: ...in the list To change settings select the port to edit from the list and click the Edit button Make changes to each port in the edit screen shown in Figure 11 1 13 If you click the Cancel button setu...

Page 117: ...the Switch IDs to the same value makes the IDs AL_PA of the ports the same value For details refer to Appendix A Following specification click the OK button This completes specification of the select...

Page 118: ...lick the Execute button to set the specified values to the disk array If settings was may by mistake such as setting a data rate that differs from that of the host bus adapter it will not be possible...

Page 119: ...rom the list and click the Clear button Be sure to input the program product license of the BaseProduct If the cursor becomes invisible in the middle of being moved by the Tab key move it using the Ct...

Page 120: ...ws When binding a spare a special processing disk is needed RAID1 Basic Configured on 2 physical disks RAID6 4 PQ Dynamic Configured on 6 physical disks RAID6 8 PQ Dynamic Configured on 10 physical di...

Page 121: ...GUI for details about individual setting Following specification click the Next button If you click the Cancel button setup through host connection port setup is performed for the unit and the initial...

Page 122: ...ypes PD physical disk types displayed in a pull down LD Capacity Specify the capacity of the logical disk to bind The capacity that is displayed by default shows the maximum capacity of a logical disk...

Page 123: ...nfiguration Setting Tool User s Manual GUI for details Refresh button If the name of the host to assign to the logical disk is not displayed in the Selection host1 Selection host2 specification click...

Page 124: ...ecify an arbitrary name for the logical disk check the checkbox and change the name A four digit logical disk number is added to the specified name Quick Format By performing only the minimum necessar...

Page 125: ...tion Setting Tool User s Manual GUI for details about individual setting Specifying the host binds a 0 2 GB control volume besides the logical disk to bind to the LD Set Two control volumes are bound...

Page 126: ...layed Figure 11 1 19 Settings Confirmation Screen for individual setting Check the settings of each parameter For settings for each parameter refer to c Settings for each parameter After confirming th...

Page 127: ...ch setting with initialize wizard file Check the settings of each parameter For settings for each parameter refer to c Settings for each parameter After confirming the settings click the Next button T...

Page 128: ...to set is displayed Subnet Mask The subnet mask to set is displayed Gateway Address The gateway address to set is displayed Example IP address setting Controller0 IP Address 192 168 2 176 Subnet Mask...

Page 129: ...is displayed AccessControl ON is displayed if the AccessControl license was unlocked Example License Unlock Product BaseProduct License key ABCDEF GHIJKL MNOPQR STUVWX YZABCD AccessControl ON Pool Bi...

Page 130: ...xample Spare Binding Physical Disk 00h 0dh LD Binding The specifications for logical disk binding are displayed Start Number Only when the initialize wizard file is used The starting logical disk numb...

Page 131: ...e LD Set is displayed LD Set Name The name of the LD Set is displayed Host Name The host name is displayed Path Info WWPN information set for the LD Set is displayed Assigned logical disks Only when t...

Page 132: ...ned to Host LUN Number OS type LD Name Capacity RAID Type PD Type 0000h 001Dh WN WG001D 0 2GB RAID1 Basic FC 0001h 001Eh WN WG001E 2 0GB RAID1 Basic FC Access Control Setting Host2 Platform WN LD Set...

Page 133: ...used as the file used for batch setting in 4 Setting method selection when initializing another disk array For the contents of the file refer to Appendix B Initialize Wizard File To use the saved init...

Page 134: ...ng information and connections If initialization through 6 Network setup terminated normally perform subsequent initialization from individual settings Refer to 11 2 Setup Modification for details If...

Page 135: ...volume setting 2 Network setting Network setting 3 Host connection port setting Host connection port setting 4 License unlocking Batch license unlocking License unlocking and display 5 Logical disk b...

Page 136: ...being connected must be a newly installed Windows platform If an operating host were to be connected tasks of the operating host could be affected by the host recognize volume that is created on auto...

Page 137: ...ter selecting the target disk array from the main window screen of the Storage Manager client start Easy Configuration by selecting File Configuration Setting Easy Configuration from the menu bar or b...

Page 138: ...asy Configuration Menu Screen Various easy configurations can be performed from the menu screen Figure 12 2 1 Easy Configuration Menu Screen For each configuration refer to 12 3 and subsequent section...

Page 139: ...indicates that license unlocking was carried out and for a failure it shows that license unlocking could not be done Enter button The input license key is checked and if it is a valid license key it...

Page 140: ...disk types that can be selected are displayed in a pull down LD Capacity Specify the capacity of the logical disk to bind Number of LDs Specify the number of logical disks to bind Selection host1 Sele...

Page 141: ...me is not displayed after execution select Update with info file Update with info file Use this to perform host specification using the host information file The host information file is the file that...

Page 142: ...this to automatically bind a spare physical disk that has the same PD type as that selected in RAID Type PDP Type capacity This does not bind a spare disk if there is no physical disk of the same PD...

Page 143: ...many as the number of logical disks assigned to the server times the number of access paths from the server to each logical disk are displayed and the respective disk drives RAID Storage 1000 SCSI Di...

Page 144: ...Open Disk Management and check the number of logical disks as many as the number of logical disks assigned to the server are displayed Check the total number of disks Figure 13 1 2 Disk Management 12...

Page 145: ...d from the command prompt spscmd getlun Look at the messages displayed on command execution Figure 13 1 3 Sample spscmd getlun Output and confirm the number of logical disks assigned to the server the...

Page 146: ...Attached devices Host scsi1 Channel 00 Id 00 Lun 00 Vendor xxxxxxx Model xxxxxxx Rev xxxx Type Direct Access ANSI SCSI revision 03 Host scsi1 Channel 00 Id 00 Lun 00 Vendor xxxxxxx Model xxxxxxx Rev...

Page 147: ...ogical disks that are subject to PathManager control may be displayed after the logical disks recognized by the OS via host bus adapters host adapter 1 and host bus adapter 2 sections of the above sam...

Page 148: ...sps sps xxx yyyy rpm qi sps xxx yyyy Kernel version A Name sps X XXX Relocations not relocateable Version 2 X X Vendor RAID Inc Release 2 X XX XX Build Date 200y MM DD hh mm ss Install date 200y MM D...

Page 149: ...he server are not being recognized on any access path Check connections between the server and RAID Storage AccessControl settings and the host bus adapter driver setup Sample display When two logical...

Page 150: ...isks are assigned to the server and there are two access paths for each logical disk cat proc scsi sps dda device dev dda disk info RAID RAID Storage 1000 xxxxxxxxxxxxxxxx xxxxx device info Host scsi...

Page 151: ...o command as a user with administrator privileges in a Windows environment or as a super user in a Linux environment Moreover when performing host information storage the target disk array that is the...

Page 152: ...y when working Wearing a wrist strap arm band antistatic glove or other Wrap a wrist grounding strap around your wrist If you do not have one touching an uncoated metal surface of the cabinet before t...

Page 153: ...ocked at bottom The controller comes out by freeing it on the left and right Ejector 4 Holding the ejectors in both hands pull horizontally approximately 10 cm 5 Hold the controller firmly in both han...

Page 154: ...stalling and Removing Front Panel Chapter 5 Cable Connections 5 1 Notes on Cable Connections 5 2 Connection of SAS Cables 5 3 SAS Cable Connections and DE and PD Numbers 5 7 Connecting Power Cables Wh...

Page 155: ...See 15 2 Removing and Installing Controllers 2 Remove the cover of the controller Remove the cover by sliding it while pressing the lock indicated in red in figure below 3 The following shows the surf...

Page 156: ...rt 5 Remove the guard panel on the front view of the controller blue rectangle in figure above Next insert the expansion port by matching the connector locations Insert by matching the expansion port...

Page 157: ...e cover to the grove in the controller Put it on so that the location of the side lock of the cover figure below meets it 8 Close the cover by sliding it as shown in the figure below 9 Install the con...

Page 158: ...n of the unit after expansion port installation Power on and confirm normal startup Confirm that the LEDs LINK and ACCESS in the places in the figure below are blinking The expansion port installation...

Page 159: ...k or other fine tipped tool available 1 Remove the controller from the housing See 15 2 Removing and Installing Controllers 2 Remove the cover of the controller Remove the cover by sliding it while pr...

Page 160: ...thpick 5 Install the cover of the controller Match the end of the cover to the grove in the controller Put it on so that the location of the side lock of the cover figure below meets it 6 Close the co...

Page 161: ...controller LED status 3 Trouble in disk array unit or disk enclosure rear panel power LED status 4 Trouble in disk enclosure 5 Trouble in extended BBU 1 Trouble in disk array unit front panel LED sta...

Page 162: ...beyond the estimated time ask the maintenance personnel to investigate This indicates that the power on sequence or download sequence of the disk array unit is in progress It takes several minutes fr...

Page 163: ...nstalled in the disk array unit A battery purchase and maintenance request must be made Contact your sales or maintenance service agent There is a charge for battery exchange due to life span When con...

Page 164: ...isk enclosure or disk array unit It takes several minutes until POWER LED of the disk enclosure turns on after turning on the unit power If POWER LED does not illuminate in 10 minutes check the follow...

Page 165: ...f the extended BBU connected to the disk array unit An extended BBU purchase and maintenance request must be made Contact your sales or maintenance service agent There is a charge for battery exchange...

Page 166: ...LED orange ON OFF 3 FAN FAULT LED orange ON OFF PS1 1 POWER GOOD LED green ON OFF 2 POWER FAULT LED orange ON OFF 3 FAN FAULT LED orange ON OFF CONT0 4 HPE GOOD LED orange ON OFF 5 Battery FAULT orang...

Page 167: ...reen Only orange ON Location Location Location Disk enclosure rear face PS0 1 POWER GOOD LED green ON OFF 2 POWER FAULT LED orange ON OFF 3 FAN FAULT LED orange ON OFF PS1 1 POWER GOOD LED green ON OF...

Page 168: ...nance task such as during recovery Power on ON Blinking Power on sequence in progress ON ON for 5 sec and OFF for 7 sec Requesting maintenance battery backup failure write data may have been lost Powe...

Page 169: ...LED Description Operating ON OFF Normal operation ON ON Requesting maintenance or processing a maintenance task such as during recovery Power off OFF OFF Powered off 3 ACTIVE FAULT LED green orange f...

Page 170: ...o its life Normal 6 BACKUP LED orange Blinking Battery backup state Normal 7 FAULT LED orange 8 READY LED green READY LED FAULT LED State OFF OFF Powered off OFF ON Occurrence of fault ON OFF Power on...

Page 171: ...een ON Link up OFF Link down FAULT LED FLT orange ON Error detection OFF Normal Location and port numbers DP1 DP0 5 FAULT LED orange 6 READY LED green READY LED FAULT LED Status OFF OFF No connection...

Page 172: ...agent Execute initialization again If the disk array cannot be found make initial settings individually by referring to 16 3 1 Changing Network Settings for Monitoring Disk Arrays from Storage Manage...

Page 173: ...rage Manager client Web GUI initialization wizard select Update with info from Storage Manager server click OK and perform host specification again 3 If host information is not displayed in the logica...

Page 174: ...sisting of 10 physical disks In the case of LD Bind Easy Configuration confirm that there is a physical disk with the same capacity which has not been used to configure RAID in the Storage Manager cli...

Page 175: ...nitored from Storage Manager in spite of wrong network settings the disk array unit network settings can be changed from Storage Manager Make changes using Disk Array Setting Network from the menu Fil...

Page 176: ...ver NIC is in the same subnet as the IP address of each controller 4 5 Referring to the installation guide perform environment setup so that disk array monitoring is performed through a LAN connection...

Page 177: ...nager server it is necessary to temporarily change the management server IP address subnet mask and gateway address to configure the disk array so that it can be monitored 5 Change the IP address to t...

Page 178: ...and CONT1 On a disk array unit for which initialization already was completed since there is a risk of previously set contents being changed by mistake when continuing setup in the initialization wiza...

Page 179: ...fee may be charged even if within the warranty period Stained goods dropped goods goods damaged by mishandling Goods damaged by mishandling in storage or shipping Items touched by the user Items whos...

Page 180: ...on a failure or abnormality of the disk array unit have the following items ready The warranty and this manual Conditions of the fault or abnormality notes on content of questions Notes on the config...

Page 181: ...llers of a disk array unit that are recognized by servers to the same value is described below for each connection configuration Directly connecting disk array unit to server HBA Set the Loop Switch I...

Page 182: ...to the same value the units will not start normally For Loop Topology FC Switches binding with one FC Switch is not possible since different Loop Switch IDs must be set within a FC Switch Server A SPS...

Page 183: ...rage disk array 1 Switch No Port No Connection device Switch ID Target ID Switch0 Port0 RAID Storage 0 Cont0 10h 0 Switch0 Port1 RAID Storage 1 Cont0 12h 1 Recognizes Targets connected to Fabric Switc...

Page 184: ...hat can be accessed from the server For example if LDN00 to 03 are in the disk array unit Access Control makes it possible to set them so that LDN00 LUN00 LDN01 LUN01 LDN02 LUN02 are recognized by Ser...

Page 185: ...Storage 2 Switch Port No Connection Device Loop ID Zone 0 Port 0 Fault tolerant server Port 1 RAID Storage 1 Cont0 0 10h Port 2 RAID Storage 2 Cont0 0 11h Zone 1 Port 8 Fault tolerant server Port 9 R...

Page 186: ...defined file is explained a The file is an ASCII character format text file txt b From a sharp to the end of a line is treated as a comment c A section must be enclosed in and start from the beginnin...

Page 187: ...setup file 2 Section Network This describes the network IP address etc to set in the disk array Explanation of syntax Section SVPConf Key SVPNO Subkeys IP GateWay Mask Syntax SVPNO xx xx IP aaa bbb c...

Page 188: ...12345 4 Section Disk array This is key information for displaying the disk array type being set The section name begins with DiskArray and is not used in initialization 5 Section Host connection port...

Page 189: ...s displayed as LDSET_ASS 9 Section Pool This describes the binding of a pool The section name is displayed as Pool 10 Section Spare This describes the binding of a spare disk The section name is displ...

Reviews: