background image

Radial Engineering Ltd.

Shotgun™  User Guide

4

MAKING CONNECTIONS

Before making connections ensure your amplifiers 

are either turned off or volume turned down. This will 

avoid unpleasant plug-in transients that could shorten 

the lifespan of more sensitive components. Set all of 

the ground lift and 180º polarity reverse switches to 

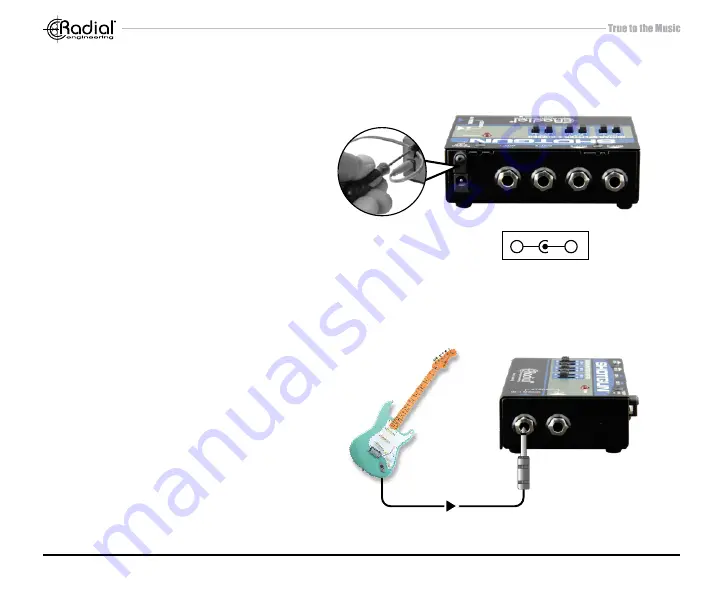
the down position. Plug in your 9V power supply (not 

included). This should be a standard ‘Boss’ type guitar 

pedal adaptor or 9V supply from a multi-pedal power 

brick with a center negative connection. There is no 

power switch on the Shotgun. Once the power supply 

is connected, it will turn on and the top panel LED will 

illuminate to let you know power is on.  

A handy cable lock is also available that will help 

prevent accidentally disconnecting the power. To 

use, unscrew the lock using a hex key, pass the 

wire through the clamp hole and retighten. 

Connecting to and from the Shotgun is done using 

standard  ¼"  hi-Z  coaxial  guitar  cables.  Better 

quality, low-capacitance cables with 90% to 100% 

shield will improve signal-to-noise. Keeping cables 

as short as possible on the input side will further 

reduce susceptibility to noise. Once the signal has 

passed  through  the  Shotgun,  longer  cables  may 

be used as the Shotgun will buffer the signal and 

lower the impedance to enable cable distances up 

to 15 meters (50') without appreciable noise. The 

Shotgun is a unity gain device. Whatever signal you 

put in, it will put out - producing the same relative 

output volume. 

+

-

The Shotgun requires a 9 volt power 

supply with a negative center.

Summary of Contents for SHOTGUN

Page 1: ...Radial Engineering Ltd 1165 1845 Kingsway Ave Port Coquitlam BC V3C 1S9 Tel 604 942 1001 Fax 604 942 1010 Email info radialeng com GUITAR SPLITTER AND BUFFER User Guide...

Page 2: ......

Page 3: ...s super easy to use we ask that you please take a couple of minutes to go through this short manual This will not only help you maximize your tone it will ensure you get the most out of the Shotgun wi...

Page 4: ...four outputs 5 IN 2 STEREO When used changes the circuit from 1x4 mono to 2x2 stereo to allow stereo sources such as a chorus to drive 1 or 2 sets of amps 6 POWER LED Lets you know the Shotgun power s...

Page 5: ...o or a 2x2 stereo distro depending on how it is connected Further three of the Shotgun outputs are transformer isolated in order to prevent the hum and buzz that is commonly associated with ground loo...

Page 6: ...w power is on A handy cable lock is also available that will help prevent accidentally disconnecting the power To use unscrew the lock using a hex key pass the wire through the clamp hole and retighte...

Page 7: ...l Warranty Should you for any reason feel uncomfortable with the above statement you should return the Shotgun before use to the dealer in the original packaging for full credit within 7 days of purch...

Page 8: ...point them at each other face to face or speaker to speaker When you play if the sound is thin or distant you are likely out of phase Simply push the 180 polarity reverse switch in the upward position...

Page 9: ...are not equipped with isolation transformers or ground lift switching to prevent noise Simply connect the left and right outputs from your chorus to the Shotgun s 1 and 2 inputs Once connected to inp...

Page 10: ...ide 8 PUSHING THE SHOTGUN TO THE EXTREME Effects B Tuner Effects A Experiment with using multiple outputs with your setup Create unique tones by having two effect chains in parallel then merge them to...

Page 11: ...h Impedance Load Input impedance 400K 200K Stereo Mono Maximum input 8dBu Gain 0dB 0 2dB Out 1 Out 2 3 4 High Impedance Load Clip Level Output 7 5dBu Output impedance 100 1 8k Out 1 Out 2 3 4 Noise fl...

Page 12: ...all not apply if the product has been damaged due to abuse misuse misapplication accident or as a result of service or modification by any other than an authorized Radial repair center THERE ARE NO EX...

Reviews: