background image


10


·    

D

RIVER


Each  recorded  video  is  associated  with  a  driver,  a 
car, a track and an event. 

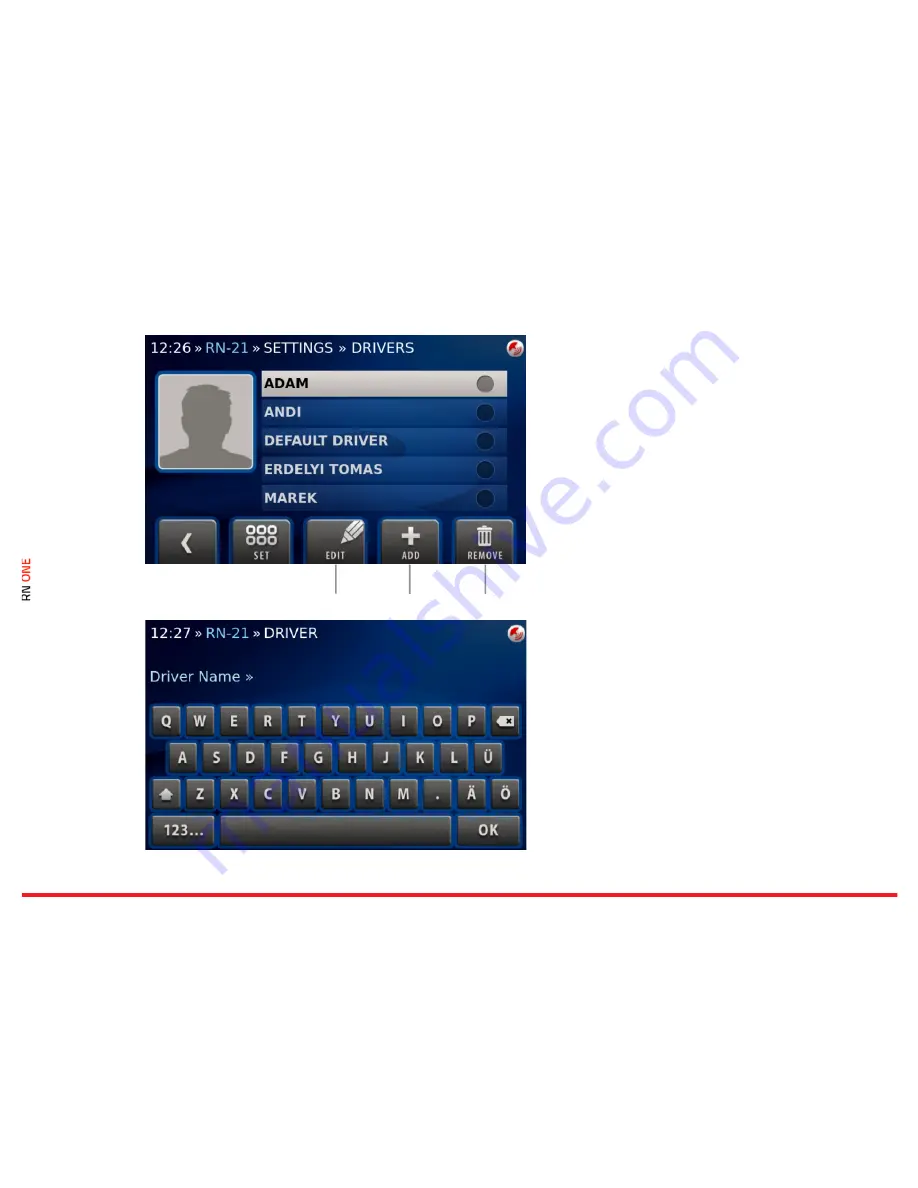
To select a driver, go to the Settings view and click 
on Driver. There will be the list of existing users. 
Scroll  down  the  list  and  select  the  proper  one. 
Press Set to confirm your selection. 

Edit 

You can edit an existing driver.


Add 

You can add a new driver. 

Remove 

You can remove a driver.


10.1


   ·    

DRIVER · Add


To create a new driver click on the Add button. 

Enter  the  driver’s  name  using  onscreen  keyboard 
and confirm with OK. 

Edit 

        Add             Remove 

Summary of Contents for ONE

Page 1: ... RACE NAVIGATOR COM YOUR PERSONAL TRACK ASSISTANT QUICKSTART GUIDE ...

Page 2: ... ...

Page 3: ... Thank you for choosing RN ONE Please read this manual before the first use of the device Visit the website for more info www race navigator com Release date 23 09 2014 r ...

Page 4: ...Panel 2 10 03 3 DASHBOARD Panel 3 10 04 MANUAL RECORDING 10 05 RECORDING WITH OBD II DIAGNOSTIC DATA 12 06 LAPS HISTORY LAPS 12 06 1 LAP DETAILS 14 06 2 REVIEW DRIVE 14 06 3 VIDEO PLAYER 15 07 EVENTS 15 08 ANALYSIS 16 09 SETTINGS 17 10 DRIVER 18 10 1 DRIVER Add 18 11 CAR 20 11 1 CAR Add 20 12 TRACK 21 ...

Page 5: ...urance 25 13 3 EVENT Taxi 26 14 NETWORK 27 15 DEVICE 28 15 1 DEVICE Status 28 15 2 DEVICE Clock 30 15 3 DEVICE Update 30 15 4 DEVICE Diagnostics 34 15 5 DEVICE RN Reset 35 15 6 DEVICE Help 37 15 7 DEVICE Logo 37 16 AUTOSTART 38 17 VIDEO 38 18 EXPORT VIDEO 39 Right side view ...

Page 6: ...ted RN ONE can record videos properly In general the best position is about 5 10 cm above the dashboard Adjust the RN ONE so that the top is approximately in balance Check the position by recording a test video NOTE Before every ride check the adherence of the holder Incorrectly installed device might get detached from the windscreen and get damaged cause damage to the car or serious injuries to t...

Page 7: ...he RN ONE device Laps History Laps All recorded laps can be found here Settings Here you can specify all the settings of the RN ONE e g drivers tracks network etc Driver Selection The currently selected driver is displayed here The driver can be changed by clicking on the item and choosing the desired person from the list Driver Selection Driver Car Track Name Event Type Dashboard Laps History Lap...

Page 8: ...processed Progress The animated icon shows up whenever the RN ONE device is busy GPS The icon shows up when the GPS signal is lost Battery The icon shows up when the power supply is disconnected The color notifies about the battery charging state 03 DASHBOARD The Dashboard consists of three panels 03 1 DASHBOARD Panel 1 Panel 1 presents the data for the current lap and the reference lap Gap to Ref...

Page 9: ...e lap the red one means the opposite Reference Lap Selection The fastest lap is automatically selected as the reference lap Different lap can be chosen from the laps list by clicking on the icon Current Speed Current RPM Gap to Reference Gap to Reference Chart Panels Current Lap Time Reference Lap Time Reference Lap Selection Next Panel ...

Page 10: ...d reference lap is framed in blue 03 3 DASHBOARD Panel 3 Panel 3 presents all important diagnostic information about the vehicle The RN Plug is required to be plugged into OBD2 port in the car There is information about the revolutions per minute water and oil temperatures as well as the throttle position 04 M ANUAL RECORDING Previous Panel Recorded Laps Reference Lap Time Panels ...

Page 11: ...cording possibility you can also start and stop recording videos manually Start Stop Button To start recording press the Start Stop button on the right side of the Home Screen Press the button again to stop recording Start Stop Button ...

Page 12: ...our vehicle it is usually located in the driver footwell under the steering wheel on the left side The OBD II values are gathered from the car while recording To verify if your car is compatible with the RN PLUG record 2 laps manually each at least 2 minutes long Check on the Panel 3 of the Dashboard if the values are available 06 LAPS HISTORY LAPS Laps page displays all laps in the selected event...

Page 13: ...wo ways to delete laps 1 Remove all not complete laps 2 Remove all laps except the top three of each driver Remove Clicking on the button removes all selected laps If a video file for the lap exists it is deleted as well Change Event Choose the event from the list and browse its laps Show Lap Display the lap details and the video Clean up Remove Change Event Show Lap ...

Page 14: ... can watch the animation with the lap data View Video Here you can display the video 06 2 REVIEW DRIVE In Lap Review mode all lap data is simulated so that you can observe them as they were displayed in real time during the lap You can stop the review by clicking the Stop Review Button on the right side of the Home screen 06 3 Back Button Review Drive View Video ...

Page 15: ...ap data is presented like track name current time lap time current speed Bars on the right and bottom edges of the inner camera view present the current G force values 07 EVENTS On this page you can find all events recorded on the device Remove Button With this button you can remove selected event and all its data including video files and not full laps Remove Button ...

Page 16: ... Lap B This button allows for selecting laps A and B Select lap A and click on the button then select lap B If lap A is selected the button shows B and vice versa Lap A is colored green and lap B is colored orange Analyze The chart displays speed series with colors corresponding to selected laps The red line can be moved with a finger The chart can be enlarged The right Plus button zooms in width ...

Page 17: ... select a track variant Event You can select an event type Network You can connect to the network Camera You can check cameras views Device You can modify another settings of the device Auto Start You can set manual or auto recording Video You can set the quality of your videos Export Video You can export your videos to the memory stick ...

Page 18: ...ll be the list of existing users Scroll down the list and select the proper one Press Set to confirm your selection Edit You can edit an existing driver Add You can add a new driver Remove You can remove a driver 10 1 DRIVER Add To create a new driver click on the Add button Enter the driver s name using onscreen keyboard and confirm with OK Edit Add Remove ...

Page 19: ... camera of the RN ONE to take a photo of yourself Press Take to take a picture Use the Back button to complete the process Now you can find the new driver on the list and select it Confirm your selection by pressing the Set button ...

Page 20: ...o confirm your selection Edit You can edit an existing car Add You can add a new car Remove You can remove a car The default vehicle cannot be removed 11 1 CAR Add To create a new driver click on the Add button Enter the race number and the car model s name using onscreen keyboard and confirm with OK Use the Back button to complete the process Now you can Edit Add Remove ...

Page 21: ...m your selection by pressing the Set button 12 TRACK Here you can find all available tracks and their variants Click on the track element to open the Track Variants view You can select one of the available track variants or create a new one see 12 1 2 ...

Page 22: ...You can edit a track variant Add You can add a new track variant Remove You can remove a track variant 12 1 1 TRACK VARIANTS Edit Here you can edit the track properties like name track name total distance track width Enter the proper values using onscreen keyboard and confirm with OK Use the Back button to complete the process 12 1 2 TRACK VARIANTS Add Edit Add Remove ...

Page 23: ...ecord button Place the car exactly on the start line press Start Track Recording and drive The RN ONE automatically records the new track When you cross the finish line again the RN ONE stops recording and the new track is stored NOTE Make sure that the GPS signal is strong enough We recommend using an external GPS antenna ...

Page 24: ...nd is always available Other types are optional and can be purchased for an additional fee Start New Event You can start new event by clicking on the button Each event contain its own list of laps 13 1 EVENT Trackday It is default event type All data are recorded directly on the device Another movie is prepared for each lap In the auto recording mode recording is activated automatically and deacti...

Page 25: ...ecording requires the memory stick to be plugged in Otherwise the video is not recorded and you are informed about missing memory stick The videos and data are recorded directly on the memory stick In the auto recording mode recording is activated automatically after exceeding the required speed and deactivated 3s after the vehicle stops When the red diode turns off you can safely remove the memor...

Page 26: ...e informed about missing memory stick The videos and data are recorded directly on the memory stick and can be received immediately after the vehicle stops In the auto recording mode recording is activated automatically after exceeding the required speed and deactivated 3s after the vehicle stops When the red diode turns off you can safely remove the memory stick ...

Page 27: ...irectly to your iPad and make more extensive analysis of your laps with our RN Analyzer app You can use the encryption of RN access point network The encryption increases the security and stability of the connection between devices Internet Click on this button to open the list of available WiFi networks If you want to update your device and install the latest version of the software you need to c...

Page 28: ...date You can install the latest version of the software Diagnostics You can download diagnostic data RN Reset You can reset various device settings Help You can read the descriptions of RN ONE functions Video Logo You can change the video logo 15 1 DEVICE Status Basic data of the device and its components are presented here Edition Name ...

Page 29: ... for SD HD quality Free Disk Space Free space on the hard drive Battery Level Display percentage value of battery level When the value drops to 10 a warning dialog pops up When the value reaches 1 the device shuts down GPS Signal Strength The level of the GPS signal Video Processing Indicates whether video files are currently processed External Memory Indicates whether the memory stick is plugged ...

Page 30: ... 15 2 DEVICE Clock Here you can set the current date and time Zones You can choose the proper time zone or set the time manually Use the Back button to complete the process 15 3 DEVICE Update Zones ...

Page 31: ...ge click the RN Device button and then the Update button Make sure that your device is connected to the WiFi network to connect go to Settings Network Internet and choose and connect to your Internet network 2 On the Updates view click the Download button The progress of the downloading is presented by the progress bar You can also check details of the new version by clicking the Details button ...

Page 32: ... 3 When the download is finished click the Install button on the Updates view Wait for the next screen 4 On the next screen click the Start Update button ...

Page 33: ... 5 Installing a new version is in progress It may take few minutes 6 The installation is finished with the successful message Press the Back button to restart your device ...

Page 34: ... copy the diagnostic data directly to the memory stick Press Export Data button to start the process The memory stick is required to be plugged in Otherwise the Export data button is disabled and you are informed about missing memory stick ...

Page 35: ...E settings and restore the device to the basic installation 15 5 1 RN Reset Reset Event Data Press the RN Reset button to display the list of events Select particular event and press the Remove button to reset the event data The operation cannot be undone ...

Page 36: ...inal settings In the next dialog click YES to confirm or NO to abort the operation The operation cannot be undone 15 5 3 RN Reset RN Recovery Press the RN Recovery button to proceed device recovery to the basic installation Confirm the operation by clicking on the Start Recovery button You can keep the data ...

Page 37: ...ions of the functions of your device 15 7 DEVICE Logo All available video logos are enlisted here You can browse the list and select one of them Press Set to confirm your selection You can also import your own logos When you plug the memory stick your logos will be automatically added to the list ...

Page 38: ...eed 20 km h or 40 km h Select the mode by clicking on the proper element Use the Back button to complete the process 17 VIDEO Different video quality options are available The video can be recorded in SD quality 1280x768 half bitrate HD quality 1280x768 full bitrate Select the option by clicking on the proper element Use the Back button to complete the process ...

Page 39: ...aps for exporting All laps from selected event are enlisted Full laps are colored white while the others are colored grey except the best laps of each driver which are colored yellow The list can be sorted by the column headers You can change the sorting method by clicking on one of them Current sorting column is colored red You can find the laps on the list and select it Confirm your selection by...

Page 40: ...here he bought the Race Navigator product from another seller than the Macrix company Consumer protection laws Macrix s one year warranty is a service provided voluntarily by the manufacturer The rights that are the result of the Macrix s one year warranty supplement and do not substitute the rights that are the result of consumer law If the product is flawed the consumers can choose if they want ...

Page 41: ...vigator Product s use USER S RESPONSIBILITIES IF SOFTWARE DATA OR OTHER INFORMATION CAN BE STORED IN A PRODUCT OWNED BY THE USER THEN FOR SECURITY MEASURES AND AS A PROTECTION AGAINST POSSIBLE FAILURES THE USER SHOULD PERIODICALLY CREATE BACKUP COPIES OF SUCH INFORMATION STORED ON THE MACRIX PRODUCT S DATA STORAGE Before submitting a Macrix product to warranty repair the user should create a backu...

Page 42: ...gible for mail in service Macrix will send you prepaid waybills and if applicable packaging material so that you may ship your Macrix Product to Macrix Once service is complete Macrix will return the Macrix Product to you Macrix will pay for shipping to and from your location if all instructions are followed 2 Do it yourself DIY parts service Within the DIY parts service Macrix will provide the us...

Page 43: ...all not be affected or impaired This warranty is governed by and construed under the laws of the country in which the Macrix product purchase took place BATTERY The lithium ion battery in Race Navigator should be replaced only by Macrix or a Macrix Authorized Service Provider The batteries should be recycled or utilized separate from the domestic waste For more information about recycling and batt...

Reviews: