background image

23

Smart Stop

TM


    10

Configuration de un double bras de moniteur   

18

Deutsch 

     19

Français 


     22

Nederlands 


    25

Nous vous recommandons de regarder notre vidéo Comment 

installer votre bras de moniteur. Regardez !

Conseils ergonomiques

Saviez-vous qu’une mauvaise installation de votre moniteur a un effet 

direct sur votre posture de travail ? Vous pouvez facilement vous 

plaindre de problèmes physiques, comme une douleur au cou. Voici 

quelques conseils pour un environnement de travail sain avec écran :

• 

Placez le haut de votre écran à la hauteur des yeux. Vous serez 

alors automatiquement assis bien droit.

• 

Placez votre écran au moins à bout de bras pour soulager vos 

yeux.

• 

Placez votre écran directement devant vous. De cette façon, 

vous adopterez une posture droite pendant que vous travaillez.

Afin d’utiliser au mieux la profondeur de votre bureau, nous vous 

recommandons de ne pas fixer la base du bras de l’écran au milieu, 

mais de le positionner à environ 45 cm du milieu du bureau.

Travaillez-vous avec deux moniteurs ? Dans ce cas, nous vous 

recommandons de placer l’écran le plus fréquemment utilisé 

juste devant vous. L’autre écran (supplémentaire) doit être placé 

directement à côté, à la même hauteur, et tiré légèrement vers vous. 

Cette disposition vous permet de rester assis bien droit la plupart du 

temps.

Qu’y a-t-il dans la boîte ?

R-Go Caparo D2 

R-Go Zepher C2

Mise en place

Un seul bras de moniteur

Summary of Contents for Caparo D2

Page 1: ...Monitorarms Manual R Go Caparo D2 Twin R Go Zepher C2 Twin...

Page 2: ...2 Contents Ergonomic tips 3 What s in the box 4 Setup Single Monitor Arm 8 Smart StopTM 10 Setup Dual Monitor Arm 18 Deutsch 19 Fran ais 22 Nederlands 25...

Page 3: ...screen directly in front of you This way you will adopt an upright posture while working To make maximum use of the depth of your desk we recommend that you do not fix the base of the monitor arm in...

Page 4: ...4 What s in the box R Go Caparo 4 D2 Single Monitor Arm 1 2 3 4 5 6 Monitorarms Manual R Go Caparo D2 Twin R Go Zepher C2 Twin...

Page 5: ...5 R Go Zepher C2 Single Monitor Arm 2 3 4 5 1 6 Monitorarms Manual R Go Caparo D2 Twin R Go Zepher C2 Twin...

Page 6: ...6 R Go Caparo 4 D2 Dual Monitor Arm 1 2 3 4 5 6 Monitorarms Manual R Go Caparo D2 Twin R Go Zepher C2 Twin 2x 2x 2x 7...

Page 7: ...7 R Go Zepher 4 C2 Dual Monitor Arm 2 3 4 5 1 6 Monitorarms Manual R Go Caparo D2 Twin R Go Zepher C2 Twin 2x 2x 2x 7...

Page 8: ...8 Step 1 Slide the base 1 onto the desktop Tighten the screw A with the hex key B Setup B A Single Monitor Arm...

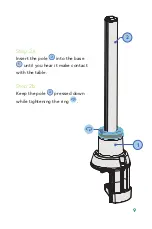
Page 9: ...9 Step 2a Insert the pole 2 into the base 1 until you hear it make contact with the table Step 2b Keep the pole 2 pressed down while tightening the ring 1 2...

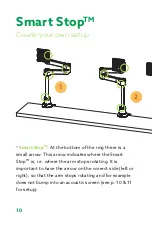
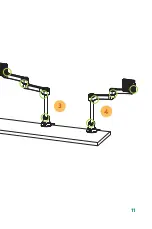
Page 10: ...ere is a small arrow This arrow indicates where the Smart StopTM is i e where the arm stops rotating It is important to have the arrow on the correct side left or right so that the arm stops rotating...

Page 11: ...11 3 4...

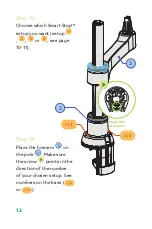
Page 12: ...e pole 2 Make sure the arrow points in the direction of the number of your chosen setup See numbers on the base 1 4 or 2 3 2 3 1 4 2 3 Underside of forearm Step 3a Choose which Smart StopTM setup you...

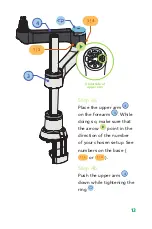
Page 13: ...forearm 3 While doing so make sure that the arrow point in the direction of the number of your chosen setup See numbers on the base 1 2 or 3 4 Step 4b Push the upper arm 4 down while tightening the r...

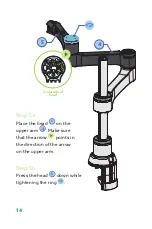
Page 14: ...Step 5a Place the head 5 on the upper arm 4 Make sure that the arrow points in the direction of the arrow on the upper arm Step 5b Press the head 5 down while tightening the ring 4 5 Underside of hea...

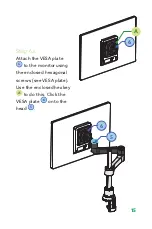
Page 15: ...15 Step 6a Attach the VESA plate 6 to the monitor using the enclosed hexagonal screws see VESA plate Use the enclosed hex key A to do this Click the VESA plate 6 onto the head 5 6 6 5 A...

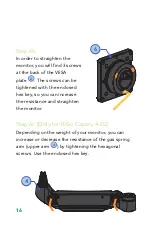
Page 16: ...ance of the gas spring arm upper arm 4 by tightening the hexagonal screws Use the enclosed hex key Step 6b In order to straighten the monitor you will find 3 screws at the back of the VESA plate 6 The...

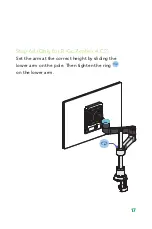
Page 17: ...17 Step 6d Only for R Go Zepher 4 C2 Set the arm at the correct height by sliding the lower arm on the pole Then tighten the ring on the lower arm...

Page 18: ...18 Install the first arm following step 1 6 and follow step 3 6 to install the extra arm Setup Dual Monitor Arm...

Page 19: ...tshaltung hat Sie k nnen leicht k rperliche Beschwerden bekommen wie z B Nackenschmerzen Hier sind einige Tipps f r einen gesunden Bildschirmarbeitsplatz Stellen Sie den oberen Rand Ihres Bildschirms...

Page 20: ...raube A mit dem Inbusschl ssel B fest Schritt 2a F hren Sie die Stange 2 in den Sockel 1 ein bis sie h rbar auf dem Tisch aufliegt Schritt 2b Halten Sie die Stange 2 nach unten gedr ckt w hrend Sie de...

Page 21: ...dem Unterarm 1 2 oder 3 4 Schritt 4b Dr cken Sie den Oberarm 4 nach unten w hrend Sie den Ring festziehen Unterseite des Oberarms Unterseite Kopf Schritt 5a Setzen Sie den Kopf 5 auf den Oberarm 4 Las...

Page 22: ...verringern Schritt 6d nur f r R Go Zepher 4 C2 Stellen Sie den Arm auf die richtige H he ein indem Sie den unteren Arm auf die Stange schieben Ziehen Sie dann den Ring am unteren Arm fest Einrichtung...

Page 23: ...oit Placez votre cran au moins bout de bras pour soulager vos yeux Placez votre cran directement devant vous De cette fa on vous adopterez une posture droite pendant que vous travaillez Afin d utilise...

Page 24: ...t droit gauche ou droite afin que le bras cesse de tourner et ne touche pas un cran acoustique par exemple voir p 10 11 pour la configuration tape 3a Choisissez la configuration Smart StopTM que vous...

Page 25: ...trouverez 3 vis l arri re de la plaque VESA 6 Les vis peuvent tre serr es l aide de la cl hexagonale fournie ce qui vous permet d augmenter la r sistance et de redresser le moniteur tape 6c uniquemen...

Page 26: ...ederlands 25 We raden je aan om onze video Hoe zet je je monitorarm op te bekijken Bekijk m eens Welkom Wist je dat een verkeerde opstelling van je beeldscherm direct effect heeft op je werkhouding Je...

Page 27: ...doos R Go Caparo D2 R Go Zepher C2 Set up Enkele Monitor arm Stap 1 Schuif de voet 1 op het bureaublad Draai de schroef A vast met de inbussleutel B Stap 2a Zet de stang 2 in de voet 1 totdat je hoort...

Page 28: ...onderarm 1 2 or 3 4 Stap 4b Druk de bovenarm 4 naar beneden terwijl je de ring vastdraait Onderzijde bovenarm Onderzijde kop Stap 5a Zet de kop 5 op de bovenarm 4 Laat hierbij de pijl wijzen in de ri...

Page 29: ...nd van de gasveer arm bovenarm 4 verlagen of verhogen door de inbusschroefjes aan te draaien met behulp van de bijgevoegde inbussleutel Stap 6d alleen voor R Go Zepher 4 C2 Zet de arm op de juiste hoo...

Page 30: ......

Reviews: