


156 |
Puma 20/40
156 |
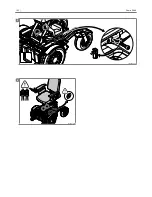
5.3.29 Adjusting the seating height, all Puma-versions
Preparation
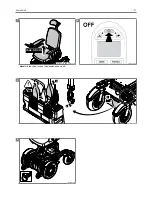
• Switch off the wheelchair via the remote control.
•
Remove the fuses from the battery compartment before
carrying out any work on the electrical system.
• Use a lifting device to raise the drive wheels clear of the
ground.
Instructions
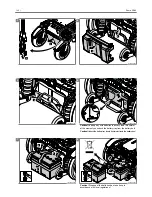
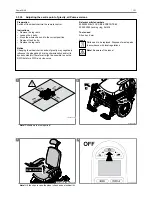
• Remove the legrests.
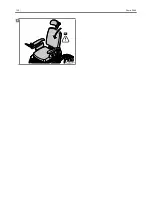
• Lift the chair, in case the wheelchair has a lift.
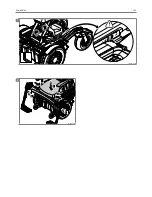
• Disconnect all connections of the power module and the
battery fuses.
• Remove the entire seating unit (incl. electrical lift,
electrical tilt or mechanical tilt) from the carrier.
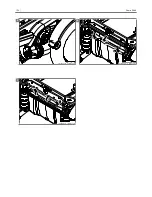
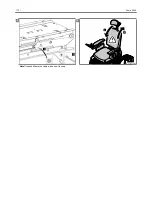
• Loosen the mounting supports (l/r) of the lift supports.
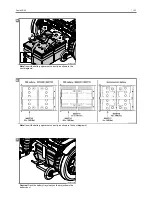
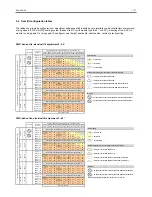
• Adjust the height of lift support; 5 height adjustments are
possible (0/+25/+50/+75/+100).
• Is the lift support in the lowest position? Mount also the
battery cover in the lowest position!
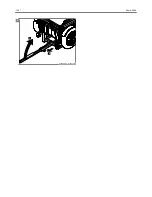
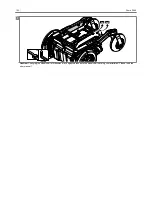
•
Replace the entire seating unit on the carrier. Two
people are needed to carry out this operation.
•
Tighten the interface and seat on the carrier.
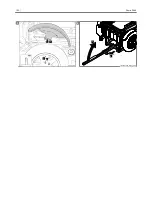
• Replace the legrests.
Notice
Raising the seat height has a negative effect on dynamic
stability, because of the centre of gravity rises. Please read
the user manual or contact your supplier, who will advise
about the seat adjustments.
Relevant article numbers
9002592 M8x12 CKS BZK PRECOTE 85
00000.2003 Locking ring, flat M8
Tools used
• Lifting device
• Screwdriver
•
Allen key, 6 mm
•
Torx key, T30
• Open ended or ring spanner, 10 mm
• Pair of wire-cutters
•
Tie wraps
Icons
Parts need to be replaced. Dispose of waste parts
in accordance with local regulations.
Note!
Be aware of the issue!
Action must be carried out by two persons!
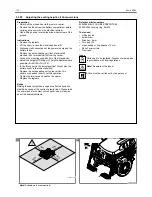
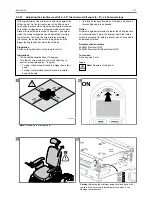
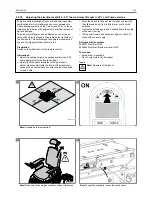
1
min.
100 cm
min.
100 cm
min.
75 cm
min.
75 cm
110648-03-001
Note!
Suitable work area required!
2
110648-03-902
2
2
1
Summary of Contents for puma 20
Page 1: ...Puma 20 40 TECHNICAL MANUAL EN Powered wheelchair ...
Page 2: ...Puma 20 40 2 ...
Page 44: ...Puma 20 40 44 Spare parts Cable routing Shark Drive and lights ...
Page 99: ... 99 Puma 20 40 99 5 1 1 2 2 110648 03 034_5spaak_2016 ...
Page 109: ... 109 Puma 20 40 109 3 3 1 2 110648 03 035 4 110648 03 013 5 6 7 8 ...
Page 118: ...118 Puma 20 40 118 8 9 ...
Page 130: ...130 Puma 20 40 130 11 1 2 110648 03 042_5spaak_2016 ...
Page 144: ...144 Puma 20 40 144 11 1 2 110648 03 087 12 3 1 2 110648 03 088 ...
Page 148: ...148 Puma 20 40 148 5 1 2 110648 03 042_5spaak_2016 ...
Page 150: ...150 Puma 20 40 150 5 1 2 110648 03 042_3spaak_2016 ...
Page 152: ...152 Puma 20 40 152 5 6 1 2 110648 03 042_5spaak_2016 ...
Page 160: ...160 Puma 20 40 160 14 3 1 2 110648 03 083 15 110648 03 903 2 2 3 3 1 ...
Page 162: ...162 Puma 20 40 162 5 FW D RW D 6 110648 03 010 6 110648 03 093 ...
Page 163: ... 163 Puma 20 40 163 7 FW D RW D 6 110648 03 094 8 110648 03 903 2 2 3 3 1 ...
Page 168: ...168 Puma 20 40 168 5 10º 110648 03 906 ...
Page 170: ...170 Puma 20 40 170 5 Note If needed fixate the cable with a new tie wrap 6 2 1 110648 03 908 ...
Page 198: ...Puma 20 40 198 ...
Page 199: ...Puma 20 40 199 ...


