background image

XRSeries

EN

A

1

B

1

A = B

QUICK 

XRSeries

 INSTALLATION AND USER’S MANUAL - REV000A

16

6 - Cautions & Use

FREE FALL

1)

 Make sure that Quick

®

 chain stopper is in a position that does NOT lock the chain (Fig. C).

2)

 Make sure that the band brake is completely tight.

3)

   Unscrew the bushing counter-clockwise until its end of stroke and make sure that the drum is up, disengaged from the 

gypsy (Fig. A).

4) Use the handwheel to loosen the band brake and adjust the anchor free fall.

USING THE DRUM (GYPSY LOCKED)

1)

 Make sure that Quick

®

 chain stopper is in a position that locks the chain (Fig. D).

2)

 Make sure that the band brake is completely tight.

3)

   Unscrew the bushing counter-clockwise until its end of stroke and make sure that the drum is up, disengaged from the 

gypsy (Fig. A).

4)

 Use Quick

®

 controls to rotate the drum in either direction (Fig. E). Wrap the rope counter-clockwise around the drum (at least 

3 turns - Fig. F). It is possible to adjust speed reduction and recovery force by sliding the rope on the drum cylinder.

WARNING: 

during recovery, keep a suitable safety distance between your hands and the windlass drum.

FIG. C

FIG. D

FIG. E

FIG. F

QUICK

®

 CONTROLS

Summary of Contents for XR Series

Page 1: ... 5500 AC HYDRO XR8 5500 AC 7500 AC HYDRO XR9 15000 AC HYDRO REV 000A VERTICAL WINDLASSES EN INSTALLATION AND USER S MANUAL Other languages available by scanning the QR code on the back of this manual or on the label on the product ...

Page 2: ......

Page 3: ...ler 8 4 Installation 9 4 0 Installation requirements 9 4 1 Installation procedures 9 5 Wiring diagram 11 5 0 Example of connection XR7 4000W DC 11 5 1 Example of connection XR7 4000 5000 XR8 5500 EC BOX 12 5 2 Example of connection Inverter XR7 XR8 13 5 3 Example of connection XR9 14 6 Cautions Use 15 6 0 Important cautions 15 6 1 Use 15 7 Maintenance 17 8 Product disposal 17 9 XR7 spare parts 19 ...

Page 4: ......

Page 5: ...asurements carried out with gypsy for 16 mm STUD LINK chain 3 Minimum recommended value for total length L 20m Calculate the cable cross section according to the connection length 4 With specific circuit breaker for direct current DC and delayed thermal magnetic or hydraulic magnetic circuit breaker 5 Three phase motor 6 Studs for greater deck thickness can be supplied upon request HYDRAULIC MODEL...

Page 6: ...y Quick Flow rate 70 l min 18 5 USG min Maximum pressure 170 bar 2175 psi 1 Measurements carried out with gypsy for 20 5 mm STUD LINK chain 2 Studs for greater deck thickness can be supplied upon request 1 3 XR9 Technical Data ELECTRIC MODELS XR9 AC 15000 X Y MOTOR POWER 15000 W AC Motor voltage 1 400 690 V Maximum instantaneous pull 17637 Kg 38882 lb Maximum work load 13227 Kg 29160 lb Maximum re...

Page 7: ...ating the material of the surface where it will be fastened 2 Supply and equipment 2 0 Standard supply and material included in the package Windlass top gearmotor Contactor or reversing contactor box DC model only Lever Screws for assembly Installation and user s manual Warranty Drilling template 2 1 Quick accessories required not included in standard supply RH LH chain pipe Band brake handwheel 2...

Page 8: ...e windlass in case one is damaged We recommend the use of Quick switch as motor safety device Secure the chain with a retainer before sailing off 24 V MODEL ONLY The reversing contactor box must be installed in a position protected from any water entry After completing the anchorage secure the chain to fixed points such as chain stopper or bollard To prevent accidental releases the anchor must be ...

Page 9: ...or power loss The deck thickness must be between the values shown in the table Sect 1 In case of different thickness please contact your Quick dealer There must be no obstacles below deck for chain passage the shallow depth of the locker could cause jams 4 1 Installation procedures A Identify the ideal position and drill the holes using the drilling template supplied B Remove the excess material f...

Page 10: ...ROWER Tighten screws and nuts following a cross pattern with reference to the tightening values shown in the table page 7 Apply threadlocker on the screws supplied Periodically check proper tightening of screws ELECTRIC MOTOR Connect the power cables coming from the windlass to the mains AC HYDRAULIC MOTOR Connect the pipes coming from the distribution valve to the two hydraulic motor flanges see ...

Page 11: ...OSE PUSH BUTTON PANEL HRC 1002 WINDLASS MOTOR BATTERY HYDRAULIC MAGNETIC SWITCH SEE TABLE ON PAGE 5 REVERSING CONTACTOR BOX MOD T6415 24 24V C A2 FOOT OPERATED SWITCHES MOD 915C BLACK BROWN BLUE BROWN BLACK BLUE A1 FUSE 2A 24V 4A 12V L5 L2 L3 L1 L6 L4 L L1 L2 L3 L4 L5 L6 5 0 Example of connection XR7 4000W DC ...

Page 12: ...0 5000 XR8 5500 EC BOX W2 U2 V2 U1 W1 AC IN AC OUT 24V IN CONTROLLER U1 V1 W1 XP XP XP R S T L1 XP R L2 XP S L3 XP T M 3 V1 MULTI PURPOSE PUSH BUTTON PANEL MOD HRC 1002 WINDLASS SENSORE TERMINAL BOX MOTOR SENSOR CABLE EC BOX FOOT OPERATED SWITCHES MOD 915C BATTERY 24V BROWN MARRONE BLACK NERO BLUE BLU FUSE 2A 24V 4A 12V ...

Page 13: ...N AND USER S MANUAL REV000A 13 5 Wiring diagram M 3 200 690 Vac WINDLASS INVERTER THREE PHASE SUPPLY FUSE MOTOR TERMINAL BOX MULTI PURPOSE PUSH BUTTON PANEL HRC 1002 FOOT OPERATED SWITCHES MOD 915C 5 2 Example of connection Inverter XR7 XR8 ...

Page 14: ...EV000A 14 5 Wiring diagram WINDLASS BATTERY 12 24 CONTACTORS 12 24 THREE PHASE SUPPLY FUSE 5 3 Example of connection XR9 M 3 200 690 Vac INVERTER MOTOR BRAKE CONTACTS BRAKING RESISTOR MULTI PURPOSE PUSH BUTTON PANEL MOD HRC 1002 FOOT OPERATED SWITCHES MOD 915C ...

Page 15: ...ed to the reduction gear and the drum The gypsy is dragged by the drum through front couplings on the gypsy When the drum 9 is up Fig A and the bushing 3 is fully unscrewed the gypsy 14 is free When the drum 9 is down Fig B and the bushing 3 is fully screwed the gypsy 14 is connected to the axis through the drum and it is possible to weigh the anchor GYPSY COUPLING 1 Use the lever 1 to screw the b...

Page 16: ...G THE DRUM GYPSY LOCKED 1 Make sure that Quick chain stopper is in a position that locks the chain Fig D 2 Make sure that the band brake is completely tight 3 Unscrew the bushing counter clockwise until its end of stroke and make sure that the drum is up disengaged from the gypsy Fig A 4 Use Quick controls to rotate the drum in either direction Fig E Wrap the rope counter clockwise around the drum...

Page 17: ...rt to prevent corrosion and grease with marine grease the shaft thread and the gypsy As with installation at the end of this product life dismantling must be carried out by qualified personnel This product is made up of various materials some can be recycled and others must be suitably disposed of enquire about the recycling or disposal systems provided for by local regulations for this product ca...

Page 18: ... 37 41 40 38 39 35 23 27 21 2 1 3 71 4 5 6 12 12 7 8 9 10 11 11 11 42 43 43 44 44 44 44 45 46 47 49 52 53 51 48 57 51 54 55 56 12 13 20 18 19 20 18 19 50 65 64 63 66 62 63 60 61 70 63 69 67 68 QUICK XRSeries INSTALLATION AND USER S MANUAL REV000A 18 9 XR7 spare parts ...

Page 19: ...R7 WINDLASS DRUM 9 DRUM DISC SPACER 10 SCREW 11 OIL SEAL 13 ANTI ROTATION RING 14 GYPSY 15 SCREW 16 XR7 SERIES WINDLASS BASE 17 STUD 18 GROWER 19 NUT 20 WASHER 21 SENSOR 22 STUD 23 STUD 24 BAND BRAKE LOCK 25 UPPER WASHER 26 LOWER WASHER 27 REMOTE BRAKE ROD 28 UNIVERSAL JOINT 29 ELASTIC PIN 30 REMOTE BRAKE HANDWHEEL 31 BAND BRAKE SHAFT 32 EXTERNAL SNAP RING 33 EXTERNAL SNAP RING 34 XR8 SERIES BAND ...

Page 20: ...4 36 37 41 40 38 39 35 23 27 22 2 3 1 4 5 6 7 8 8 8 9 10 11 12 13 13 13 42 43 43 44 44 44 44 45 46 47 48 49 50 51 52 53 54 57 50 50 50 55 56 8 14 19 20 21 19 20 21 63 60 65 64 63 66 62 63 61 QUICK XRSeries INSTALLATION AND USER S MANUAL REV000A 20 10 XR8 spare parts ...

Page 21: ...44 BEARING 45 XR8 BASE INSERT 46 XR8 SERIES WINDLASS SHAFT 47 KEY 48 SCREW 49 GROWER 50 O RING 51 HUB FLANGE 52 SCREW 53 SCREW 54 REDUCTION GEAR FLANGE 55 XR8 REDUCTION GEAR CLOSING FLANGE 56 SCREW 57 TG150 REDUCTION GEAR 58 RH CHAIN PIPE 59 LH CHAIN PIPE 60 5 5KW MOTOR 61 7 5KW MOTOR 62 HYDRAULIC MOTOR 63 KEY 64 ADAPTER 65 HYDRAULIC MOTOR FLANGE 66 90 FLANGE 10 0 XR8 spare parts Refer to the expl...

Page 22: ...1 27 30 43 39 8 7 9 10 11 12 13 14 6 5 5 4 3 2 41 42 35 38 40 37 32 34 36 33 28 29 15 20 21 21 22 23 24 25 26 16 17 18 18 19 1 18 45 44 46 QUICK XRSeries INSTALLATION AND USER S MANUAL REV000A 22 11 XR9 spare parts ...

Page 23: ...R8 series band brake 35 Flat washer 36 Screw 37 XR8 chain stripper support 38 XR8 series chain stripper 39 Countersunk screw 40 Screw 41 XR8 brass pin 42 Band brake shaft 43 Band brake lock 44A AC motor 44A AC motor 45 Key 46 Hydraulic motor 47 RH chain pipe 48 LH chain pipe 11 0 XR9 spare parts Refer to the exploded view on page 24 CODE DESCRIPTION PART NO FVSSBXR92200A00 16MM GYPSY OSP XR9 STUD ...

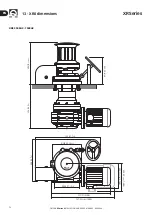
Page 24: ... 13 64 DC 270 10 5 8 DC Ø 250 9 27 32 420 16 17 32 668 26 19 64 24V 4 5 5 kw AC 301 11 27 32 4 5 5 kw AC 378 14 7 8 318 12 33 64 383 15 5 74 QUICK XRSeries INSTALLATION AND USER S MANUAL REV000A 24 12 XR7 dimensions XR7 4000W DC XR7 4000 5000W AC ...

Page 25: ...ries EN 255 10 1 32 525 20 43 64 378 14 7 8 318 12 33 64 383 15 5 74 710 27 61 64 Ø 295 11 39 64 400 15 3 4 Ø 250 9 27 32 QUICK XRSeries INSTALLATION AND USER S MANUAL REV000A 25 12 XR7 dimensions XR7 HYDRO ...

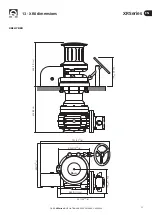
Page 26: ...335 13 3 16 7 5KW Ø 300 11 13 16 500 19 11 16 331 12 33 64 524 20 5 8 793 31 7 32 Ø 350 13 25 32 711 27 5 7KW 300 11 13 16 5 7KW 400 15 3 4 QUICK XRSeries INSTALLATION AND USER S MANUAL REV000A 26 13 XR8 dimensions XR8 5500AC 7500AC ...

Page 27: ...ies EN 275 10 53 64 531 20 29 32 500 19 11 16 331 12 33 64 524 20 5 8 793 31 7 32 Ø 350 13 25 32 400 15 3 4 Ø 300 11 13 16 QUICK XRSeries INSTALLATION AND USER S MANUAL REV000A 27 13 XR8 dimensions XR8 HYDRO ...

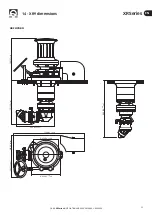
Page 28: ...CK XRSeries INSTALLATION AND USER S MANUAL REV000A 28 1350 53 5 32 1116 42 29 32 787 30 63 64 1570 61 13 16 Ø 490 19 19 64 350 13 25 32 385 15 5 32 1158 45 19 32 Ø 420 16 17 32 708 27 7 8 XR9 15000AC 14 XR9 dimensions ...

Page 29: ...es EN QUICK XRSeries INSTALLATION AND USER S MANUAL REV000A 29 14 XR9 dimensions 708 27 7 8 737 29 1 64 1158 45 19 32 Ø 490 19 19 64 350 13 25 32 385 15 5 32 Ø 420 16 17 32 649 25 35 64 883 34 49 64 XR9 HYDRO ...

Page 30: ...XRSeries EN QUICK XRSeries INSTALLATION AND USER S MANUAL REV000A 30 Note ...

Page 31: ...XRSeries EN QUICK XRSeries INSTALLATION AND USER S MANUAL REV000A 31 Note ...

Page 32: ...0 A 48124 Piangipane RAVENNA ITALY Tel 39 0544 415061 Fax 39 0544 415047 www quickitaly com quick quickitaly com XRSeries XR7 4024 DC 4000 AC 5500 AC HYDRO XR8 5500 AC 7500 AC HYDRO XR9 15000 AC HYDRO REV 000A Product serial number ...

Reviews: