


EN
.
49
Parameter no. 3
–
Input 2 contact type
Values (size is 1 byte dec):
•
default value 0
•
0 - NO (normally open) input type
•
1 - NC (normally close) input type
Parameter no. 4
–
Input 3 contact type
Values (size is 1 byte dec):
•
default value 0
•
0 - NO (normally open) input type
•
1 - NC (normally close) input type
Summary of Contents for ZMNHDD2
Page 18: ...EN 18 4 Package Contents Flush Dimmer Device Installation Manual...
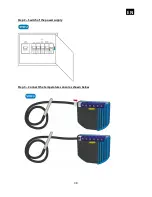
Page 25: ...EN 25 After Qubino installation Wiring with one switch...
Page 26: ...EN 26 INSTALLATION WITH ON OFF SWITCH AND SCENE SWITCHES...
Page 27: ...EN 27 INSTALLATION WITH 3 WAY SWITCH...
Page 29: ...EN 29 2 WAY SWITCH...
Page 30: ...EN 30 MULTI WAY SWITCHES...
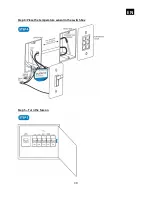
Page 31: ...EN 31 INSTALLATION WHERE THERE IS NO NEUTRAL LINE N IN SWITCH BOX Before Qubino installation...
Page 32: ...EN 32 After Qubino installation...
Page 38: ...EN 38 Step 2 Switch of the power supply Step 3 Connect the temperature sensor as shown below...
Page 39: ...EN 39 Step 4 Place the temperature sensor in the switch box Step 5 Turn the fuse on...
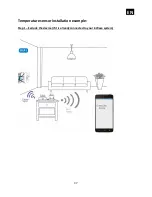
Page 40: ...EN 40 Step 6 Re include the device to your network...
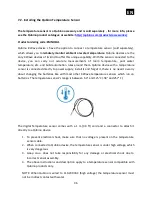
Page 41: ...EN 41 Step 7 Start using the temperature sensor in connection with your device...


