


© Qube Engineering 2009
Qube’s AP1 LED Dash DIY Kit Supplemental Instructions Page 17
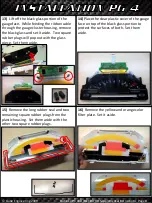
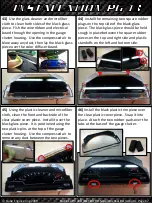
43)
Use the glass cleaner and microfiber
cloth to clean both sides of the black glass
piece. Fish the wire ribbon and electrical
board through the opening in the gauge
cluster housing. Use the compressed air to
blow away any dust, then lay the black glass
piece over the color diffuser board.
44)
Install the remaining two square rubber
plugs on the top side of the black glass
piece. The black glass piece should be held
snugly in place between the square rubber
pieces on the top and right side and plastic
standoffs on the left and bottom side.
45)
Using the plastic cleaner and microfiber
cloth, clean the front and backside of the
clear plastic cover piece. Install it over the
black glass piece. It is positioned using the
two plastic pins at the top of the gauge
cluster housing. Use the compressed air to
remove any dust between the two pieces.
46)
Install the black plastic trim piece over
the clear plastic cover piece. Snap it into
place. Attach the two rubber pads over the
tabs at the base of the gauge cluster.


