background image

LIMA


01 01 63xx

Quax nv

 Karel Picquélaan 84 B-9800 Deinze Belgium 

T

T

 0032 9 380 80 95                                                                  www.quax.eu - 

E

E

 [email protected]

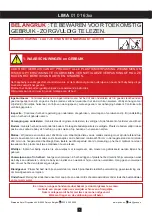
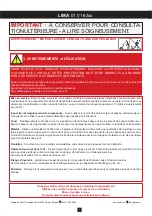
TO AVOID DANGER OF SUFFOCATION REMOVE PLASTIC COVER BEFORE USING THIS 
ARTICLE. THIS COVER SHOULD BE DESTROYED OR KEPT AWAY FROM BABIES AND 
CHILDREN.

The babybed is intended for children who cannot climb out the bed by themselves and as soon as this is the case remove 
the cot from use.
Assemble the bed following the instructions hereunder.
Do not change the design and the assembly method of this bed.


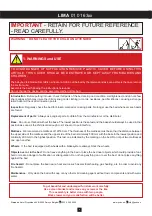
1.


WARNINGS and USE

WARNING : DO NOT LEAVE THE CHILD UNATTENDED

IMPORTANT

 - RETAIN FOR FUTURE REFERENCE

- READ CAREFULLY.

Introduction 

: Before putting into use, check if all parts of the bed are in good condition, well tightened, and do not show 

sharp edges which may injure the child or snag on its clothing (or cords, necklaces, paci

fi

 er ribbons), causing a strangu-

lation hazard. Check all connection points.

Inspection 

: Regularly check the bed for broken, warped or missing parts. No longer use the bed whenever such parts 

are found.

Replacement of parts

 : Allways use original parts, to obtain from the manufacturer or the distributor.

Base 

: Do not use this bed without the base. The lowest position is the safest and the base should always be used in that 

position as soon as the child is old enough to sit, kneel or to pull itself up. 

Mattress

 : We recommend a mattress of 120*60 cm. The thickness of the mattress must be so that the distance between 

the upper side of the mattress and the upper side of the bed is minimally 500 mm with the base in the lowest position and 
minimally 200 mm in the highest position. This last one indicated by the marking on the bed. Do not put two mattresses 
one upon another.

Wheels

 : If the bed is equipped with wheels with a brakesystem, allways block the wheels.

Objects over or in the bed

 : Do not leave anything in the bed or place the bed near objects which could provide a foot-

hold or create a danger of su

 ocation or strangulation. Do not hang anything on or over the bed, do not place anything 

against the bed.

Fire hazard

 : Do not place the bed near a heat source such as electrical heating, gas heating, etc. in order to avoid any 

fi

 re hazard.  

Maintenance 

: Only clean the bed with soap or any other mild cleaning agent without toxic components and with warm 

water.

To get beautiful and undamaged furniture work carefully.

Use a clean blanket and remove any screws or the like.

This assembly is better done with two people.

Work slower and your satisfaction will be better.

14

Summary of Contents for LIMA 01 01 63 Series

Page 1: ...bien fix la structure du lit Es ist wichtig dass den Boden gut an den Bettstruktur befestigt ist It is important to attach the mattress support to the structure of the bed Quax nv Karel Picqu laan 84...

Page 2: ...kant of verdeler van dit bed Bodem Gebruik het bed nooit zonder de bodem De laagste bodempositie is de veiligste Plaats de bodem altijd in deze positie van zodra de baby zich rechtop op de knie n of o...

Page 3: ...informatie info quax eu Verkoop sales quax eu Klantenservice customerservice quax eu Veiligheid Dit bed voldoet aan de veiligheidsvoorschriften omschreven in de norm EN 716 2017 Productinformatie Afme...

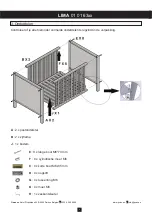
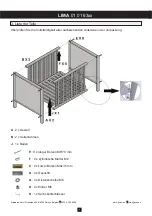
Page 4: ...info quax eu 3 Onderdelen 4 Controleer of je alle hieronder vermelde onderdelen terugvindt in de verpakking A 2 x pootonderstel B 2 x zijframe J 1 x bodem E 8 x lange bout M6 70 mm F 8 x cylindrische...

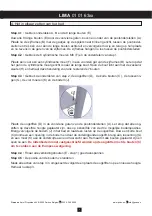
Page 5: ...ht aan met de zeskant sleutel H en herhaal deze handeling voor alle resterende 7 bouten Stap 4 3 Gebruik de onderdelen van stap 2 de oogstiften D de korte bouten C de tussenrin gen G de vier moeren K...

Page 6: ...s le lit sans le fond La position du fond la plus basse est la plus s re et d s que le b b est en ge de s asseoir de s agenouiller ou de se hisser seul il est indispensable de toujours utiliser le fon...

Page 7: ...ces de s curit d crites dans la norme EN 716 2017 Information produit Dimensions du lit assembl 128x66x79H cm Dimensions du fond 120x60x2H cm Dimensions conseill es pour un matelas 120x60x9H cm Struct...

Page 8: ...iste des pi ces d tach es 8 Contr lez si vous retrouvez dans l emballage toutes les pi ces d tach es mentionn es ci dessous A 2 x pi tement B 2 x cadre lat ral J 1 x fond E 8 x boulon long M6 70 mm F...

Page 9: ...ec la clef hexagonale jointe H Rep tez cet action avec les autres 7 boulons Ne serrez pas finalement les raccords Etape 4 3 Utilisez les pi ces de l tape 2 le fond J les 4 crochets D les 4 rondelles G...

Page 10: ...hne Boden verwenden Die niedrigste Bodenposition ist die meist sichere Legen Sie der Boden immer in dieser Position sobald das Baby sich aufrecht erhalten kann sowohl auf den Knien als auf H nde und F...

Page 11: ...nen info quax eu Verkauf sales quax eu Kundendienst customerservice quax eu Sicherheit Dieses Bett entspricht den im Standard EN 716 2017 beschriebenen Sicherheitsvorschriften Productinformation Abmes...

Page 12: ...3 Liste der Teile 12 berpr fen Sie die Vollst ndigkeit aller nachstehenden Unterteile in der Verpackung A 2 x Gestell B 2 x Seitenrahmen J 1 x Boden E 8 x langer Bolzen M6 70 mm F 8 x zylindrische Mut...

Page 13: ...derholen Sie diese Handlung f r alle verbleibenden 7 Bolzen Schritt 4 3 Benutzen Sie die Unterteile des Schritts 2 die Boden J die 4 Distanz scheiben G die 4 senstiften D die vier kurzen Bolzen C und...

Page 14: ...e this bed without the base The lowest position is the safest and the base should always be used in that position as soon as the child is old enough to sit kneel or to pull itself up Mattress We recom...

Page 15: ...quax eu Sales sales quax eu Customer service customerservice quax eu Safety This bed meets the safety prescriptions provided in the EN 716 2017 standard Productinformation Dimensions of the assembled...

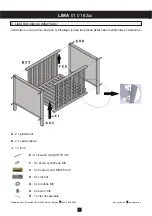
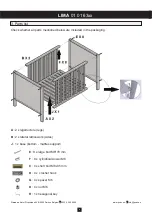
Page 16: ...arts list 16 Check whether all parts mentioned below are included in the packaging A 2 x legstructure legs B 2 x lateral latticework sides J 1 x base bottom mattres support E 8 x large bolt M6 70 mm F...

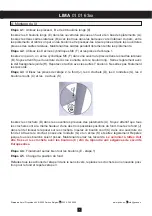
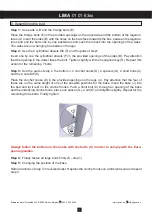
Page 17: ...Tighten slightly with the hexagonal key H Repeat this action for the remaining 7 bolts Step 3 Use the parts of step 2 the bottom J 4 crochet hooks D 4 spacers G 4 short bolts C and the 4 nuts M6 K Pl...

Reviews: