background image

StorNext QM1200, QS1200 or QS2400 Base System - Replacing a Drive

April 2015

Quantum Corporation

- 6 -

b.

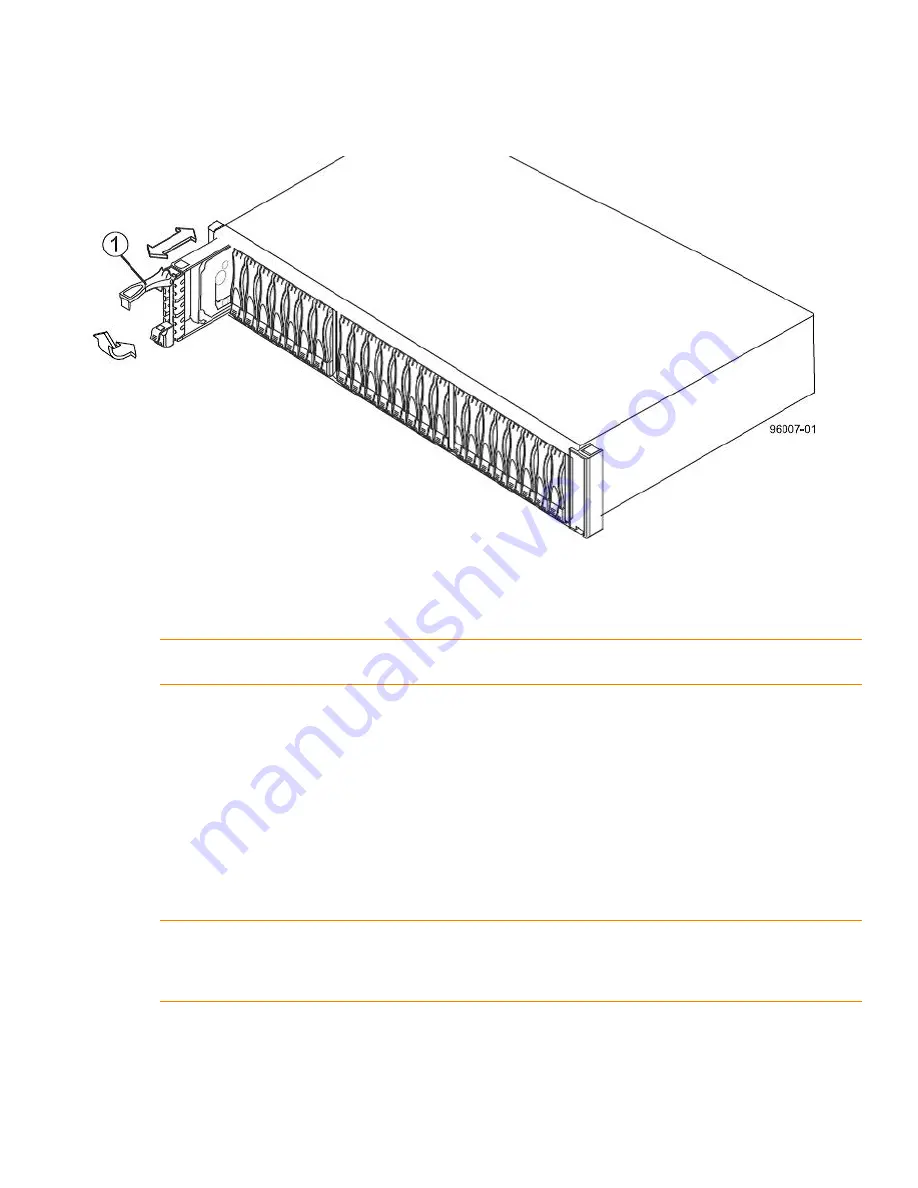
Pull the drive handle up for a drive in the QS2400 base system (

Figure 8

).

Figure 8  Removing and Replacing a Drive in the StorNext QS2400 Base System

1.

Drive Handle

c.

Use the drive handle to pull the drive out a few centimeters, and allow the drive to spin down.

d.

Use the drive handle to pull the drive out of the slot.

e.

Put the drive on an antistatic, cushioned surface away from magnetic fields.

Installing the Drive into the Drive Tray

1.

Wait 30 seconds for the storage management software to recognize that the drive has been removed.

a.

Place the replacement drive on the slot guides, and slide the drive all of the way into the slot.

b.

Push the drive handle down or to the right to lock the drive securely in place.

As the drive spins up, the Drive Power LED might blink intermittently, which indicates that data is being restored 
to the new drive.

2.

Check the Drive Power LED and the Drive Service Action Required LED (

Figure 6

). Based upon the LED status, 

perform one of these actions:

The Drive Power LED is off

 – The drive might not be installed correctly. Remove the drive, wait 30 seconds, 

and then reinstall it. Go to step 

3

.

NOTE  

If you accidentally remove an active drive, wait at least 30 seconds, and then reinstall it. For the 

recovery procedure, refer to the storage management software.

NOTE  

Depending on your configuration, the controller might automatically reconstruct data to the new 

drive. If the base system uses hot spares, the controller might need to perform a complete reconstruction 
on the hot spare before the controller copies the data to the replaced drive. This reconstruction process 
increases the time that is required to complete this procedure.

Summary of Contents for StorNext QM1200

Page 1: ...StorNext QM1200 QS1200 or QS2400 Base System Replacing a Drive 6 67542 02 Rev B 6 67542 02 B...

Page 2: ...tum the Quantum Logo Backup Recovery Archive It s What We Do Be Certain Be Quantum Certain DLT the DLT Logo DLTSage DLTtape the DLTtape Logo DXi DXi Accent Dynamic Powerdown FastSense FlexLink GoProte...

Page 3: ...drive in two ways The Recovery Guru directs you to replace a failed drive You locate the failed drive by checking the amber Service Action Required LEDs in three locations Base system Drive drawer Dr...

Page 4: ...ustration of the QS2400 service action required LED Figure 2 QS2400 service action required LED 1 Service Action Required LED Amber Drive Status LEDs Figure 3 provides an illustration of the drive sta...

Page 5: ...drive on a flat static free surface near the base system b Save all packing materials in case you need to return the drive ATTENTION Possible equipment damage You must replace the drive within three m...

Page 6: ...ED to locate the failed drive Figure 4 and Figure 5 You can also check the Drive Service Action Required LED on the drive Figure 6 Figure 4 QM1200 QS1200 Service Action Required LED 1 Service Action R...

Page 7: ...drive the blue Drive Service Action Allowed LED must be on Figure 6 Item1 7 Remove the failed drive from the base system a Pull the drive handle to the left for a drive in the QM1200 or QS1200 base s...

Page 8: ...to lock the drive securely in place As the drive spins up the Drive Power LED might blink intermittently which indicates that data is being restored to the new drive 2 Check the Drive Power LED and th...

Page 9: ...contact your Customer and Technical Support representative No Go to step 6 6 Remove the antistatic protection 7 Gather support data about your updated storage array by using one of these methods Use t...

Reviews: