background image

Replacing Controller Canisters in the E5660 Controller-Drive Tray to Update HICs - 7

b. Reset all controllers using SANtricity Storage Manager.
c. Wait for all controllers to boot up. When a controller has finished booting, it appears in the EMW.

7. Look at the LEDs on controller A to make sure that it is booting correctly.

The Host Link Service Action Required LEDs turn green during the reboot. The seven-segment display shows

the sequence 

OS

Sd

+ blank- to indicate that the controller is performing Start-of-day (SOD) processing. After

the controller successfully completes rebooting, the seven-segment display shows the tray ID matching the

seven-segment display on the second controller. You can then discover the new controller by using the storage

management software.

NOTE  

Your controller might have a different number and type of host interface connectors than what is shown

in the following figure.

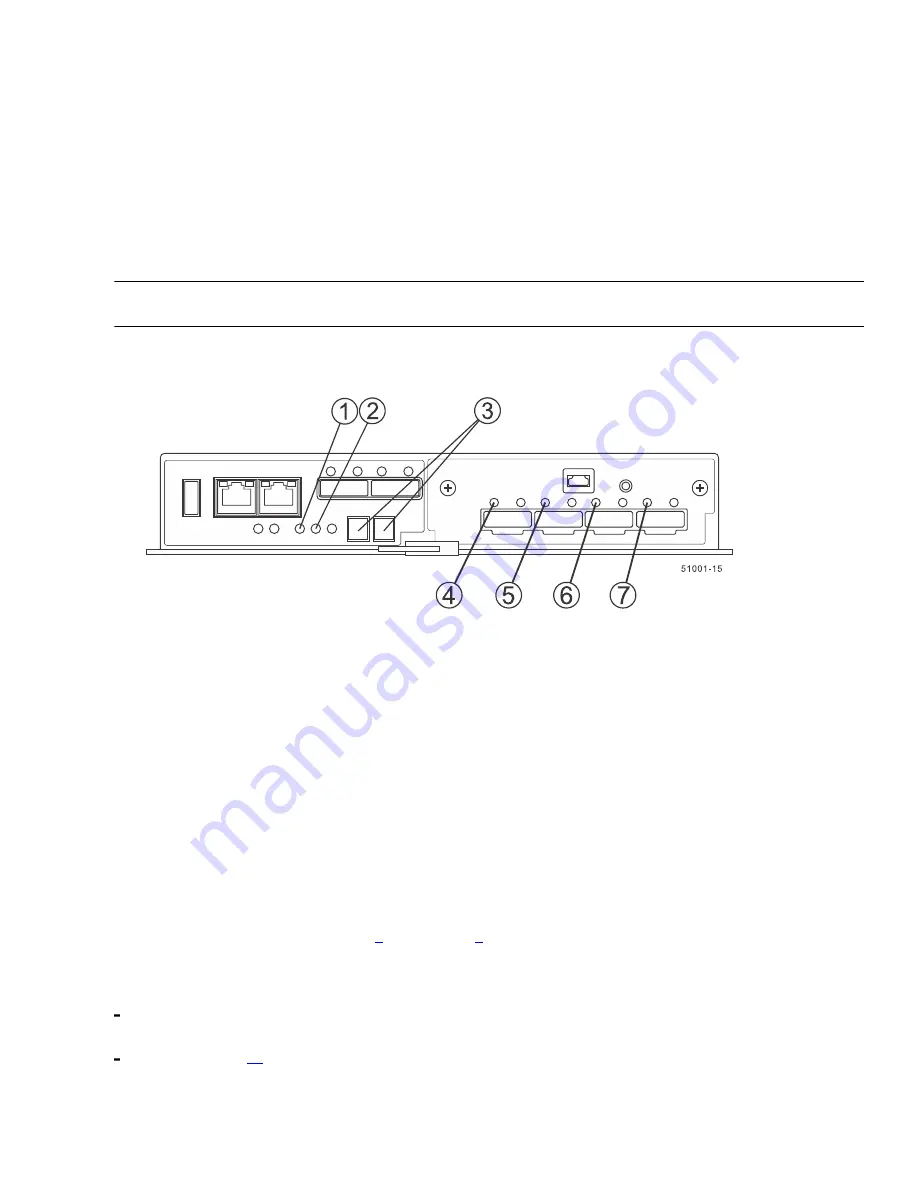
Figure 3. LED Status and Seven-Segment Display

1. Controller Service Action Allowed LED (Blue)
2. Controller Service Action Required LED (Amber)
3. Seven-Segment Display
4. Host Link 1 Service Action Required LED (Amber)
5. Host Link 2 Service Action Required LED (Amber)
6. Host Link 3 Service Action Required LED (Amber)
7. Host Link 4 Service Action Required LED (Amber)

8. Execute these steps if any of the controller-drive tray’s Service Action Required LEDs are 

on

, or if the Controller

Service Action Required LED is 

on

:

a. Check that the controller canister has been installed correctly and that all of the cables are correctly seated.

Reinstall the controller canister, if necessary.

b. Check the controller-drive tray’s Service Action Required LEDs and the Controller Service Action Required

LED again. If the problem is not corrected, contact your Technical Support Representative.

9. For a duplex configuration, repeat step 

7

 through step 

8

 for controller B.

10.Using the LEDs and the storage management software, check the status of all of the trays in the storage array.
11.Does any component have a Needs Attention status?

Yes –

 Click the Recovery Guru toolbar button in the 

Array Management Window

, and then complete the

recovery procedure. If the problem is not resolved, contact your Technical Support Representative.

No –

 Go to step 

12

.

12.Remove the antistatic protection.

Summary of Contents for StorNext QD7000

Page 1: ...Upgrading Host Interface Cards StorNext QD7000 Firmware 8 30 xx xx 6 68564 01 Rev A...

Page 2: ...iolation of the law TRADEMARK STATEMENT Artico Be Certain and the Q brackets design DLT DXi DXi Accent DXi V1000 DXi V2000 DXi V4000 DXiV Series FlexTier Lattus the Q logo the Q Quantum logo Q Cloud Q...

Page 3: ...only Refer to the NetApp to Quantum Naming Decoder section for additional information This section provides the following information Audience Prerequisites NetApp to Quantum Naming Decoder Product Sa...

Page 4: ...uantum storage naming conventions Table 1 Product Nomenclature E Series NetApp Product Quantum Storage Description Controller Drive Tray Base System Quantum uses Base System when referring to a drive...

Page 5: ...DE6600 4U drive enclosure with E5400 RAID controllers Quantum StorNext QD6000 E5424 DE5600 24 drive 2U drive enclosure Code Name Camden with E5400 RAID controllers Quantum StorNext QS2400 E5412 DE1600...

Page 6: ...umes all risk in this aspect This unit is engineered and manufactured to meet all safety and regulatory requirements Be aware that improper use may result in bodily injury damage to the equipment or i...

Page 7: ...on about contacting Quantum including Quantum office locations go to http www quantum com aboutus contactus index aspx Comments To provide comments or feedback about this document or about other Quant...

Page 8: ...support eSupport Submit online service requests update contact information add attachments and receive status updates via email Online Service accounts are free from Quantum That account can also be u...

Page 9: ...his procedure you will need antistatic protection and one or two new controller canisters Depending on your new host interface you might need new host bus adapters HBAs host channel adapters HCAs swit...

Page 10: ...he following steps to record the serial number for your storage array a In the EMW tree view double click your storage array The AMW opens b In the Summary tab of the AMW click the View Storage Array...

Page 11: ...ENTION Possible hardware damage To prevent electrostatic discharge damage to the tray use proper antistatic protection when handling tray components 1 Put on antistatic protection ATTENTION Potential...

Page 12: ...drive tray Figure 1 Removing and Replacing a Controller Canister 1 Release Levers 2 Controller Canister c Set the controller canister on a flat static free surface with the release levers up 6 Remove...

Page 13: ...Tab c Remove the controller battery by sliding it towards the rear of the controller canister 7 For a duplex controller drive tray repeat step 5 through step 6 for controller B Installing a Controlle...

Page 14: ...nsceivers that you removed from your old controller canister See Table 1 for details about cabling requirements 9 Connect all host cables between the controller canister and the hosts or the switches...

Page 15: ...LED Amber 3 Seven Segment Display 4 Host Link 1 Service Action Required LED Amber 5 Host Link 2 Service Action Required LED Amber 6 Host Link 3 Service Action Required LED Amber 7 Host Link 4 Service...

Page 16: ...I to run the save storageArray supportData command to gather comprehensive support data about the storage array For more information about the CLI command refer to the current version of the Command L...

Page 17: ...h A complete and current list of other IBM trademarks is available on the web at http www ibm com legal copytrade shtml Apple is a registered trademark and QuickTime is a trademark of Apple Inc in the...

Reviews: