manualshive.com logo in svg
background image

4472-0707

1 12

R

Home Security Cabinet

Installation Instructions

®

Key #:

Serial #:

MODEL GC-910-5 

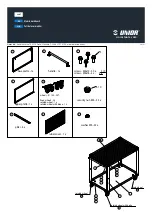
INSTALLATION OF BARREL RESTS AND SHELF

Installation of Barrel Rests

Measure and mark the locations of the barrel rests on the innner sides of the cabinet using the 

dimension shown. (See figure 1)
To install the barrel rests to the cabinet, first remove the backing from the foam rests.  For help in 

doing this, pinch the end of the foam to help secure the adhesive to the foam.
 Attach the barrel rests to the inner sides of the cabinet as shown. 

Shelf Assembly

Assemble the shelf inside the cabinet with (4) 10-32 nuts and bolts as shown. (See figure 1)
Place the bottom pad (A) in the bottom of the cabinet.

1

A

36"

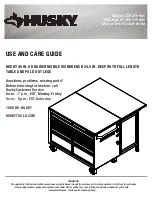
CABINET MOUNTING INSTRUCTIONS

Selecting a Location

Your Security Cabinet should be installed in an isolated, dry and secure area.
For greater security the cabinet must be fastened to a solid surface with a minimum space on either side. 

Ideally the cabinet would be installed on the side wall of a closet.  (See figure 2)
The cabinet should be flat against the wall and floor.  Remove the baseboard if necessary.  (See figure 3)
Insert the plastic plugs in the cabinet's top mounting holes if you are not installing the Pistol-Ammo cabinet 

on the top of the security cabinet.

Wall Mount Option

The (4) mounting holes in the rear of the cabinet must line up with the 16" centers of the wall studs.  Drill 

new holes in the cabinet if necessary.  (See figure 3)
Drill (4) 3/16" pilot holes into the wall studs and secure the cabinet to the wall using (4 ea.) lag bolts and 

washers.  (See figure 3)

Floor Mount Option

The (4) mounting holes in the rear of the cabinet must line up with the 16" centers of the wall studs.  Drill 

new holes if necessary.  (See figure 3)
Drill (2) 3/16" pilot holes into the wall studs lining up with the top (2) mounting holes in the back of the 

cabinet.  Secure the cabinet to the wall using (2) lag bolts and washers.
Drill (2) pilot holes and secure the cabinet bottom to the floor with (2) lag bolts and washers.

2

16"

CENTERS

CABINET

TOP VIEW

MINIMUM

3

IMPORTANT:

Record the serial and key numbers from the back of the 

cabinet.  You will need the serial number information in 

order to replace lost keys.  
Do not store this document in your security cabinet.  
Keep keys in a secure place away from children.

NOTE:

  Assemble shelves before mounting the cabinet 

to a wall or floor.  Exterior access is required for 

assembly.  Review these instructions prior to installation.

7/16" wrench

Phillips screwdriver

Drill with 

3/16" bit

Tools Required:

Содержание Stack On GC-500-5

Страница 1: ...t s top mounting holes if you are not installing the Pistol Ammo cabinet on the top of the security cabinet Wall Mount Option The 4 mounting holes in the rear of the cabinet must line up with the 16 centers of the wall studs Drill new holes in the cabinet if necessary See figure 3 Drill 4 3 16 pilot holes into the wall studs and secure the cabinet to the wall using 4 ea lag bolts and washers See f...

Страница 2: ... washers See figure 5 Tighten the 2 bolts that connect the cabinets 4472 0707 2 12 5 STACK ON PRODUCTS COMPANY P O BOX 489 WAUCONDA IL 60084 MODEL GC 500 5 PISTOL AMMO CABINET ASSEMBLY IMPORTANT Install the shelf before mounting the cabinet to a wall Install shelf with 4 10 32 nuts and bolts See figure 4 Place foam pad in bottom of cabinet Insert the plastic plugs in the cabinet s top mounting hol...

Страница 3: ... _______ Unit Dimensions________________________________________ Unit Description___________________________________________________________ Owner s Name ____________________________________ Date Purchased___ ___ ____ Owner s Address ___________________________ Unit or Apt Number _________________ City ___________________________ State _______________ Zip Code________________ Telephone Number ____...

Страница 4: ...E USE ACCIDENT NEGLIGENCE ABUSE OR MISUSE INCORRECT MAINTENANCE ALTERATION OR REPAIR BY ANYONE OTHER THAN STACK ON IN ADDITION THIS WARRANTY DOES NOT COVER ANY ACCESSORIES OR PARTS USED WITH OR IN THE PRODUCT WHICH ARE NOT INCLUDED WITH THE ORIGINAL PURCHASE THIS WARRANTY IS EXCLUSIVE AND EXPRESSLY IN LIEU OF ALL OTHER WARRANTIES EXPRESSED OR IMPLIED INCLUDING THE WARRANTIES OF MERCHANTABILITY AND...

Страница 5: ...eurs de l armoire si vous n installez pas l armoire à munitions et pistolets sur le dessus de l armoire de sécurité Fixation au mur Les 4 trous de fixation à l arrière de l armoire doivent être alignés aux 16 pouces centres des montants Percez de nouveaux trous dans l armoire si nécessaire Figure 3 Percez 4 avant trous de 3 16 po dans les montants et fixez l armoire au mur à l aide de 4 tire fonds...

Страница 6: ...boulons qui maintiennent les armoires ensemble 4472 0707 6 12 5 STACK ON PRODUCTS COMPANY P O BOX 489 WAUCONDA IL 60084 MODÈLE GC 500 5 INSTALLATION DE L ARMOIRE À MUNITIONS ET PISTOLETS IMPORTANT Installez la tablette avant de fixer l armoire au mur Installez la tablette à l aide de 4 boulons et écrous de 10 32 Figure 4 Installez le revêtement en mousse au fond de l armoire Insérez les bouchons d...

Страница 7: ..._________________ Numéro de clé le cas échéant ________________ Dimensions de l unité________________________________________________________ Description de l unité___________________________________________________________ Nom du propriétaire _____________________________________ Date d achat ___ ___ ____ Adresse du propriétaire ___________________________ No d appartement _____________ Ville ___...

Страница 8: ...GLIGENT ABUSIF D UNE MAUVAISE UTILISATION D UN ENTRETIEN INCORRECT D ALTÉRATIONS OU DE RÉPARATIONS PAR QUICONQUE AUTRE QU UN REPRÉSENTANT DE STACK ON EN OUTRE CETTE GARANTIE NE S APPLIQUE À AUCUN ACCESSOIRE OU PIÈCE UTILISÉS AVEC LE PRODUIT OU DANS LE PRODUIT ET QUI NE FONT PAS PARTIE DE L ACHAT ORIGINAL CETTE GARANTIE EST EXCLUSIVE ET REJETTE FORMELLEMENT TOUTE AUTRE GARANTIE EXPRIMÉE OU SUGGÉRÉE...

Страница 9: ...n gabinete para pistolas y municiones sobre este gabinete Para Montar a la Pared Los 4 hoyos para montar el gabinete a la pared ubicados en la parte posterior de la unidad deberán alinearse con los centros de la madera detrás de las paredes de tablaroca Taladre hoyos nuevos en la caja fuerte si es necesario véase la figura 3 Taladre 4 hoyos de 3 16 de diámetro dentro de la pared y fije la caja fue...

Страница 10: ...2 tornillos que conectan los gabinetes 4472 0707 10 12 5 STACK ON PRODUCTS COMPANY P O BOX 489 WAUCONDA IL 60084 MODELO GC 500 5 ENSAMBLADO DEL GABINETE PARA PISTOLAS Y MUNICIONES IMPORTANTE Instale la repisa antes de montar el gabinete a la pared Instale la repisa con 4 tuercas y tornillos 10 32 véase la figura 4 Coloque el cojín de hule espuma sobre el fondo del gabinete Inserte los pernos de pl...

Страница 11: ...______ Número de Llave si aplica ______________ Dimensiones de la Unidad_____________________________________________________ Descripción de la Unidad______________________________________________________ Nombre del Propietario ______________________________ Fecha de Compra___ ___ ____ Dirección propietario _____________________________ No Interior _________________ Ciudad ________________________...

Страница 12: ...CCIDENTE NEGLIGENCIA ABUSO O MAL USO MANTENIMIENTO INCORRECTO ALTERACIÓN O REPARACIÓN POR CUALQUIER TERCERO QUE NO SEA STACK ON ADICIONALMENTE ESTA GARANTÍA NO CUBRE ACCESORIOS O PIEZAS USADAS CON O DENTRO DEL PRODUCTO QUE NO ESTÁN INCLUIDOS CON LA COMPRA ORIGINAL ESTA GARANTÍA ES EXCLUSIVA Y EXPRESAMENTE EN LUGAR DE CUALQUIER OTRA GARANTÍA EXPRESA O IMPLÍCITA INCLUSIVE LAS GARANTÍAS DE COMERCIABI...

Отзывы: