background image

Quantum Scalar i6000: Drive Replacement

6-67999-01 Rev A

October 2013

Remove and Replace the Drive

5

c

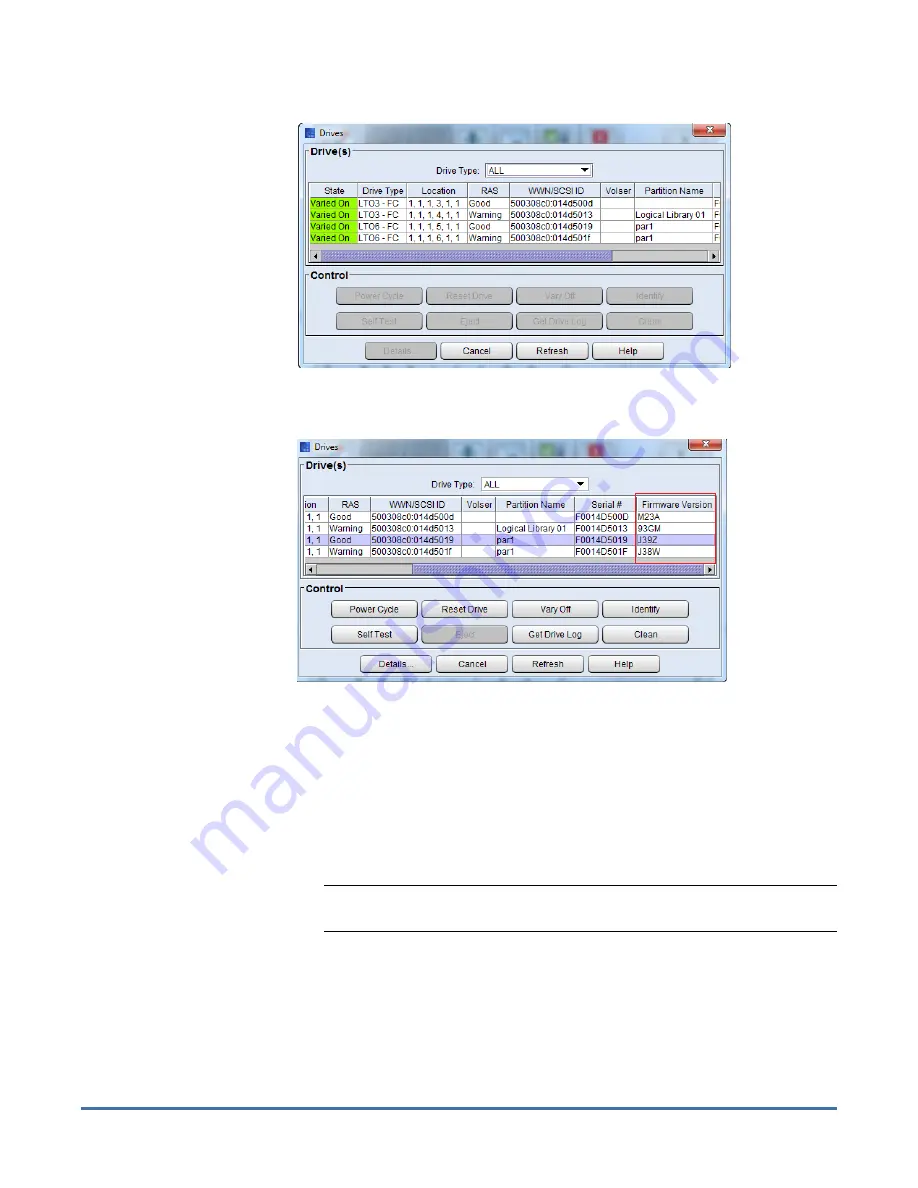
Using the coordinates, select the drive to be replaced.

d

Scroll over to the 

Firmware Version

 column.

e

Write down the four digit firmware level.

4

Click 

Cancel

 to close the 

Drives

 screen.

5

Double check that there is no tape in the drive you are removing. If there is 

a cartridge in the tape drive:

a

Select 

View > Partition

. You will select the partition that contains the 

drive you are replacing.

b

Select 

Operations > Drives > Unload

. This will eject the tape from the 

drive and return it in its storage slot in the library.

Note:

If a tape is in the drive and cannot be ejected, call Quantum 

support before proceeding.

6

Go back to library view by selecting 

View > Physical Library

.

7

Select 

Tools > Drives

. The 

Drives

 screen displays.

8

Vary off the drive:

a

From the 

Drives

 screen, use the 

Drive Type

 drop-down menu to display 

the drives by drive type.

b

Select the drive, and then click 

Vary Off

.

Summary of Contents for Scalar i6000

Page 1: ...eplace a tape drive in a Scalar i6000 library If a drive fails the library will issue a ticket From the Details screen write down the Repair Link or Error Code number You ll need it when you contact Q...

Page 2: ...able to identify the correct drive Removing a drive incorrectly can impact data on your library The drive coordinate system has six 6 numbers for example 1 2 1 7 1 1 The first number identifies the a...

Page 3: ...nly be contained in rack 1 this number will always be 1 The fourth number indicates the section Each module can contain 12 drives so with drives this number can range from 1 12 Drives are counted from...

Page 4: ...is an EDLM drive it must be replaced by Quantum service personnel Caution Before starting this procedure verify that you have received the same make and model drive as the drive you are replacing The...

Page 5: ...e drive a Select View Partition You will select the partition that contains the drive you are replacing b Select Operations Drives Unload This will eject the tape from the drive and return it in its s...

Page 6: ...ve Handle 9 Disconnect all cables from the drive Note which cables go to which connections for reference during drive replacement 10 Loosen the two thumbscrews on the drive 11 Grip the drive handle an...

Page 7: ...complete before continuing The drive sled firmware update will take approximately 5 minutes 18 Go to the rear of the module and observe the drive status LEDs and wait for the following conditions to...

Page 8: ...ate operations affect drives that are within the partition only Note You can only perform firmware updates for drives of the same product such as IBM LTO 4 or HP LTO 5 Caution If you load a firmware i...

Page 9: ...n menu select the firmware image you want to install The drop down list includes all drive firmware images that are currently stored on the library regardless of drive type Be careful to select a driv...

Page 10: ...Ds on the back of the drive will display Green LED 1 solid green indicating port connectivity to either the FC I O blade or the customer FC switch Amber LED off Blue LED blinks one time per 10 seconds...

Page 11: ...acement drive online and perform any necessary tests to ensure it is working properly 18 Call Quantum Service to confirm that drive replacement was successful and to perform any further troubleshootin...

Page 12: ...Quantum Scalar i6000 Drive Replacement 6 67999 01 Rev A October 2013 12 Update the Drive Firmware Using Firmware Images...

Reviews: