background image

Chapter 3  Quantum PX720 Remote Management

Setup

Quantum PX720 User’s Guide

126

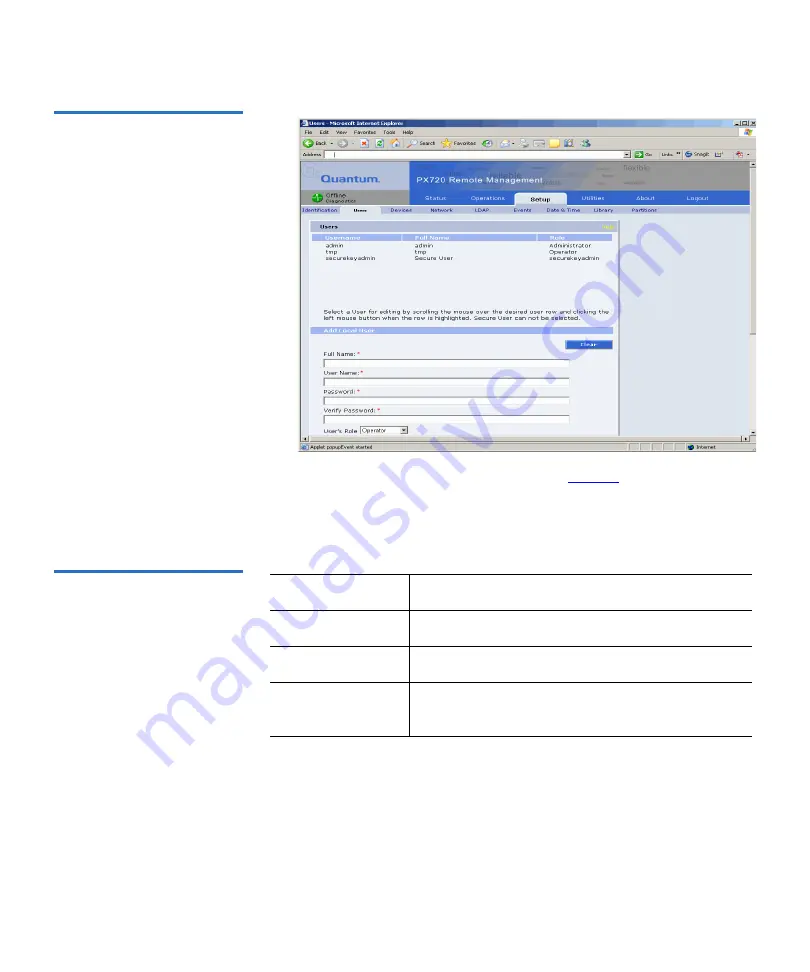
Figure 73  Users Page

2

Edit the user information as desired (see 

table 25

 for a description of 

the fields).

3

Click 

Save

 when complete.

Table 25   User Information

Field

Description

Full Name*

Enter the full name of the user

User Name*

Enter a user name

Password/Verify 
Password*

Enter a password

Summary of Contents for PX720

Page 1: ...Quantum PX720 6444601 08 A01 Quantum PX720 PX720 User s Guide User s Guide User s Guide User s Guide User s Guide...

Page 2: ...OPYRIGHT STATEMENT Copyright 2007 by Quantum Corporation All rights reserved Your right to copy this manual is limited by copyright law Making copies or adaptations without prior written authorization...

Page 3: ...Library Models 7 Shelf Slot Numbering Conventions 8 Sliding Out the Slot Panels 16 Features and Benefits 17 DLTSage Tape Security 19 Mixed Media Support 19 SMI S Support 19 Tape Drive and Media Analy...

Page 4: ...and Off 51 Turning On the Library 51 Placing the Library On line or Off line 52 Turning Off the Library 52 Using the OCP Operator Control Panel 53 Home Screen 53 OCP Buttons 54 Library Status and Att...

Page 5: ...Page 107 CLM If Installed 108 Operations 109 Accessing the Operations Page 110 Find Page 110 Move Page 116 Inventory Page 118 Drives Page 119 Sift Sort 120 Setup 123 Accessing the Setup Page 123 Ident...

Page 6: ...tions 195 Appendix B Relocating the Library 201 Checking the New Installation Site 202 Preparing the Library for Relocation 202 Removing Tape Cartridges 203 Installing Shipping Restraints and Packing...

Page 7: ...anada Digital Apparatus 218 Notice for USA and CANADA Only 218 Cette remarque ne concerne que les Etats Unis et le Canada 219 Battery Statement 219 Electronic Waste Recycling and Disposal WEEE 223 Dec...

Page 8: ...Numbering PX720 LTO Left Panels 14 Figure 8 Slot Shelf Numbering PX720 LTO Right Panels 15 Figure 9 Slot Shelf Numbering PX720 LTO Back Slots 16 Figure 10 Sliding the Slot Panels Out of the Cabinet 1...

Page 9: ...losing the Front Door 48 Figure 30 Closing the Back Door 49 Figure 31 PX720 Cabling Configuration 50 Figure 32 Turning On the Library 52 Figure 33 OCP Main Screen 54 Figure 34 OCP Components 58 Figure...

Page 10: ...reen 97 Figure 57 Status Page 98 Figure 58 Event Log Page 99 Figure 59 Statistics Page 103 Figure 60 Tape Alert Page 104 Figure 61 Event Log Page 106 Figure 62 Cabinet Status Page 107 Figure 63 CLM St...

Page 11: ...ils 151 Figure 89 Partition Layout 152 Figure 90 Secure Key Page 156 Figure 91 Protection Mode for Cartridges 157 Figure 92 Enable Disable Secure Key for Drives 158 Figure 93 Modify Secure Key for Lib...

Page 12: ...Page 183 Figure 107 Links Page 184 Figure 108 Tape Drive LEDs 192 Figure 109 Shipping Restraints Storage Location 204 Figure 110 Installing the Robotic Shipping Restraint 205 Figure 111 Installing th...

Page 13: ...P LTO 3 Characteristics 8 Table 6 HP LTO 4 Characteristics 8 Table 7 Storage Elements SDLT 9 Table 8 Storage Elements LTO 13 Table 9 OCP Features 24 Table 10 Tape Drive and Cartridge Specifications 27...

Page 14: ...n 139 Table 29 Send Email Test 140 Table 30 SNMP Trap Selections 142 Table 31 Library Configuration 146 Table 32 Host Configuration 146 Table 33 Creating a Partition 153 Table 34 Configuration File Ty...

Page 15: ...Tables Quantum PX720 User s Guide xv Table 46 Information Events 211 Table 47 Warning Events 213 Table 48 Critical Events 214...

Page 16: ...and discusses Library operations Configuration Relocation Basic troubleshooting Audience This manual is written for library operators and field service engineers Purpose This document provides inform...

Page 17: ...The Appendixes provide library specifications relocation and repacking instructions automatic drive cleaning instructions laser regulations regulatory statements and event reporting Notational Conven...

Page 18: ...anual s for information about your tape drive and cartridges SCSI 2 Specification 0 The SCSI 2 communications specification is the proposed American National Standard for information systems dated Mar...

Page 19: ...m Getting More Information or Help StorageCare Quantum s comprehensive service approach leverages advanced data access and diagnostics technologies with cross environment multi vendor expertise to res...

Page 20: ...vice Center More StorageCare Guardian information can be found at http www quantum com ServiceandSupport Services GuardianInformation Index aspx For further assistance or if training is desired contac...

Page 21: ...fixed in minutes When problems require onsite support field engineers will have better information along with the right parts necessary to fix the problem StorageCare Guardian allows Quantum to 0 Mon...

Page 22: ...an agent software from http www quantum com guardiandownload 2 Customer installs the StorageCare Guardian agent on any Windows 2000 2003 XP or Solaris 8 9 server located at the customer s site 3 The S...

Page 23: ...StorageCare Guardian Quantum PX720 User s Guide xxiii...

Page 24: ...PX720 and its components The chapter consists of Overview Features and Benefits DLTSage Tape Security Mixed Media Support SMI S Support Library Components Cabinet OCP CHM Tape Drives Load Port and Ma...

Page 25: ...20 supports Super DLTtape and LTO Ultrium technology with single frame combinations of up to 20 drives 642 slots with SDLT or 726 slots with LTO Tape drive choices include the Quantum SDLT320 SDLT600...

Page 26: ...ty Entry Level Capacity 1 The entry level capacity PX720 see figure 1 allows cartridge slots to be accessed from bin panels one and two Note All levels of capacity on demand do NOT include the availab...

Page 27: ...rtridge slots to be accessed from bin panels one through four Drive Type Available Slots with removable load ports SDLT 382 LTO 430 Left hand panels Right hand panels Entry level capacity allows cartr...

Page 28: ...apacity PX720 see figure 3 allows cartridge slots to be accessed from all six bin panels Drive Type Available Slots with removable load ports SDLT 642 Left hand panels Right hand panels Intermediate l...

Page 29: ...on Overview Quantum PX720 User s Guide 6 Figure 3 Full Capacity LTO 726 Drive Type Available Slots with removable load ports Left hand panels Right hand panels Full capacity allows cartridge slots to...

Page 30: ...0 Performance Characteristics Table 3 DLT S4 Performance Characteristics Table 4 HP LTO 2 Characteristics Quantum PX720 SDLT Model drives slots 20 648 Capacity in Terabytes TB 160 GB per cartridge 103...

Page 31: ...p to 20 tape drives 648 storage slots on interior walls see table 7 2 programmable load ports with 14 28 SDLT slots each Quantum PX720 HP LTO 3 Model drives slots 20 732 Capacity in Terabytes TB 400 G...

Page 32: ...show the storage slot load port slot and tape drive numbering conventions These conventions are used by the library GUI and the diagnostic software program Number of Tape Drives Number of Storage Elem...

Page 33: ...0266 0267 0268 0269 0270 0271 0272 0273 0274 0275 0276 0277 0278 0279 0280 0281 0282 0283 0284 0285 0286 0287 0224 0225 0226 0227 0000 0001 0002 0003 0004 0005 0006 0007 0008 0009 0010 0011 0012 0013...

Page 34: ...0556 0557 0558 0559 0560 0513 0514 0515 0516 0274 0275 0276 0277 0278 0279 0280 0281 0282 0283 0284 0285 0286 0287 0288 0289 0290 0291 0292 0293 0294 0295 0296 0297 0298 0299 0300 0301 0302 0303 0304...

Page 35: ...e table 8 2 programmable load ports with 16 32 LTO slots each Note The number of slots located on the back of the library varies with the number of installed tape drive clusters see table 7 and if a c...

Page 36: ...show the storage slot load port slot and tape drive numbering conventions These conventions are used by the library GUI and the diagnostic software program Number of Tape Drives Number of Storage Elem...

Page 37: ...0082 0083 0084 0085 0086 0087 0088 0089 0090 0091 0092 0093 0094 0095 0096 0097 0098 0099 0100 0101 0102 0103 0104 0105 0106 0107 0000 0001 0002 0003 0004 0005 0006 0007 0008 0009 0010 0011 0012 0013...

Page 38: ...0622 0623 0624 0625 0626 0627 0628 0629 0630 0631 0632 0633 0634 0635 0636 0637 0638 0639 0640 0641 0642 0643 0644 0645 0646 0647 0306 0307 0308 0309 0310 0311 0312 0313 0314 0315 0316 0317 0318 0319...

Page 39: ...inet see figure 10 Note The number of slots located on the back of the library varies with the number of installed tape drive clusters see table 8 and if a card cage or CLM is present in the library 0...

Page 40: ...ures and Benefits The Quantum PX720 provides the following features and benefits High capacity high performance data storage and retrieval The library may house up to 648 SDLT tape cartridges and 20 S...

Page 41: ...ported in the same library Library partitioning option available SMI S Storage Management Initiative Specification support Easy serviceability and manageability Hot swappable drives and DC power suppl...

Page 42: ...nt DLTSage Tape Security is available at no additional cost as an integrated feature in of the DLT S4 tape drive and PX720 tape library firmware revision 4 5 or later Mixed Media Support The PX720 tap...

Page 43: ...vent of a backup failure the Tape Alert page can tell you what happened and why answering questions such as Where is the problem Is it with the drive or media Does the tape drive need to be returned f...

Page 44: ...ary operation through the front and back doors of the library cabinet Front Panel 1 The front of the library cabinet see figure 11 provides the following Front door provides easy access to the CHM and...

Page 45: ...rtridge magazines for easy insertion of cartridges without interrupting library operations Cabinet Back 1 The back of the cabinet see figure 12 provides easy accessibility to Cooling fans Power contro...

Page 46: ...unit Figure 12 PX720 Cabinet Back Panels OCP 1 The OCP features a menu system for determining library status configuring the library and performing certain diagnostic functions The OCP see figure 13...

Page 47: ...ese buttons in combination with the OCP to scroll through screens and select options or commands The functionality of these buttons changes depending on the currently displayed OCP screen Light emitti...

Page 48: ...Quantum PX720 User s Guide 25 Figure 13 OCP Initial Screen CHM 1 The CHM consists of the following components CHM Cartridge handling mechanism Vertical carriage assembly Horizontal drive motor Extens...

Page 49: ...CHM to remove the cartridge from a slot or drive The CHM includes an optical scanner that reads standard six character 7 characters for SDLT and 8 characters for LTO 3 of 9 barcode labels The scanner...

Page 50: ...e than standard drives due to the automated environment If a drive experiences read write errors when the AutoClean function is enabled the library issues an error message stating that drive cleaning...

Page 51: ...n page 82 for more information Note When a cleaning cartridge has completed its 20 use limit it is automatically exported from the library requiring a new one to be loaded through the load port Note T...

Page 52: ...rt Bin Packs Figure 16 Right Load Port Bin Packs Fixed bin packs SDLT removable LTO removable bin packs 7 bins bin packs 8 bins 8 SDLT 9 LTO 2 bins per pack per pack per pack Fixed bin packs SDLT remo...

Page 53: ...you have the following equipment and accessories available before installing the library Sufficient SCSI cables to support 2 host bus adapters HBAs per drive cluster Sufficient HBAs 1 for the media c...

Page 54: ...ion Cabling the Quantum PX720 Loading the Tape Cartridges Initial Configuration Cabling the Quantum PX720 1 After the Quantum PX720 is in its final location the tape drives and robotics controller mus...

Page 55: ...es see figure 17 3 Connect the host computers to the tape drives by routing SCSI cables up through the base of the library and along the right hand side of the cabinet see figure 18 Tech Tip Start cab...

Page 56: ...cting the Tape Drives Note Make sure that all SCSI cables droop down slightly to ensure that the back door closes Host computers SCSI cables Host computers Cluster with 2 tape drives per bus Terminato...

Page 57: ...he library load the appropriate tape cartridges LTO or SDLT into the library starting with the left hand panels see Shelf Slot Numbering Conventions on page 8 for slot locations Initial Configuration...

Page 58: ...Library 2 When the library completes the boot up sequence and the OCP is active press Menu from the Home screen The OCP displays the Menu screen see figure 21 Power button Door latch Service tray PX7...

Page 59: ...ption Getting Started Quantum PX720 User s Guide 36 Figure 21 Menu Screen 3 From the Menu screen use the up and down arrows to highlight Setup and press Select 4 The library prompts you for your passw...

Page 60: ...tting Started Quantum PX720 User s Guide 37 Figure 22 Password Screen 5 Enter the 6 digit password The password is accepted after the sixth digit is entered The Setup screen displays see figure 23 Not...

Page 61: ...ing information IP Address requires cabinet reboot IP Subnet Mask IP Gateway DHCP default enabled Change Password Restore Factory Settings Drive Autoclean default disabled Drive Autounload default dis...

Page 62: ...enter the password to confirm To enable drive autoclean use the up and down arrows to select Drive Autoclean and press Select To enable drive autounload use the up and down arrows to select Drive Auto...

Page 63: ...Library On and Off Using the OCP Operator Control Panel Inserting Tape Cartridges into the Load Port Inserting Tape Cartridges To insert tape cartridges 1 Label each cartridge 2 Set the write protect...

Page 64: ...me Keep the strap on until you are ready to close the cabinet doors Keep static sensitive parts in their shipping containers until ready for installation Do not place static sensitive parts on any met...

Page 65: ...leaning cartridges The SDLT cartridge label has eight characters e g AAANNNS The first six characters are called the volume identifier which is made up of three alpha characters and three numeric char...

Page 66: ...be written to the cartridge write enabled or whether data on the cartridge is protected from being erased or overwritten write protected Set the write protect switch to enabled when inserting new car...

Page 67: ...ridges The LTO cartridge label has eight characters e g AAANNNL The first six characters are called the volume identifier which is made up of three alpha characters and three numeric characters These...

Page 68: ...and insertion orientation Figure 26 LTO Cartridges Note You cannot choose the sequence of labels inside the bar code label packs No two packs are ever the same to avoid issues with duplicate bar code...

Page 69: ...dge however the cartridge can be placed anywhere in the library When the library completes the inventory the system stores the cleaning cartridge location so it will be available when a tape drive req...

Page 70: ...lace a tape cartridge in each fixed storage slot on the back wall and the side walls of the cabinet and on the sides Be sure all cartridges are properly oriented with the barcode facing you and that t...

Page 71: ...ck the front door using the key provided in the accessory kit see figure 29 Figure 29 Closing the Front Door 2 Close and lock the back door using the key provided in the accessory kit see figure 30 No...

Page 72: ...st Workstations 2 Connect the SCSI cables and jumpers as shown in the following figure Note Quantum ships sufficient SCSI cables and terminators with this cabinet to set up two drives per SCSI bus The...

Page 73: ...20 Cabling Configuration Note Make sure that all SCSI cables droop down slightly to ensure that the back door closes Host computers SCSI cables Host computers Cluster with 2 tape drives per bus Termin...

Page 74: ...y Turning On the Library 2 To turn on the library 1 Verify that Power cables are firmly in place All power buttons on the tape drive clusters are on Both power buttons on the cabinet controller are on...

Page 75: ...ect Cabinet and use the up and down arrows to turn the library off line For more information on the Operations screen see Operations Screen on page 74 Turning Off the Library 2 To turn off the library...

Page 76: ...ry see figure 32 Using the OCP Operator Control Panel The OCP is located on the front of the library The menus on the OCP allow you to obtain information about the library execute library commands and...

Page 77: ...screen Library Status and Attention Messages 2 The upper left hand and right hand corners of the OCP are reserved for library status and attention messages The library status information consists of...

Page 78: ...drive cluster controller software Library Status Information Location Cabinet State Description Cabinet Health Description Online The cabinet is online and ready for backup jobs OK The cabinet health...

Page 79: ...reconnect to the robot Reestablishing Library Communication The cabinet is attempting to reestablish library communication Attention Message Location Attention Messages Description Stopped The cabinet...

Page 80: ...anagement pages to determine the problem see chapter 3 on page 81 Upgrading FW The cabinet is in the process of updating firmware When the update is complete the cabinet will go on line Comm Mismatch...

Page 81: ...hread Details Cabinet Health Check Partitions Cabinet Name Model Serial Number IEEE Number WWN WWN Ports Slots Occupied Slots Drives Partition Name IEEE State Slot Start Addr Slot Start Phys Idx Total...

Page 82: ...n Operations Screen Diagnostics Screen Stop Button Menu Screen 2 The Menu screen provides access to contact information cabinet information as well as providing a way to setup library information opti...

Page 83: ...rmation Options Service Information Options Event Log Information menu item only available with the library partitioning option installed Library Information 2 To view library information 1 From the M...

Page 84: ...ary to Quantum customer support Software software version currently loaded on the library including the cabinet controller and cabinet robotics Serial number serial number of the library 2 When you ar...

Page 85: ...the cabinet Serial Number serial number of the cabinet IEEE ID IEEE identification of the cabinet Slots number of slots configured in the cabinet for the specific drive type Drives number of drives co...

Page 86: ...own arrows to highlight Health Status and press Select The Health Status screen displays see figure 38 Figure 38 Health Status Screen The Health Status screen displays the current library health When...

Page 87: ...tions and press Select The Partitions screen displays see figure 39 Figure 39 Partitions Screen 2 From the Partitions screen use the up and down arrows to highlight a specific partition and press Sele...

Page 88: ...13 Table 13 Partitions Details Partitions Options Description Partitions Name Displays the name of the specific partition IEEE Displays the IEEE ID of the partition State Displays the library state o...

Page 89: ...ys idx Displays the physical starting tape drive address for the partition Total drives Displays the total number of tape drives in the partition SDLT drives Displays the number of SDLT tape drives in...

Page 90: ...gned to this partition No barcode lbl Displays the barcode status enable disable Autoclean Displays the tape drive autoclean status enable disable Auto unload Displays the tape drive auto unload statu...

Page 91: ...he sixth digit is entered The Setup screen displays see figure 41 Figure 41 Setup Screen The Setup screen displays the following information Change Network Settings Note The default password is 001122...

Page 92: ...unload default disabled Barcode Length Configured Drives Quick Load Port Open Configured Slots Identify as ATL P7000 Both Load Ports Left Load Port default enabled Right Load Port default enabled 3 To...

Page 93: ...P server to assign IP information disable this function 4 To edit the setup information use the up and down arrows to highlight the section and press Select To change the password use the up and down...

Page 94: ...Both Load Ports and press Select The library is automatically reconfigured To enable P7000 identity use the up and down arrows to select Identify as ATL P7000 and press Select This allows the host com...

Page 95: ...om the Home screen The OCP displays the Load Ports screen see figure 43 Warning Keep fingers and other body parts away from the load port doors when open The stop button is available from the operator...

Page 96: ...ecific load port s and press Select a To open the load port us the up and down buttons to select Open and then press Select A notification displays warning you to open the doors prior to opening the l...

Page 97: ...access the Operations screen press Ops from the Home screen The OCP displays the Operations screen see figure 44 Device Options Description Details Status The Status value can either be an OK or a err...

Page 98: ...uantum PX720 User s Guide 75 Figure 44 Operations Screen 1 To change the status of the cabinet or tape drive s use the up and down arrows to highlight the specific device and press Select The followin...

Page 99: ...entories every slot load port and tape drive and reports back the location of every tape cartridge within the cabinet Barcode labels are also reported if available Reboot A reboot shuts down the cabin...

Page 100: ...is option shuts down a specific tape drive within the cabinet in preparation for tape drive removal On This option powers on a specific tape drive within the cabinet Reset This option re initializes a...

Page 101: ...the type of media SDLT LTO Status The Status value can either be a OK or a error A zero indicates that the last command to be executed on the tape drive completed successfully If a 2 appears a check c...

Page 102: ...s see figure 45 Figure 45 Move Media Screen The following move media options are available see table 17 Table 17 Move Media Options Note The library must be offline to perform a move media command Mov...

Page 103: ...d port that is holding the cartridge you wish to move see Shelf Slot Numbering Conventions on page 8 for element numbering Destination Cabinet number in a CLM environment that contains the destination...

Page 104: ...ng diagnostic tests are available from the OCP Robotics Self Test Individual Axis Self Test Robotics to Home Position Calibrate Cabinet Read Cabinet Serial Number Read Cabinet IEEE ID Read Cabinet Typ...

Page 105: ...m moving To return the cabinet to the online state press the Start button Inserting Tape Cartridges into the Load Port This section explains how to insert tape cartridges using the load port mechanism...

Page 106: ...2 Both the left and right load ports on the front of the PX720 can have either fixed or removable bin packs These bin packs can support both SDLT and LTO tape cartridges see table 18 Table 18 Load Po...

Page 107: ...antum PX720 User s Guide 84 Figure 47 Removing the Bin Packs 2 To install the removable bin packs place the base of the bin back into the bin panel and snap into place as shown in figure 48 Note The b...

Page 108: ...Chapter 2 Basic Library Operations Inserting Tape Cartridges into the Load Port Quantum PX720 User s Guide 85 Figure 48 Installing the Removable Bin Packs...

Page 109: ...lled on the host computer Status allows you to view the following error and cabinet status tape alerts event logs and statistics Operations allows you to perform cabinet operations remotely such as ca...

Page 110: ...er You can download this software from http www java com Quantum PX720 Web Page Menu Items 3 The following figures depicts the menu items available from the Quantum PX720 Web Pages Figure 49 and figur...

Page 111: ...Add Local User Full Name User Name Password Verify password User Role Operator Observers Administrator Address Phone Fax Pager Email SCSI Fibre Add to Event List Devices Device SCSI ID Vendor Model S...

Page 112: ...IEEE ID Slots Drives Load Ports Setup Secure Key Protection Mode Never write Only write Write to all Enable Disable Enable all drives Disable all drives Select drives Select Secure Key Sec Key Name Da...

Page 113: ...tware 2 In the Address field type http IPaddress where IP address is the IP address for the Quantum PX720 see Setup on page 123 3 Enter the username and password and click OK The Overview page display...

Page 114: ...curity Settings The banner frame displays the corporate logo and product name The contents frame displays a list of the Quantum PX720 web pages To view a page click its corresponding link The manageme...

Page 115: ...s in the process of going online Diagnostics or Observer Mode display under the Quick Status message indicating that a diagnostics test is running or the user logged in is an Observer Online Fail The...

Page 116: ...s lost communications with the robot CHM Check the error log and contact Quantum Customer Support if necessary Reconfiguring Library The library is in the process of reconfiguring Wait until the proce...

Page 117: ...LM is installed in the library the CLM and all connected cabinet status is displayed in the Overview section see table 21 Note When a library reconfiguring activity partition setting host configuratio...

Page 118: ...or drives that are not in an ok condition Clicking on the Quick Status icon redirects the browser to the Error Status page Table 22 lists the possible CLM health messages Table 22 CLM Status Health Me...

Page 119: ...tions area see figure 55 Figure 55 Security Settings Require SSL When selected the remote management pages are not available to browser sessions that are not using Secure Socket Layer SSL Enable or Di...

Page 120: ...pecific hardware status The page also provides access to event logs as well as library statistics The Status page is divided into the following sections Overview Page Event Log Page Statistics Page Ta...

Page 121: ...ll categories views all events in all categories Hardware views only hardware related events Software views only software related events Host Communication views only events related to host communicat...

Page 122: ...s by increments of one Double clicking will increment or decrement the value by 5 You may also type in a valid hour 0 24 or minute 0 59 2 Select desired categories and priority levels critical warning...

Page 123: ...ail windows also contains a Save As and Send buttons Statistics Page 3 The Statistics page allows the user to view library statistics for the entire library or certain components within the library Th...

Page 124: ...pted slot port picks Attempted slot port places Attempted drive picks Attempted drive places Number of individual horizontal moves Number of individual vertical moves Number of individual extension mo...

Page 125: ...displays see figure 59 Number of extension retries Number of gripper retries Number of depth retries Number of rotary retries Number of drive place retries Number of drive pick retries Number of parti...

Page 126: ...ed for notifying host applications and the library of current or impending problems with the tape drive or media To access the Tape Alert page from the Status page click on the Tape Alert tab at the t...

Page 127: ...rt Page The Tape Alert pages is divided into the following sections Refresh Tape Alert Data Display Filters Tape Alert Flags Barcode with Tape Alert Flags Drives with Tape Alert Flags Details Refresh...

Page 128: ...en it last occurred To view details of a tape alert including which drive and barcode the tape alert was detect in click the Alert Flag s View Details Barcode with Tape Alert Flags 3 The Barcode with...

Page 129: ...resulting window will display all events for that tape alert Error Status Page 3 The Error Status page lists all drives sensors within the library that are not in a normal operational condition To acc...

Page 130: ...cabinets the CLM and the available cabinet numbers display To access the Cabinet page from the Status page click on the Cabinet tab at the top of the page The Cabinet status page displays see figure 6...

Page 131: ...e recipients CLM If Installed 3 The CLM status page displays the CLM component status within the library This tab is only active in the library is in a CLM environment To access the CLM page from the...

Page 132: ...lick Save As to save the CLM status information to a local destination Use the Send button to email the hardware status information to one or more recipients Operations The Operations page is divided...

Page 133: ...management frame displays the Operations page see figure 64 Figure 64 Operations Page Find Page 3 The Find page allows the user to find and locate specific barcodes within the library as well as view...

Page 134: ...Grippers Find Barcode 3 The find barcode section allows the user to find a specific barcode or partial barcode within the library s and view its location To find a barcode or partial barcode 1 Enter a...

Page 135: ...ted Click the individual barcode label to display the corresponding cartridge detail page Select Map 3 The select map section allows the user to view the library in either a physical or logical view T...

Page 136: ...p A logical map see figure 67 displays panels clusters and load ports within a partition Clicking on the panel name opens a zoom Note The physical map shows gaps in the element addressing depending on...

Page 137: ...the panel i e similar to pulling out a loadport or drawer displaying all elements slots ports or drives belonging to the partition in a spreadsheet format From the zoom view clicking on an element ope...

Page 138: ...Chapter 3 Quantum PX720 Remote Management Operations Quantum PX720 User s Guide 115 Figure 67 Logical Map Unassigned partition First partition Second partition...

Page 139: ...cluding a virtual gripper for each partition Move Page 3 The Move page allows the user to move a cartridge or range of cartridges from a source slot port drive or address to a destination slot port dr...

Page 140: ...n If more than one cartridge is moved the position entered in as a destination is the first one filled consecutive elements must be empty Note The Physical Map allows you to move tape cartridges to or...

Page 141: ...ry on all elements within the library or specific element ranges To access the Inventory page from the Operations page click on the Inventory tab at the top of the page The Inventory page displays see...

Page 142: ...Shutdown shuts down the tape drive Power on powers on the tape drive To access the Drives page from the Operations page click on the Drives tab at the top of the page The Drives page displays see fig...

Page 143: ...Sift Sort page provides the capability for bulk movement of tape cartridges from their standard locations to load port elements Sift Sort Export The Sift Sort page also provides the ability to reloca...

Page 144: ...he Operations page click on the Sift Sort tab at the top of the page The Sift Sort page displays see figure 71 Figure 71 Sift Sort Page To sort the tape cartridges 1 Select the search criteria that th...

Page 145: ...sorting Show Sift Sort Barcode Table 3 Click the Show button to generate a barcode table for further sorting and filtering To apply filters select the filter type follow by a string case sensitive and...

Page 146: ...Users Devices Bridges Only if a Fibre Channel bridge is present Network LDAP Events Date Time Library Partitions Only available if partitioning option is installed Secure Key Only available if enabled...

Page 147: ...fication page from the Setup page click on the Identification tab at the top of the page The Identification page displays see figure 72 2 Edit the identification information as desired see table 24 fo...

Page 148: ...ers page displays see figure 73 Contract Number Enter the contract number for the library This is used to identify the library to customer support Asset Number Customer internal tracking number Locati...

Page 149: ...re 73 Users Page 2 Edit the user information as desired see table 25 for a description of the fields 3 Click Save when complete Table 25 User Information Field Description Full Name Enter the full nam...

Page 150: ...There are three User Roles available Administrators have access to all pages Operators have access to all pages except the pages under the Operations Setup or Utilities tabs Observers have access to...

Page 151: ...Enter a secure password 2 Verify the secure password by entering the password a second time in the Verify Password box 3 Click Create to create the secure key password Once the secure key administrato...

Page 152: ...ecure key password is updated Devices 3 This section allows the user to set the SCSI IDs for the changer library and every tape drive within the library 1 To access the Devices page from the Setup pag...

Page 153: ...takes effect 3 Click the drive link to view the drive details 4 Click Save As to save the SCSI setup information to a local destination Use the Send button to email the SCSI setup information to one o...

Page 154: ...e native Fibre Channel tape drive 1 Under the Drives page click Fibre in the connectivity column The Drive Configuration screen displays see figure 77 Figure 77 Native Fibre Channel Drive Configuratio...

Page 155: ...nstalled in the cabinet 1 To access the Bridges page from the Setup page click on the Bridges tab at the top of the page The FC Bridge page displays see figure 79 Figure 79 Fibre Channel Page 2 Click...

Page 156: ...ed as Not Communicating Click Rescan to re discover any recently installed Fibre Channel bridges Rescan will also remove any non communicating bridges Click Discovery to issue a discovery command on a...

Page 157: ...ck Save The Quantum PX720 will not use the new network information until it has been rebooted The Reboot button is available at the bottom of the Network page Table 26 Network Configuration Fields Fie...

Page 158: ...Default Gateway View or set the default gateway for the library Obtain IP from DHCP Server If your network uses a DHCP server to assign device IP addresses dynamically select this box When this box is...

Page 159: ...ds Table 27 LDAP Configuration Information Note The local users database created in the Users setup tab and the LDAP users database created remotely on the LDAP server can be used at the same time Fie...

Page 160: ...default attribute is userid Password Attribute Enter the attribute password used to compare with the supplied password If your LDAP server contains encrypted passwords this field must be blank Group...

Page 161: ...ents page allows the user to designate what library events are emailed to users as well as setup SNMP traps 1 To access the Events page from the Setup page click on the Events tab at the top of the pa...

Page 162: ...not successful verify the email server information and the administrative recipients list and try again The Email area details are shown in table 28 table 29 and table 30 Table 28 Email Notification N...

Page 163: ...list Message Type Informational When an informational event has occurred on the Quantum PX720 system such as starting up or shutting down the system an email is sent to everyone on the operator acces...

Page 164: ...in the Network Mask edit box ends in a zero the value in the IP address edit box must also end in a zero c Subnet mask in the Network Mask field d Access rights for the new community Read Only allows...

Page 165: ...ected Informational Traps are enabled Warning If selected Warning Traps are enabled Critical If selected Critical Traps are enabled No User Intervention Needed If selected a trap is generated whenever...

Page 166: ...k on the Date Time tab at the top of the page The Date Time page displays see figure 84 Figure 84 Date Time Page 2 There are two options for setting the system date and time a To manually set the syst...

Page 167: ...t and end period c Select Use NTP Network Time Protocol to synchronize the Quantum PX720 system clock with an outside time server To set the date and time using a network server select NTP server chec...

Page 168: ...CLM configuration as desired see table 31 and table 32 for a description of the fields and click Apply Note If the partitioning option is enabled the host configuration information appears on the part...

Page 169: ...enabled the Ports button on the OCP is replaced with OpenPorts to enable a 1 button push to open all configured load ports Note The Quick Load Port Open button does not require system to be offline En...

Page 170: ...uires activation Prefix media type in barcode Enables disables swapping media type prefix from the back of barcode to the beginning Barcode length Configures the number of maximum characters of tape c...

Page 171: ...diate or Full to enable in the option box and enter the Capacity Key to enable the slots The Capacity Key is found either in an e mail or letter from Quantum Changing the capacity level causes the lib...

Page 172: ...ns page displays see figure 87 Note Library partitioning requires the optional Quantum PX720 Library Partitioning Upgrade Kit to be installed in your library To add this upgrade kit please contact you...

Page 173: ...n or changing a partition s configuration and options Newly created or edited partitions are designated by an and are not available for operations such as Move Inventory and System Tests Partitions ma...

Page 174: ...PX720 Remote Management Setup Quantum PX720 User s Guide 151 Figure 88 Partition Details Partition Layout 3 The partition layout displays a map of all elements within the library color coded to design...

Page 175: ...o view the partition layout click the Partition Layout link The Partition Layout screen displays see figure 89 Figure 89 Partition Layout Note Use the Partition Layout link when creating or editing pa...

Page 176: ...t has been activated Library Global and Unassigned are reserved and cannot be used Available HBAs Select an available HBA to act as the media changer for this partition Slot count Enter the physical s...

Page 177: ...string to the host connected to this partition The partition will appear to the host as an ALT P7000 tape library Prefix Media Type in Barcode Select this box to move the media type prefix LTO or SDL...

Page 178: ...ed for deletion are still available for moves and inventory until you click Activate 3 Click Delete All to mark all partitions for deletion Partitions marked for deletion are still available for moves...

Page 179: ...Chapter 3 Quantum PX720 Remote Management Setup Quantum PX720 User s Guide 156 Figure 90 Secure Key Page...

Page 180: ...re Key File Protection Mode for Cartridges 3 Refer to figure 91 for information on Protection Mode for Cartridges Figure 91 Protection Mode for Cartridges The Protection Mode for Cartridges area defin...

Page 181: ...ble Disable Secure Key for Drives 3 Refer to figure 92 for information on Enable Disable Secure Key for Drives Figure 92 Enable Disable Secure Key for Drives The secure key can only be used with tape...

Page 182: ...e 93 Modify Secure Key for Library To modify the secure key used by the library 1 Select the secure key name from the list of available names 2 Click Update Assign Secure Key to Cartridge 3 Refer to f...

Page 183: ...ridge 1 Enter the barcode of the cartridge Separate multiple barcodes with either spaces or commas 2 Select a secure key name from the list of available names 3 Selecting Remove will remove the associ...

Page 184: ...e protected Secure Key field 3 Enter the same secure key in the Verify Secure Key field 4 Click New to create the secure key name key pair Delete Secure Key Name 3 Refer to figure 96 for information o...

Page 185: ...keys associated with cartridges in the library or currently assigned to the library but not assigned to any tape drives Active Secure Keys keys currently assigned to a tape drive To delete a Secure Ke...

Page 186: ...ould be backed up to a local device whenever a change is made to the security keys 1 Enter and verify the Encryption Key The Encryption Key is required when restoring the backup secure key file to any...

Page 187: ...the original library 2 Enter the path and file name of the file to be uploaded click Browse 3 Click Upload button A progress window is displayed indicating when the upload is complete or if any errors...

Page 188: ...165 Utilities The Utilities page is divided into the following sections Library Selftests Barcode Tests Logs System Tests Maintenance To access the Utilities page from the Overview page click on the...

Page 189: ...rary page is divided into the following sections Start Stop Library Online Offline Home Robotics Reboot Library Reboot CLM Remove Cabinet CLM Only Calibrate Fibre Channel Bridge Rescan To access the L...

Page 190: ...n depends on the current state of the cabinet If the cabinet is running a Stop button will be displayed If the cabinet is in the stop state a Start button will be displayed If multiple libraries are a...

Page 191: ...ange the library state to online or offline The library changes state to online or offline Home Robotics 3 The Home button homes all axis of the robot and moves the robot platform to the home position...

Page 192: ...abinet button to display When the cabinet has been physically removed from the CLM configuration the Remove Cabinet option can be used to remove the cabinet from the remote management pages Calibrate...

Page 193: ...scovers any FC bridges installed in the cabinet Details of the scan will be presented under FC Bridge tab To rescan Fibre Channel bridges installed in the cabinet 1 Click Rescan The Fibre Channel brid...

Page 194: ...Save As to save the selftest information to a local destination Use the Send button to email the selftest information to one or more recipients Barcode Tests 3 Barcode tests are used to test the integ...

Page 195: ...der is also used to calibrate the robot s position during inventory 1 To access the Barcode Tests page from the Utilities page click on the Barcode Tests tab at the top of the page The Barcode Tests p...

Page 196: ...ion A 100 OK at the end of the result indicates the test passed without errors The test results may be downloaded to a workstation by clicking the test name in the list Logs 3 The Logs page allows you...

Page 197: ...ly Bridge Traces and Event Logs if bridges are present Cabinet Robotic Controller Logs Available Logs Tape Drive Logs ADI Enabled drives only 3 Tape drive log files Log Page 7 can be generated for ADI...

Page 198: ...bridges These logs may be helpful for diagnostic purposes After generating a bridge log file it is recommended the file be saved to a local workstation with a unique name which can be used later to id...

Page 199: ...nel or saved for later use To create a log file 1 Click Create for the CC and RC logs or for the individual Cabinet or Robot logs files The Available Logs area contains the compressed log files that a...

Page 200: ...re 104 Figure 104 System Tests Page To run a system test on a cabinet 1 Select an action and a number of runs and click Apply a Select Continuous to continuously run the selected system test b Select...

Page 201: ...y until you abort the system test Previous test results can be viewed below Click Save As to save the system test information to a local destination Use the Send button to email the system test inform...

Page 202: ...agement Utilities Quantum PX720 User s Guide 179 Figure 105 Maintenance Page The following maintenance functionality is supported Configuration Files Upload Library Firmware Upload Fibre Channel Bridg...

Page 203: ...onfiguration information Use this file to replace all configurable options on the library User Contains only the user configuration information name password address etc Use this configuration file to...

Page 204: ...Upload Fibre Channel Bridge Firmware 3 The upload Fibre Channel bridge firmware section allows the user to remotely upload new Fibre Channel bridge firmware to the library Note After restoring config...

Page 205: ...e Firmware 3 The upload drive firmware section allows the user to remotely upload new drive firmware to the tape drive To upload tape drive firmware 1 Enter a path and filename where the file exists o...

Page 206: ...About page click on the About tab at the top of the page The About page displays the model number software version serial number and slot drive configuration Cabinet and partition characteristics als...

Page 207: ...cess to various points of interest which may be helpful in the operation and support of your library Your browser must have access to the internet for these links to operate Logout The Logout page all...

Page 208: ...problems produce error messages on the OCP called sense data values Sense data value messages consist of a number and a description of the error Common Problems and Solutions The troubleshooting info...

Page 209: ...I cabling and termination behind the center rear access door If necessary contact your field service representative about replacing the drives Internal Communication Error Communication error between...

Page 210: ...e error message including the SK ASC and ASCQ numeric values Press Ok to clear the message Problem Corrective Action The robot does not move at power up Make sure that all internal packing materials f...

Page 211: ...artridge Open the doors Retrieve the cartridge orient it properly and place the cartridge in an empty storage slot Do not try to place the cartridge in the gripper Perform an inventory see Inventory P...

Page 212: ...ersists contact an authorized Quantum field service engineer A move command failed Check the source and destination slots The source slot should hold the cartridge to be moved the destination slot sho...

Page 213: ...ement present If a tape drive cluster has been removed you must replace it with a back wall bin panel To add back wall bin panel upgrade kit please contact your Quantum Enterprise Storage Partner rese...

Page 214: ...o detects the absence of a tape cartridge and in DLT and SDLT drives the drive is not ready to accept a new cartridge In LTO drives this condition is a warning of a snapped tape Contact an authorized...

Page 215: ...Chapter 4 Troubleshooting Common Problems and Solutions Quantum PX720 User s Guide 192 Figure 108 Tape Drive LEDs Red LEDs Green LEDs...

Page 216: ...haracteristics and specifications are categorized as follows Physical Characteristics Performance and Reliability Characteristics Environmental Specifications Physical Characteristics Table 40 provide...

Page 217: ...2 x 142 cm Height 75 in 191 cm packaged 82 in 208 cm Weight Library 910 lbs 413 kg packaged 1075 lbs 487 6 kg Drives 8 lbs 3 63 kg each Cartridges 7 7 oz 218 kg each Tape Drives and Cartridges Tape Dr...

Page 218: ...teristics Environmental Specifications Table 44 provides various library environmental specifications Table 44 Environmental Specifications Average Swap Time 18 to 20 seconds consisting of two Move Me...

Page 219: ...transition 30o C 86o F per hour Relative humidity Operating 20 to 80 non condensing Shipping and storage 5 to 95 non condensing Altitude Operating Sea Level to 10 000 ft 3 048 m Shipping and storage S...

Page 220: ...r CISPR 22 FCC EN55022 European Union VCCI Japan AS NZS 3548 Australia New Zealand CNS13438 Taiwan Conductive Emissions 150kHz 5MHz 5MHz 30MHz Legal Limits 66dBuV Class A 60dBuV Class A RF Emissions p...

Page 221: ...surfaces Indirect Discharge Vertical Coupling Plane Legal Limits 2kV 4kV Quantum Limits 6kV 8kV Legal Limits 2kV 4kV 6kV 8kV Quantum Limits 10kV 12 5kV 15kV Legal Limits 2kV 4kV Quantum Limits 6kV 8k...

Page 222: ...al Limits 1kV 5 50ns 5kHz rep Quantum Limits 4kV 5 50ns 5kHz rep Legal Limits 0 5kV 5 50ns 5kHz rep Quantum Limits 2kV 5 50ns 5kHz rep Surge per EN55024 European Union Limits EN61000 4 5 Test Procedur...

Page 223: ...usceptibility per EN55024 European Union Limits EN61000 4 8 Test Procedure H Field 50Hz Legal Limits 1A m 3 Axis Quantum Limits 3A m 3 Axis Voltage Dips Interruptions per EN55024 European Union Limits...

Page 224: ...ding to another The instructions in this appendix are divided into the following sections Checking the New Installation Site Preparing the Library for Relocation Crating the Library Preparing the Libr...

Page 225: ...y Instructions Make sure the new location meets all applicable clearance environmental and power requirements Preparing the Library for Relocation To prepare the library for relocation Removing tape c...

Page 226: ...he OCP This places the library off line after the completion of any currently executing operations b Turn the library off 3 Unlock and open both front doors 4 Remove all tape cartridges from the libra...

Page 227: ...Restraints Storage Location 2 If the cartridge handling mechanism CHM is not in the far right position gently move it along the horizontal carriage until it is as far front as possible 3 Install the r...

Page 228: ...Library for Relocation Quantum PX720 User s Guide 205 Figure 110 Installing the Robotic Shipping Restraint 4 Open the back library door and install the counterweight as shown in figure 111 Robot Vert...

Page 229: ...d Ethernet cables 2 Disconnect the power cord from the outlet and the power distribution assembly of the library 3 Pack all cables with other library accessories Crating the Library Use this section I...

Page 230: ...place b Use the four shipping bolts to secure the library to the pallet c Remove the ramp from the pallet and slide and lean it against the side of the library with a cardboard sheet between the libr...

Page 231: ...Appendix B Relocating the Library Crating the Library Quantum PX720 User s Guide 208 Figure 112 Crating the Library...

Page 232: ...Operation After shipping or moving the library refer to the Quantum PX720 Pre Installation Site Survey Instructions and the Quantum PX720 Unpacking Instructions to Prepare the new installation site R...

Page 233: ...he OCP and remote GUI or through e mail alerts Quantum PX720 Events are broken up into the following sections Information Events Warning Events Critical Events Information Events Informational events...

Page 234: ...SNMP community Updated SNMP community Removed SNMP community Added new trap destination Updated trap destination Removed trap destination Updated date and time Updated IP address Updated subnet mask...

Page 235: ...are file complete Library option modified Begin LoadPort unload End LoadPort unload Library shutdown requested from OCP Library reboot requested from OCP HP Interface Manager Present Library Database...

Page 236: ...Table 47 Warning Events indicates a variable character This will change depending on the specific item within the cabinet Warning Events No mond connection No HBAs found Upgrade firmware failed pleas...

Page 237: ...Name Found OCP Unable to change http port forwarding Restore Library Database Factory Settings Failed Diagnostic Test stopped due to OCP communication error System Test Error Firmware upgrade failed...

Page 238: ...Cabinet Not Found Unable to communicate with cabinet task process Cabinet Controller Connection Failure Cabinet Controller Connection Lost HP Interface Manager Not Present Event Monitor Failure indic...

Page 239: ...ordance with the instruction manual may cause harmful interference to radio communications Any changes or modifications made to this equipment may void the user s authority to operate this equipment O...

Page 240: ...Appendix D Regulatory Statements Japan Statement VCCI Quantum PX720 User s Guide 217 Taiwan Statement 4 Japan Statement VCCI DEN AN Notice Japan Industry Canada Digital Apparatus...

Page 241: ...adequate measures ACHTUNG Dieses ist ein Ger t der Funkst rgrenzwertklasse A In Wohnbereichen k nnen bei Betrieb dieses Ger tes Rundfunkst rungen auftreten in welchen F llen der Benutzer f r entsprec...

Page 242: ...ci dessous et convenant pour 200 240 V Fiche NEMA L6 20P verrouillage par rotation avec broche de mise la terre Cordon Type SJT trifilaire 12 AWG 3 x 2 50 mm2 ou 18 AWG 1 0 mm2 LongeurMaximum 4 5 m 1...

Page 243: ...ST Micro M4Z28 BR00SH1 bevindt zich op de robot board De lithiumbatterij Renata CR1225FH Panasonic BR1225 1HC of Ray O Vac BR1225T2 bevindt zich op de kastcontroller board De ingebedde lithiumbatterij...

Page 244: ...er Fibre Channel Controller Platine Die Entsorgung dieser Batterie muss unter Einhaltung aller lokalen regionalen und bundesweiten Gesetze und Vorschriften erfolgen ATTENZIONE Questo prodotto contiene...

Page 245: ...ier Litiumbatteriet ST Micro M4Z28 BR00SH1 sitter p robotkortet Litiumbatteriet Renata CR1225FH Panasonic BR1225 1HC eller Ray O Vac BR1225T2 sitter p Cabinet styrkortet Det inbyggda litiumbatteriet D...

Page 246: ...for the recycling of electrical and electronic equipment The separate collection and recycling of your waste equipment at the time of disposal will help to conserve natural resources and ensure that i...

Page 247: ...Appendix D Regulatory Statements Declaration of Conformity Quantum PX720 User s Guide 224 Declaration of Conformity...

Page 248: ...nse code qualifier ASCQ indicates detailed information related to the additional sense code B Bit The basic unit of data in a binary numbering system binary digit represented by a 0 or a 1 Eight bits...

Page 249: ...equipment such as computers office machines or telecommunications equipment connected to low voltage power main networks 600V It does not apply to equipment whose primary function is radio transmissio...

Page 250: ...ain Name System or Service or Server an Internet service that translates domain names into IP addresses Because domain names are alphabetic they re easier to remember The Internet however is really ba...

Page 251: ...SI cabling requires Twist and Flat ribbon cable and an LVD SE terminator or a Twist and Flat ribbon cable with built in LVD termination All HP LTO 2 tape drives are LVD devices Quantum SDLT tape drive...

Page 252: ...lly 32 bits wide This means that it passes 32 bits of data simultaneously as if down 32 separate wires Some of the most recent computers include wider 64 bit PCI buses and already certain very high en...

Page 253: ...within the library cabinet SNMP Short for Simple Network Management Protocol a set of protocols for managing complex networks T Take up leader The ring at the beginning of a tape in a cartridge Tape...

Page 254: ...111 length 147 prefix media type 147 barcode label labeling LTO cartridges 45 barcode tests 171 browser options color deficient vision 95 default colors 95 browser internet 87 buttons OCP 54 C cabine...

Page 255: ...4 performance 7 DLTSage tape security 155 drives creating a partition 153 drives page 119 E editing a partition 154 email test 140 environmental specifications 195 climatic environment 196 physical en...

Page 256: ...rary firmware uploading 181 library panels inserting tape cartridges 40 47 library partitioning 149 155 accept cartridges when move fails and source is unknown 154 automatic drive cleaning 153 availab...

Page 257: ...119 find 110 inventory 118 move media from remote management pages 116 partition layout 116 show grippers 116 sift sort 120 operator user role 127 operator control panel 23 P partition layout 116 pas...

Page 258: ...r information 125 setup information OCP 67 71 shipping restraint 203 show grippers 116 sift sort page 120 barcode file option 122 show sift sort barcode table 122 slot count creating a partition 153 s...

Page 259: ...sts barcode 171 system 177 timeout session 96 transfer rate 27 traps SNMP 138 troubleshooting 185 192 OCP 187 operating 188 robotics 187 start up 185 turning the library off 52 U uploading Fibre Chann...

Reviews: