background image


16


Customer Helpline 

0845 077 8888

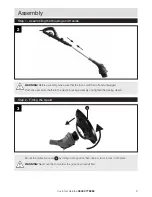
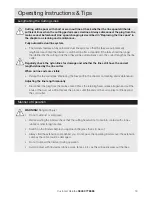
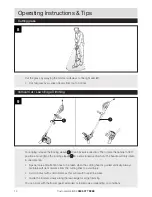
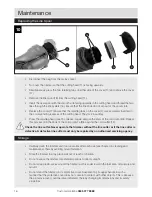
Replacing the Line Spool

Maintenance

• 

Disconnect the plug from the mains socket.

• 

Turn over the trimmer so that the cutting head (11) is facing upwards.

• 

Simultaneously press the two retaining tabs on either side of the cover (11) and remove the cover 
(17).

• 

Remove the line spool (18) from the cutting head (11).

• 

Insert the new spool with the smooth side facing upwards in the cutting head and thread the two 
lines through the line eyelets (16). Ensure that the line ends do not slip out of the spool slots.

• 

Replace the cover.(17) Ensure that the retaining tabs on the cover (17) are accurately inserted in 
the corresponding recesses of the cutting head. They lock in audibly.

• 

Press the retaining head (see 15), release it again and pull the ends of the cord out a little. Repeat 
this process until the ends of the cord project a little beyond the cord cutter (12).

Check the line cutter. Never operate the trimmer without the line cutter or if the line cutter is 
defective. A defective line cutter must only be repaired by an authorised servicing agency.

10

11

15

16

18

17

Storage

• 

Carefully clean the trimmer and its accessories after each use (see chapter on cleaning and 
maintenance), thereby avoiding mould formation.

• 

Store the trimmer in a dry place well out of reach of children.

• 

Do not expose the trimmer for extended periods to direct sunlight.

• 

Do not wrap plastic sacks around the trimmer as this could result in the formation of moisture and 
mould.

• 

Do not stand the trimmer on its protective cover. Suspend it by its upper handle in such a 
manner that the protective cover does not come into contact with other objects. This is because 
the protective cover could become deformed, thereby changing its dimensions and its safety 
properties.

Summary of Contents for GT2826

Page 1: ...hat will help you get the best from your mower ensuring it is assembled correctly and safely If you need help or have damaged or missing parts call the Customer Helpline on 0845 077 8888 Qualcast 430W...

Page 2: ...structions Tips 11 Switching ON and OFF 11 Adjusting the Additional Handle 12 Adjusting the Cutting Angle 12 Lengthening the Cutting Lines 13 Manner of Operation 13 Cutting grass 14 Vertical Cut Lawn...

Page 3: ...nd operating the trimmer Take extra care beware of hazards Read instruction manual Wear eye protection Do not use the machine in the rain or leave it outdoors when it is raining Disconnect the mains p...

Page 4: ...ed during use disconnect the cord from the supply immediately DO NOT TOUCH THE CORD BEFORE DISCONNECTING THE SUPPLY Do not use the appliance if the cord is damaged or worn Read the instructions carefu...

Page 5: ...trols and proper use of the equipment Before use always check the supply and extension cord for signs of damage or ageing If the cord becomes damaged during use disconnect the plug from the mains supp...

Page 6: ...the appliance off and disconnect the plug from the mains immediately Do not touch the main cable before disconnect from the mains Safety of others Do not allow children or any person unfamiliar with t...

Page 7: ...lways check that the power supply corresponds to the voltage on the rating plate Before using the appliance check that your cutting path is free from sticks stones wire and any other dangerous objects...

Page 8: ...e 3 Cable strain relief hook 4 ON OFF switch 5 Wing nut and screw 6 Helper handle 7 Locking sleeve 8 Aluminium shaft 9 Motor head 10 Flower guard 11 Cutting head with line spool 12 Line cutter 13 Prot...

Page 9: ...luminium shaft into the plastic housing assembly and tighten the locking sleeve Mount the protective cover 13 by sliding it into position then use 3 screws to lock it into place WARNING Never use the...

Page 10: ...Helpline 0845 077 8888 Pull the ends of the helper handle 6 apart and slide it over the handle seat 14 Attach the helper handle 6 bolt and wing fastener 5 Step 3 Assembling the Additional Handle Assem...

Page 11: ...und To switch on depress the ON OFF switch 4 Release the switch to switch off After the trimmer has been switched off the cutting head will continue to rotate for a few seconds Keep hands and feet wel...

Page 12: ...n different positions Set the handle in such a manner that the cutting head is slightly tilting forwards when in the working position Loosen the wing nut 5 and adjust the helper handle 6 to the requir...

Page 13: ...es for damage and whether the lines still have the correct length defined by the line cutter When no line ends are visible Renew the line spool see Replacing the linespool in the chapter on cleaning a...

Page 14: ...ndle to 180 position and retighten the locking sleeve 7 in a anti clockwise direction The handle will only rotate in one direction Special care and attention has to be taken when the cutting head is g...

Page 15: ...njury Do not spray water onto the trimmer and do not clean it under flowing water This would result in the danger of an electric shock and the trimmer could be damaged Always keep the trimmer clean Do...

Page 16: ...a little Repeat this process until the ends of the cord project a little beyond the cord cutter 12 Check the line cutter Never operate the trimmer without the line cutter or if the line cutter is defe...

Page 17: ...so that it just reaches the line trimming blade Technical Data Table Disposal and Recycling Getting Help Technical Data Disposal Specification Value Rated voltage 220 240V 50Hz Power 430W No load spe...

Reviews: