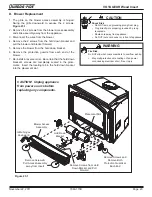
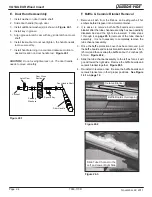
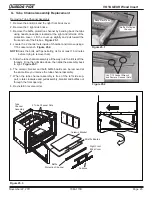
background image

Page  30

7063-173D

November 22, 2011

R

VOYAGEUR Wood Insert

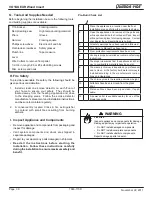
G.  Tools And Supplies Needed

H. Fire Safety

To  provide  reasonable  fi re  safety,  the  following  should  be 
given serious consideration:

1.  Install  at  least  one  smoke  detector  on  each  fl oor  of 

your  home  to  ensure  your  safety.    They  should  be 
located  away  from  the  heating  appliance  and  close 
to  the  sleeping  areas.    Follow  the  smoke  detector 
manufacturer’s placement and installation instructions, 
and be sure to maintain regularly.  

2. 

A  conveniently  located  Class  A  fire  extinguisher 
to  contend  with  small  fires  resulting  from  burning 
embers.

•  Remove appliance and components from packaging and 

inspect for damage.

•  Vent  system  components  and  doors  are  shipped  in 

separate packages.

•  Report to your dealer any parts damaged in shipment.

•  Read  all  the  instructions  before  starting  the 

installation.  Follow  these  instructions  carefully 
during the installation to ensure maximum safety and 

benefi t.

I.  Inspect Appliance and Components

1.

Place the appliance in a location near the fi nal 
installation area and follow the procedures below:

2.

Open the appliance and remove all the parts and 
articles packed inside the Component Pack.  Inspect 
all the parts and glass for shipping damage.  Contact 
your dealer if any irregularities are noticed.

3.

All safety warnings have been read and followed.

4.

This Owner’s Manual has been read.

5.

Floor protection requirements have been met.

6.

Venting is properly installed per vent manufacturing 
instructions.

7.

The proper clearances from the appliance and chim-
ney to combustible materials have been met.

8.

The masonry chimney is inspected by a professional 
and is clean, or the factory built metal chimney is 
installed  according  to  the  manufacturer’s  instruc-
tions and clearances.

9.

The chimney meets the required minimum height.

10.

All labels have been removed from the glass 
door.

11.

Plated  surfaces  have  been  wiped  clean,  if  appli-
cable.

12.

A  power  outlet  is  available  nearby  for  use  of  the  
blower assembly.

Inspect appliance and components for damage. 
Damaged parts may impair safe operation.

WARNING

•  Do NOT install damaged components.
•  Do NOT install incomplete components.
•  Do NOT install substitute components.

Report damaged parts to dealer.

Fire Risk.

Pre-Burn Check List

7/16 Socket  

Framing materia

Reciprocating saw 

High temp caulking material l

Pliers 

Gloves

Hammer 

Framing square

Phillips screwdriver 

Electric drill and bits

Flat blade screwdriver 

Safety glasses

Plumb line 

Tape measure

Level

Wire Cutters to remove from pallet

1/2-3/4 in. length, #6 or #8 self-drilling screws

Misc. screws and nails

Before beginning the installation be sure the following tools 
and building supplies are available:

Summary of Contents for Quadra-Fire VOYAGEUR-MBK

Page 1: ...ay cause house fire Fire Risk WARNING For use with solid wood fuel only Other fuels may overfire and generate poisonous gases i e carbon monoxide Installation and service of this appliance should be performed by qualified personnel Hearth Home Technologies recommends NFI certified professionals or technicians supervised by an NFI certified professional WARNING Hot glass will cause burns Do not tou...

Page 2: ...Only Also for use in Mobile Home PREVENT HOUSE FIRES HOTWHILEINOPERATIONDO NOTTOUCH KEEPCHILDREN CAUTION ANDCLOTHINGAWAY CONTACTMAYCAUSESKIN BURNS KEEPFURNISHINGSANDOTHER COMBUSTIBLEMATERIALFARAWAYFROMTHE APPLIANCE SEENAMEPLATEANDINSTRUCTIONS Model VOYAGEUR WOOD INSERT Report 100116597 R TESTED TO UL 1482 ULC S628 93 Serial No 007022 U S ENVIRONMENTAL PROTECTION AGENCY Certified to comply with Jul...

Page 3: ...Pressure 27 D Locating Your Appliance and Chimney 28 E Chimney Termination Requirements 28 F 2 10 3 Rule 29 G Tools and Supplies Needed 30 H Fire Safety 30 I Inspect Appliance and Components and Pre Burn Checklist 30 Section 7 Dimensions and Clearances A Appliance Dimensions 31 B Clearances to Combustibles UL and ULC and Hearth Protection Requirements 32 33 C Alternate Floor Protection Calculation...

Page 4: ...Page 4 7063 173D November 22 2011 R VOYAGEUR Wood Insert Warranty Policy ...

Page 5: ...November 22 2011 7063 173D Page 5 VOYAGEUR Wood Insert R ...

Page 6: ... in Canada This appliance is approved for mobile home installa tions when not installed in a sleeping room and when an outside combustion air inlet is provided The structural integrity of the mobile home floor ceil ing and walls must be maintained The appliance must be properly grounded to the frame of the mobile home with 8 copper ground wire and use only listed double wall connector pipe Outside...

Page 7: ...VISE children in same room as appliance Alert children and adults to hazards of high temperatures High temperatures may ignite clothing or other flammable materials Keep clothing furniture draperies and other flammable materials away HOT SURFACES Glass and other surfaces are hot during operation AND cool down Figure 7 1 General Operating Parts If you expect that children may come into contact with...

Page 8: ...but will give you the most efficient fire Even dry wood contains at least 15 moisture by weight and should be burned hot enough to keep the chimney hot for as long as it takes to dry the wood out about one hour It is a waste of energy to burn unseasoned wood of any kind Dead wood lying on the forest floor should be considered wet and requires full seasoning time Standing dead wood can be considere...

Page 9: ...and establishing the flue draft not evaporating the moisture out of wet unseasoned wood resulting in wasted heat 2 Second Stage In the secondary stage wood gives off flammable gases which burn above the fuel with bright flames During this stage of burning The flames must be maintained and not allowed to go out to ensure the cleanest possible fire If the flames tend to go out it is set too low for ...

Page 10: ...the firebox near the top of the glass door This preheated air supplies the necessary fresh oxy gen to mix with the unburned gases helping to create the second third and fourth combustion process This air is regulated by the Burn Rate Air Control There are four settings High Medium High Medium Low and Low When the control is raised all the way up it is on the High setting and when pushed all the do...

Page 11: ...h the Start Up Air Control all the way back until it stops and leave it there This setting over rides the timer system ACC so you must monitor the fire closely while in this setting 3 Medium High Burn Rate 15 000 to 30 000 BTU hr Raise the Burn Rate Air Control all the way up until it stops top marker to a fully open position Push the Start Up Air Control all the way back until it stops and then p...

Page 12: ... even with the Baffle Board in the front Ceramic Blanket is bunched up at the back of the firebox and NOT even with the Baffle Board in the front Ceramic Blanket Back of Firebox Baffle Board Ceramic Blanket and Baffle Board MUST be in contact with the back of the firebox and even with each other in the front Ceramic Blanket Back of Firebox Baffle Board Figure 12 1 Correct Baffle and Blanket Positi...

Page 13: ...bed and reduces excessive emis sions opacity smoke Large logs burn slowly holding a fire longer Small logs burn fast and hot giving quick heat NOTE Build fire on brick firebox floor only Do NOT use grates or other methods to support fuel It will adversely affect emissions Odors and vapors released during initial operation Curing of high temperature paint Open windows for air circulation Odors may ...

Page 14: ...rption from rain or snow Avoid covering the sides and ends completely Processed Solid Fuel Fire Logs NOT permitted for use in this appliance WARNING Fire Risk DO NOT BURN GARBAGE OR FLAMMABLE FLUIDS SUCH AS GASOLINE NAPTHA OR ENGINE OIL DO NOT USE CHEMICALS OR FLUIDS TO START A FIRE Do NOT burn treated wood or wood with salt driftwood May generate carbon monooxide if burn material other than wood ...

Page 15: ...tion Control ACC NOTE For maximum efficiency and lowest emissions when operating the blower in either the automatic or manual setting for the low and medium low burn settings leave the blower off until the burn is well established i e 30 minutes 6 The blower is equipped with a rheostat speed control The highest blower speed is obtained by turning the rheostat on then adjusting back towards OFF as ...

Page 16: ...g as it heats up and cools down similar to the sound produced by a furnace or heating duct This noise does not affect the operation or longevity of the appliance Whirring sound The blower may produce a whirring sound which increases in volume as the speed is increased Odors and vapors released during initial operation Curing of high temperature paint Open windows for air circulation Odors may be i...

Page 17: ...ght corner START UP AIR LOW HIGH BURN RATE CONTROL Upper Right Corner LOAD WOOD ADD NEWSPAPER ADD KINDLING ADD MORE WOOD SECURELY LATCH THE DOOR 4 LIGHT THE PAPER OPEN AIR CONTROLS REDUCE AIR CONTROL Set to desired heat output WARNING Risk Of Fire DO NOT LEAVE UNATTENDED During startup if additional draft is needed allow the door to remain open approxi mately1 2 inch Once the draft is established ...

Page 18: ...n use Clean out fallen ashes from the firebox It is also recommended that before each heating season the entire system be professionally inspected cleaned and repaired if necessary WARNING Risk of Fire Do not use chimney cleaners or flame colorants in your appliance It will corrode your pipe Creosote Formation and Need for Removal When wood is burned slowly it produces tar and other organic vapors...

Page 19: ...all the way open for 15 20 min utes should remove the built up coating E Glass Cleaning CAUTION Handle glass assembly with care Glass is breakable Avoid striking scratching or slamming glass Avoid abrasive cleaners Do not clean glass while it is hot Replace the firebrick if they become crumbly and or if there is a 1 4 inch 6 35mm gap between the bricks The firebox is lined with firebrick which has...

Page 20: ...d Ashes must be cool before you can dispose of the ashes in a non combustible container Firebrick is designed to protect your firebox After ashes are removed inspect the fire brick and replace firebricks that are crum bling cracked or broken WEEKLY or After Every 25 Loads of Wood Keep door and glass gasket in good shape to maintain good burn times on a low burn setting To test place a dollar bill ...

Page 21: ...o Building a Fire Section Check for adequate vent height refer to Chimney Height Section Open window below the appliance towards the wind Wood condition is too wet too large Use dry seasoned wood refer to Seasoned Wood Section Bed of coals not established before adding wood Start with paper kindling to establish bed of coals refer to Building a Fire Section Flue blockage such as birds nests or lea...

Page 22: ...y be broken by impact or misuse WARNING Risk of Fire or Injury Use only glass that is specified in the manual DO NOT replace with any other material Glass breakage will occur CAUTION Handle glass with care Inspect the gasket to ensure it is undamaged Do NOT strike slam or scratch glass Do NOT operate appliance with glass door assembly removed Do NOT operate with glass cracked broken or scratched B...

Page 23: ... are completely seated in the grom ments Insert the locating tab in the hold down bracket into the placement slot Shock Risk Do NOT remove grounding prong from plug Plug directly into properly grounded 3 prong receptacle Route cord away from appliance Do NOT route cord under or in front of appliance CAUTION Figure 23 1 Do NOT allow hot coals or embers to overflow ash lip May melt protective wire c...

Page 24: ...r as it will go and lower the right side Remove the baffle boards and ceramic blanket together Figure 24 3 4 Re install in reverse order Be sure the baffle boards and ceramic blanket are in their proper positions See Figure 12 1 on page 12 E Door Handle Assembly 1 Install washer on door handle shaft 2 Slide door handle through door 3 Install additional washer s as shown in Figure 24 1 4 Install ke...

Page 25: ...with penetrating oil for at least 15 minutes before trying to remove them 5 Slide the tube channel assembly all the way to left until it is off the threads Drop the right side down then slide the assembly back to right Figure 25 3 6 The ceramic blanket and both baffle boards can be removed at the same time you remove the tube channel assembly 7 When the tube channel assembly is free of the left si...

Page 26: ...VICING ANOTHER APPLIANCE DO NOT CONNECT TO ANY AIR DISTRIBUTION DUCT OR SYSTEM May allow flue gases to enter the house Asphyxiation Risk Installation and use of any damaged appliance Modification of the appliance Installation other than as instructed by Hearth Home Technologies Installation and or use of any component part not approved by Hearth Home Technologies Operating appliance without fully ...

Page 27: ...o minimize the effects of negative air pressure Install the outside air kit with the intake facing prevailing winds during the heating season Ensure adequate outdoor air for all combustion appliances and exhaust equipment Ensure furnace and air conditioning return vents are not located in the immediate vicinity of the appliance Avoid installing the appliance near doors walkways or small isolated s...

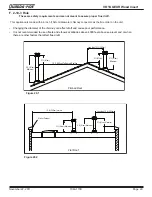
Page 28: ...d Install through the warm space enclosed by the build ing envelope This helps to produce more draft espe cially during lighting and die down of the fire Penetrate the highest part of the roof This minimizes the affects of wind turbulence and down drafts Consider the appliance location in order to avoid floor and ceiling attic joists and rafters Locate termination cap away from trees adjacent stru...

Page 29: ...fline 2 ft 61cm Pitched Roof These are safety requirements and are not meant to assure proper flue draft Figure 29 1 F 2 10 3 Rule Figure 29 2 This appliance is made with a 6 inch 152mm diameter chimney connector as the flue collar on the unit Changing the diameter of the chimney can affect draft and cause poor performance It is not recommended to use offsets and elbows at altitudes above 4000 fee...

Page 30: ...dealer if any irregularities are noticed 3 All safety warnings have been read and followed 4 This Owner s Manual has been read 5 Floor protection requirements have been met 6 Venting is properly installed per vent manufacturing instructions 7 The proper clearances from the appliance and chim ney to combustible materials have been met 8 The masonry chimney is inspected by a professional and is clea...

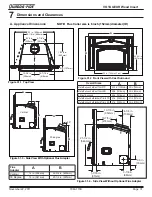
Page 31: ... 235mm 9 7 8 in 251mm C L 33 in 838mm 21 1 2 in 546mm 3 0 in 76mm 3 7 8 in 98mm 10 7 8 in 276mm 13 7 8 in 352mm 4 1 4 in 108mm C L 1 7 16 in 37mm Overall Sizes A B Metal Surround w Cast Trim STD 42 5 in 1080mm 30 in 762mm Metal Surround w Cast Trim LRG 48 in 1219mm 34 in 864mm All Cast Surround 40 in 1016mm 30 in 762mm Metal Surround w Standard Trim STD 43 in 1092mm 31 in 787mm Metal Surround w St...

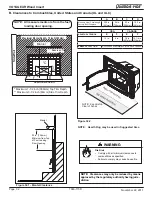
Page 32: ... Trim Mantel Fuel Door 29 in 736mm Minimum from Top of Fuel Loading Door Opening Mantel Figure 32 1 Mantel Clearance Maximum 1 1 2 inch 389mm Top Trim Depth Maximum 3 1 2 inch 89mm Side Trim Depth A B C D Masonry Heat Circulating Factory Built Fireplace 20 5 in 521mm 29 in 736mm 22 in 559mm 10 5 in 267mm USA CANADA HEARTH EXTENSION E F E F 16 in 8 in 18 in 457mm 12 1 4 in 318mm EMBER PROTECTION Re...

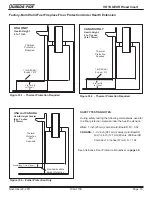
Page 33: ... Solid Fuel Fireplace Floor Protection Under Hearth Extension Figure 33 3 Ember Protection Only Thermal Protection Required 0 to 7 inch 0 to 178mm USA ONLY Hearth Height 0 to 7 inch 1 inch 25 mm R value 2 13 Figure 33 1 Thermal Protection Required SAFETY TESTING NOTES During safety testing the following material was used for the floor protection material under the hearth extension USA 1 inch 25mm ...

Page 34: ...re of a material s resisteance to heat transfer R value is convenient when more than one material is used since you can add the R values together where as you can not do this for k value The HIGHER the R factor means less heat is being conducted through the non combustible material to the combustible material beneath it The R value of a material must be equal or larger then the required R value to...

Page 35: ...r of the smoke shelf A Venting Systems Chimney Connector It is also known as flue pipe or stove pipe It must be 6 inches 152mm minimum diameter stainless steel connector pipe Chimney The chimney can be new or existing masonry or prefabricated and must meet the following minimum requirements as specified below WARNING Risk of Fire Follow venting manufacturer s clearances and instructions when insta...

Page 36: ...grees Offset in Chimney Combustible Floor Masonry Chimney Cont d Figure 36 1 Masonry Chimney with a Full Liner Kit Type UL103HT Rquirement per UL1777 NOTE In Canada this fireplace insert must be installed with a continuous chimney liner of a 6 inch 152mm diam eter extending from the fireplace insert to the the top of the chimney The chimney liner must conform to the Class 3 require ments of CAN UL...

Page 37: ...t conforms with the safety standard UL 1482 and ULC S628 Canada in all respects and is approved to UL ULC safety standards for installation and use within a fire place with masonry chimney in accordance with NFPA 211 and CAN CSA B365 01 Minimum Width of Cavity Opening Front 32 7 8 835 Minimum Width of Cavity Opening Rear 19 1 8 486 Minimum Height 21 1 2 546 Minimum Depth from Front to Rear 18 1 8 ...

Page 38: ...Y AIR DISTRIBUTION DUCT OR SYSTEM This may allow flue gases to enter the house I Factory Built Sold Fuel Fireplace A permit may be required for installations final approval is contingent of the authority having local jurisdiction Consult insurance carrier local building fire officials or authorities having jurisdiction about restrictions installation inspec tion and permits Inspect the existing fi...

Page 39: ...es only and may vary somewhat for individual installations This product was designed for and tested on a 6 inch 152mm chimney 14 to 16 feet 4 27 4 87m high in cludes appliance height measured from the base of the appliance The further your stack height or diameter varies from this configuration the possibility of performance problems ex ists Chimney height may need to be increased by 2 3 per each ...

Page 40: ...the flex pipe into the firebox first depending on installation Attach flex to adapater with at least 2 screws 3 Ensure existing access hole in fireplace is sufficient to feed the 4 inch flex 4 After sliding can into fireplace feed flex into cut opening to obtain outside combustion air 5 Level outer can and install appliance See page 41 Option Two Outside Air Installation Instructions 1 Remove the ...

Page 41: ...crews to secure in place D Leveling Legs B Optional Elbow Flue Adapter Installation Optional use of a Simpson Duravent 15 Universal Elbow Part Number 4615 may be purchased directly through your local Simpson Durvent Pipe Distributor or from your local Quadra Fire dealer Part Number DV 4615 Figure 41 1 shows a vertical installation and also how to create an optional 30 elbow installation The 15 elb...

Page 42: ... the appliance top Secure in place Figure 42 2 7 Use the strain relief in the surround side for blower cord installation and use the cover plug to insert into the hole where the blower cord is not installed Figure 42 2 Corner Brackets Figure 42 3 E Securing Appliance to Stove Pipe Liner 1 Once you have the appliance in place and secured remove the tube channel assembly baffle board and ceramic bla...

Page 43: ...ight 1 fastener package Tools Needed Powered 4 to 6 inches long Phillips head screw driver pliers G Standard Surround Cast Trim Kit 4 Felt Vibration Insulation Pads Secure Surrounds to Cast Trim Kit Attach Magnet before installing Cast Footers Magnet Installed Cast Footers Left Right Figure 43 1 Back of Side Piece Magnet Attached Faces Front Clearance Notch 7 Place the cast footers under the metal...

Page 44: ... left hole Remove the shield and re install using the second right hole Figure 44 2 5 Position the trim on the appliance matching up the mounting brackets with the slots on the appliance 6 Attach the surround to the appliance 2 screws DO NOT OVERTIGHTEN SCREWS MAY DAMAGE PROCELAIN FINISH Included in Surround Kit 2 side pieces left and right 1 l top piece 1 fastener package Tools Needed Powered 4 t...

Page 45: ...emove the 2 screws at the top of the control plate Push the bottom of the control plate to the inside of the appliance and partially remove the control plate assembly White Wire Black Wire Figure 45 2 5 Locate the black and white wires that are part of the power cord and disconnect those wires from the wire harness Green Grounding Wire Remove Screw 6 Remove the screw that is holding the ground lug...

Page 46: ...ding Wire 11 Connect the white wire on the power cord into the fiber wrapped wire on the wire harness Connect the black wire on the power cord to the white wire on the rheostat Re attach the green ground terminal to the control plate 12 Insert the control plate assembly back into the appliance as shown Tilt the assembly forward and then lift up and rotate the bottom towards the front of the applia...

Page 47: ...himney must be listed to UL103 HT or a listed UL 1777 full length six inch 152mm diameter liner must be used It must be equipped with a spark arrestor cap and the outside air must be installed on the insert 5 Refer to page 30 of this manual for clearance to combustibles and floor protections requirements All clearances must be followed precisely 6 Use silicone to create an effective vapor barrier ...

Page 48: ...ice Parts 09 11 R Cast Iron Wood Insert VOYAGEUR Part number list on following page VOYAGEUR MBK VOYAGEUR PMH 1 2 3 4 8 5 6 7 8 9 10 11 12 13 14 15 16 17 18 19 20 21 22 23 24 25 26 Beginning Manufacturing Date Sept 2010 Ending Manufacturing Date Active ...

Page 49: ...5 w Angle Qty 2 req 10 2 Brick 2 8 79 x 4 5 x 1 25 w Angle Qty 2 req 10 3 Brick 3 7 90 x 4 5 x 1 25 w Angle Qty 2 req 10 4 Brick 4 9 x 2 25 x 1 25 Split Qty 2 req 10 5 Brick 5 9 x 4 5 x 1 25 Pumice Qty 9 req 10 6 Brick Cover RH SRV7063 150 10 7 Liner Bottom SRV7063 151 10 8 Brick Cover LH SRV7063 163 Brick single uncut 832 0550 11 Andiron SRV7063 157 12 Hinge Male 450 2810 Additional service part ...

Page 50: ...SRV7063 137 13 7 Washer Sae 3 8 3 ea 832 0990 Y 13 8 Key cam Latch 430 1151 13 9 Cam Latch 430 1141 13 10 Nut Side Lock Jam Pkg of 24 226 0100 24 Y 13 11 Glass Retainer Lower Qty 4 req SRV7063 166 13 12 Glass Assembly SRV7063 011 Y 14 Access Assembly Matte Black SRV7063 010MBK Porcelain Mahogany SRV7063 010PMH 14 1 Front Lower SRV7063 125MBK 14 2 Hinge Continous 7000 510 14 3 Access Matte Black SR...

Page 51: ... Knob Speed Control 200 2041 Y Power Cord SRV7000 623 Y Wire Harness SRV7046 184 Y 19 Upper Front Matte Black SRV7063 121MBK Porcelain Mahogany SRV7063 121PMH 20 Combustion Cover Assembly SRV7063 007 21 Leg Extension Left or Right SRV7046 170 22 Combustion Air Assembly SRV7063 019 23 Timer Door Assembly SRV7044 020 Y 24 Burn Rate Control Assembly SRV7063 005 Y 25 Tube Channel Base Front SRV7063 16...

Page 52: ... VOYA CC PMH Surround Complete Cast Porcelain Mahogany SP VOYA CC MBK FASTENERS Bolt 1 4 20 x 3 4 Pkg of 4 812 2350 Y Bolt 5 16 x 18 x 1 Pkg of 12 27887 12 Y Bolt Shoulder 5 16 X 1 4 20 Pkg of 20 223 0170 20 Y Nut 5 16 18 Pkg of 10 A 3483 1 10 Y Nut 2 wy Side Lock Jam 3 Pkg of 24 226 0100 24 Y Nut flange 1 4 20 Pkg of 24 226 0130 24 Y Nut Lock 1 4 20 Pkg of 25 226 0090 25 Y Screw 10 32 x 75 HWH SF...

Page 53: ...7063 129MBK Porcelain Mahogany SRV7063 129PMH 27 3 Suround Right Matte Black SRV7063 131MBK Porcelain Mahogany SRV7063 131PMH 27 4 Trim Footer Left Matte Black 414 7090MBK Porcelain Mahogany 414 7090PMH 27 5 Trim Leg Left Matte Black 414 7120MBK Porcelain Mahogany 414 7120PMH 27 6 Trim Header Matte Black 414 7110MBK Porcelain Mahogany 414 7110PMH 27 7 Trim Leg right Matte Black 414 7130MBK Porcela...

Page 54: ...Page 54 7063 173D November 22 2011 R VOYAGEUR Wood Insert Date of Service Performed By Description of Service C Service And Maintenance Log ...

Page 55: ...November 22 2011 7063 173D Page 55 VOYAGEUR Wood Insert R Date of Service Performed By Description of Service C Service And Maintenance Log Cont d ...

Page 56: ...nual with party responsible for use and operation Read understand and follow these instructions for safe installation and operation Date purchased installed Serial Number Location on appliance Dealership purchased from Dealer phone Notes Date purchased installed Serial Number Location on appliance Dealership purchased from Dealer phone Notes We recommend that you record the following pertinent inf...

Reviews: