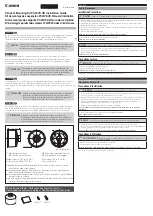
background image

7

Bumper Pads

Upright

Side

Tie-Down

Knob

Tie-Down
Assembly

— Figure 14 — 

5.  Attach the front end of each Angle Arm (part of the Stack Adapter Kit, sold separately) to each side of the Array Frame. Secure each 

side with the Angle Arm Rigging Pins. (See — Figure 15 —)

6.  Adjust the Angle Arms to the desired angle. Secure each with the Array Frame Rigging Pins. (See — Figure 16 —)

Angle Arm
Rigging Pin
(Installed inside only)

Array Frame
Rigging Pin
(Installed inside or outside)

Angle Arm
Rigging Pin

Angle Arm
Rigging Pin

Array Frame
Rigging Pin

Array Frame
Rigging Pin

— Figure 15 — 

Summary of Contents for LA108-AF

Page 1: ...Array Frame for the LA108 Active Line Array Loudspeaker LA112 AF Array Frame for LA112 Active Line Array Loudspeaker LA108 KIT SA Stack Adapter Kit to be combined with LA108 AF LA112 KIT SA Stack Ada...

Page 2: ...and approve all attachments to the building or structure Employ the services of a certi ed professional rigger for hoisting positioning and attaching the equipment to the supporting structure Correct...

Page 3: ...4 Rubber Pads for SA Storage 2 sets Rubber Pads for SA Storage Left and Right Side Flown Deployment Array Frame Attachment Preparation 1 Push Angle Levers on both sides all the way in until they make...

Page 4: ...ker from the Array Frame 1 Support the weight of the loudspeaker Remove the Array Frame Rigging Pins on both sides See Figure 7 2 Lower loudspeaker carefully using rear handles Loudspeaker remains sus...

Page 5: ...outside of the CG of the Array Frame is needed an M10 Eyebolt can be used on the rear of the lowest loudspeaker of the array to provide another pick point for further support to angle the system See F...

Page 6: ...Stack Adapter Kit accessories sold separately or the LA1 12 AF Array Frame and the LA1 12 KIT SA Stack Adapter Kit accessories sold separately are needed on the top LS1 18 KS1 18 KS212C or side LS1 1...

Page 7: ...rray Frame Secure each side with the Angle Arm Rigging Pins See Figure 15 6 Adjust the Angle Arms to the desired angle Secure each with the Array Frame Rigging Pins See Figure 16 Angle Arm Rigging Pin...

Page 8: ...of the Array Frame See Figure 18 3 Lower the back side of the loudspeaker until the Angle Arm latches onto the Rear Hook of the loudspeaker on both sides making a click sound See Figure 18 4 Push Loc...

Page 9: ...m the Stack Adapter Kit inside the Array Frame using the Angle Arm Rigging Pins and the Array Frame Rigging Pins to secure them in place See Figure 23 4 Store the Tie Down Assembly using the Tie Down...

Page 10: ...e QSC website for Technical Support and Customer Care including their phone numbers and hours of operation Go to qsc com contact us Warranty For a copy of the QSC Limited Warranty go to qsc com suppor...

Reviews: