

SAVE BMS ID
CN906
CN2
CN1
CN3
CN4
CN5
CN905
CN901
CN902
CN904
(Eng) 05/19
1) Open your mobile browser.
2) Input the URL : https://myess.hansoltechnics.com
3) After connection is made, click the “Go to Installer” icon.
4) Enter your ID and password in the login window.
If you have no account, please join as a member.
5) Click the “Join Membership” link. Membership acquisition and completion.
6) After login, the main installer page appears select Product
→
Installation.
7) Enter the product information and customer information.
(When you select a country at Product Info, it is automatically set to
the country-specific default setting.)
8) If it is saved successfully, you can see the success message.
It may take 5 to 10 minutes.
9) In order to check operation status, perform the product test. For this purpose,
select Remote
→
Remote Monitoring. (show in Figure 3-2)
10) When the installed product is in “Run,” click the product serial number.
11) On the product information page, click the “Detailed Product Information” button.
12) On the “Product Details” page, click the “Product Operation Test” button.
CAUTION
- PIN Code is a temporary password that has a-4-digit number
created by the installer.
- This pin code must be delivered for user registration.
3. Installer Account : Use On-line / Internet connection
1) Set on your laptop (shown in Figure 4-2).
ControlPanel
→
Network and Sharing Center
→
Change adapter settings
→
Local Area Connector
→
Properties
→
Internet Protocol Version 4 (TCP/Ipv4)
- Input the URL : https://myess.hansoltechnics.com
2) Connect the jumper to the connector. (* Install Jumper is required, as shown in Figure 4-3.)
3) Connect the LAN cable between Q.HOME+ ESS HYB G2 and Laptop.
4) Turn the power On (AC Grid On) and PV S/W On.
5) Access to SIM (System Install Manager) http://17.91.23.196:8000
6) Turn the power Off (AC Grid Off) and PV S/W Off.
7) Remove jumper wire for On-line & Internet connection
8) Connect Internet LAN Cable.
9) Turn the power On (AC Grid On) and PV S/W On.
Q.HOME+ ESS HYB G2
- Product Info -
a) Input Product S/N
b) Input random PIN Code (Delivered for user registration)
c) Select Country
(Automatically set to the country-specific default setting)
d) Input user’s Telephone number
e) Input Battery S/N (Enter the number of installed boxes)
f) If the entered value is correct, click the Next button
Installation
01. Product Info.
Refresh
Next
* If not agreed to the terms, you may not use the services.
[ Figure 3-1 : Product Information Entry Screen in Step 1 ]
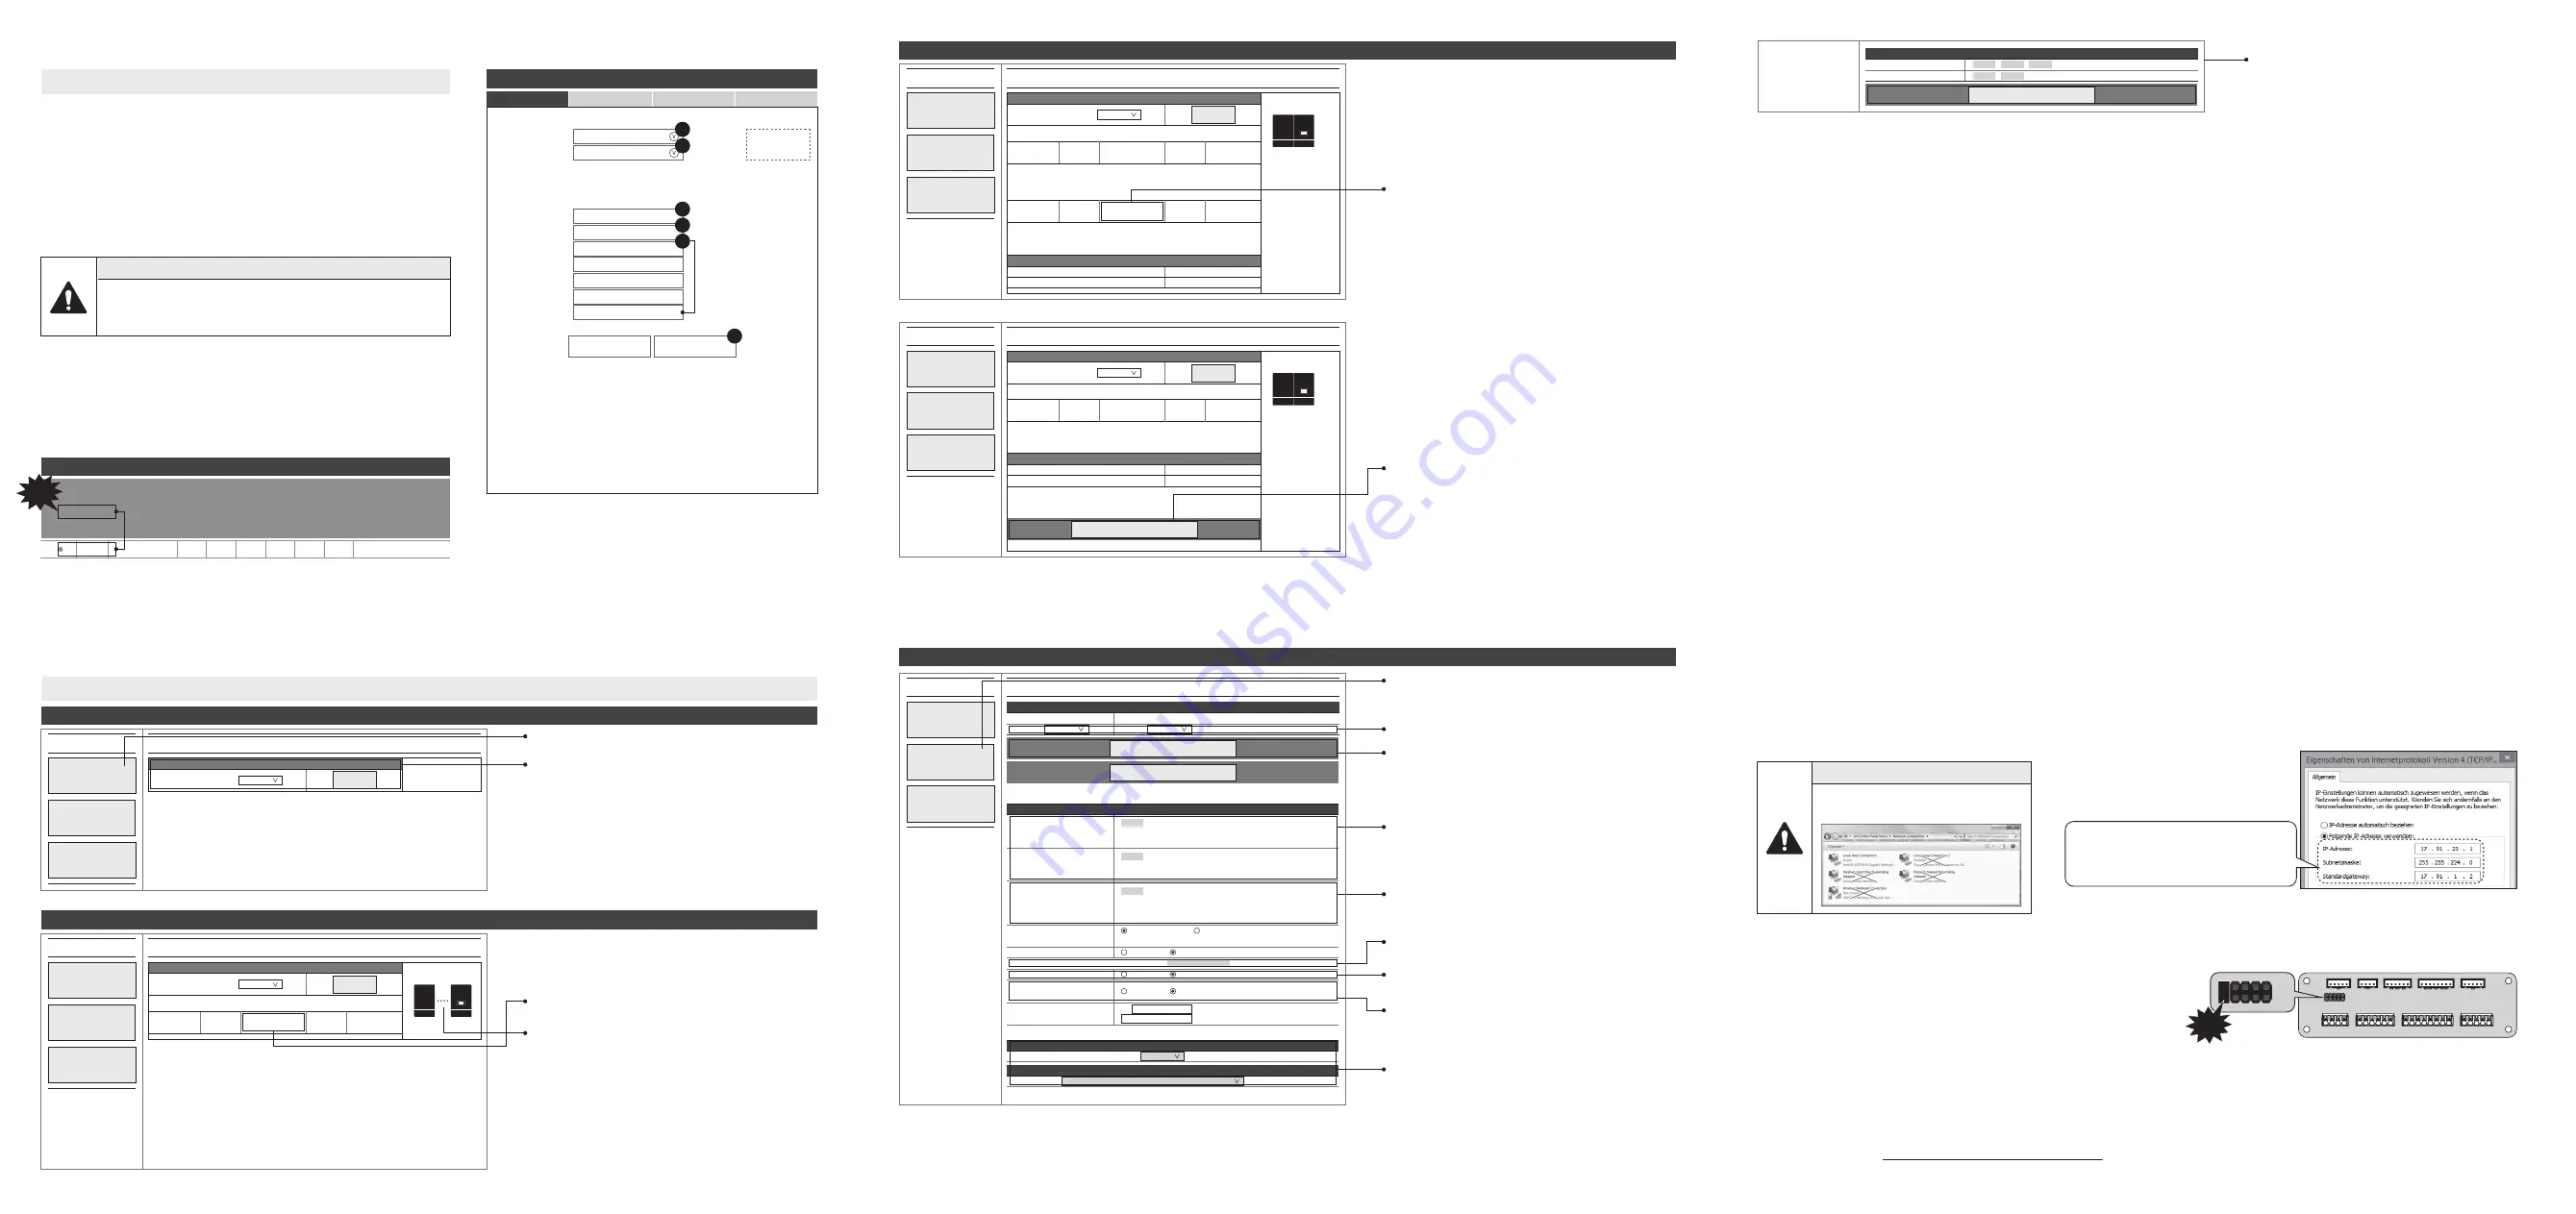
[ Figure 4-2 : Setting Laptop IP ]
Short Bar
[ Figure 4-3 : Connecting Short Bar ]
- Serial No.
- PIN Code
- Device Type
- Inverter Power
- Model Name
- Country
- User Telephone
- Battery1
- Battery2
- Battery3
- Battery4
- Battery5
Product
Image
HSHP4601Z100000001
1234
RES
8 kW
HSHP4601
United Kingdom
012-3456-7890
B62842642684D682464
B62842642684D682465
02. Installation Info.
03. Setup Info
04. Rates Info
a
b
c
f
d
e
CLICK!
[ Figure 3-2 : Remote monitoring test ]
*example “HSHP4607Z100000001” test
Remote Monitoring
Remote
Remote Monitoring
Event History
15/06/2018
08:09:51
HSHP4601Z100000001
95%
14
14
0
0
0
Product
Product List
Installation
PV Calculator
User
Account Management
VOC Management
Maintenance
Maintenance History
Activity List
Statistics
Operational Statistics
* SIM (System Install Manager) Connection
: Use Off-line & Not an internet connection
5. User Account (Refer to User Guide)
CAUTION
- Turn off Wifi .
- Only turn on Local Area Connection.
IP address :
Subnet mask :
Default gateway :
17
255
17
91
255
91
23
224
1
1
0
2
.
.
.
.
.
.
.
.
.
CN906
CN2
CN1
CN3
CN4
CN905
CN901
CN902
Short
Bar
Battery Install
1) Click here.
MENU LIST
BMS Rack Install Setting
BMS Setting
Install Setting
Operating Test
Q.HOME+ ESS HYB G2
Install BMS Setting Menu
Count of Batery RACKs :
- 1 -
ENTER
4. Installing
2) Select the number of batteries you want to install.
Battery Installation Process 1
MENU LIST
BMS Rack Install Setting
BMS Setting
Install Setting
Operating Test
Install BMS Setting Menu
Count of Batery RACKs :
Rack 1
ID = 0X1
Status
Connecting
Configure ID !!!
- 1 -
ENTER
2) Wait for the battery to connect.
1) Click here.
Battery Installation Process 2
MENU LIST
BMS Rack Install Setting
BMS Setting
Install Setting
Operating Test
Install BMS Setting Menu
Count of Batery RACKs :
Rack 1
ID = 0X2
Status
Done
Configure ID !!!
- 2 -
ENTER
BMS Test
BMS CAN ID
COUNT
1
0X1 3020000
1) If you need to continue installing the battery,
the Additional Settings button appears as shown picture.
2) Repeat steps “Battery Installation Process 1”.
Rack 2
ID = 0X1
Status
NOP
Configure ID !!!
MENU LIST
BMS Rack Install Setting
BMS Setting
Install Setting
Operating Test
Install BMS Setting Menu
Count of Batery RACKs :
Rack 1
ID = 0X2
Status
Done
Configure ID !!!
- 2 -
ENTER
BMS Test
BMS CAN ID
COUNT
1
0X1 3020000
1) Conversely, if the Battery installation is completed,
the following screen will appear.
2) Then press the following button to complete
the Battery installation.
1) Click here.
2) Select a Country & Region.
3) Click here.
* When you press the button, the screen changes
as shown below. Then proceed as described in
the follwing.
Setting Installation Process
Country / Region Information
S/N :
HSHP4601Z100000001
Country : Germany
Region: Berlin
IP: 14.34.15.211
80
I Port
Country / Region Config
SAVE and ReSTART
MENU LIST
- HSHP4601 8.0kWh
- PMS S/W : P02.00.05
Apr 16 2019 - 1_-ESS
BMS Setting
Install Setting
Operating Test
Install Setting Menu
6) Check the number of installed batteries.
9) Select Smart Meter and Type.
8) Enable when the battery in need to emergency.
Charging mode (Use Jumper as much as possible)
4) For the max power per string.
5) Select a Feed in Limit percentage
Product Information
3300 [W]
* Range : 1000 ~ 3300W
* “0” : the PV 1 is not installed
Installed PV-1 Power :
3300 [W]
* Range : 1000 ~ 3300W
* “0” : the PV 2 is not installed
Installed PV-2 Power :
42 [%]
* Range : 0 ~ 100 (%)
* 100(%) means “No-Limit Feedin”
* 0(%) means “No Feedin”
Feed In Limit percentage
Automatic Operation type
Server’s IP-address and port
Enable
Enable
Sleep-Mode
Disable
PMS External Mode Enable
Disable
Enable
Backup Mode
(Generator Charge Only)
Disable
Smart Mode
(* The “Smart” type is more advanced Algorithm.)
Basic Mode
Battery Count :
1
Smart Meter Selection
Meter Type : RS485
DO - Meter Model Selection
D0-Bi/Feed-In 4:EM112-DIN.AV0.1.X.S1.X(Gavazzi)
[ Figure 4-1 : Initial setup page block ]
Date / Time Setting
Year/Month/Day
2019 / 4 / 16
8 : 20 : 30
Hour : Minute : Second
SAVE and ReSTART
10) Set the current local time and date
11) After clicking “SAVE and RESTART” on the top of
the window a message saying “Wait for 2 Minute and
press F5” will appear
→
follow the message.
12) Click “Operating Test”.
※
Please leave the default setting not listed in this manual.
7) Select 3rd Party Connect Enable / Disable.
(Like as : EnergyBase, KIWIGRID, Solar-log)


