


QBD COOLING SYSTEMS INC.
QBD.COM
22
-
Always use QBD supplied OEM parts only. Use of non-OEM
parts will not only void the warranty but may also lead to a fire,
explosion, serious injury or death.
------------------------------------------------------------------------------------------
-
Only trained and certified technician, for Hydrocarbon
systems, should service these coolers.
------------------------------------------------------------------------------------------
-
Use extreme caution and follow all local/regional codes for
transportation or relocation of Hydrocarbon coolers.
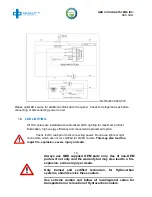
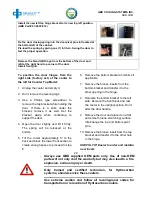
Install the new left top hinge bracket to its new top left position.
(QBD Part # 47-0090-014)
Fix the door closing spring into the door pivot pin slot located at
the bottom left of the cabinet.
Pre-load the spring by giving one (1) full turn. Swing the door to
test the proper operation.
Remove the brand QBD logo from the bottom of the door and
refit at the right hand top corner of the door.
Install front grill.
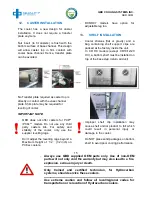
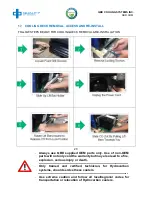
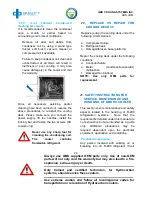
To position the door hinges from the
right side (factory set) of the cooler to
the left for Counter Top Model:
1.
Unplug the cooler and empty it.
2.
Don’t remove the leveling legs
3. Use a Philips type screwdriver to
remove the top bracket while holding the
door. If there is a shim under the
bracket, remove it as well. Set the
bracket aside while continuing to
support the door.
4. Open the door slightly and lift it firmly.
The spring will be released at the
bottom.
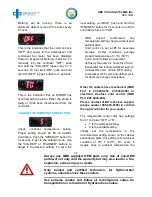
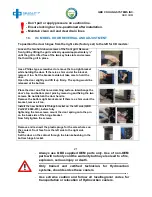
5.
Tilt the cooler approximately 6” to the
back and block the lower front section to
create enough space to proceed to step
6.
6. Remove the bottom bracket and shims if
applicable.
7. Remove the bronze inserts from the
bottom bracket and transfer it to the
other opening in the hinge.
8.
Relocate the bottom bracket to the left
side. Remove the front block and rest
the cooler in the upright position. Don’t
alter the door handle.
9.
Remove the door and place it on a flat
and smooth (none scratching) surface.
Interchange the top and bottom pivot
pins.
10. Remove the bronze insert from the top
bracket and transfer it to the other hole
in the hinge.
USEFUL TIP: Easier to order and install a
new insert.