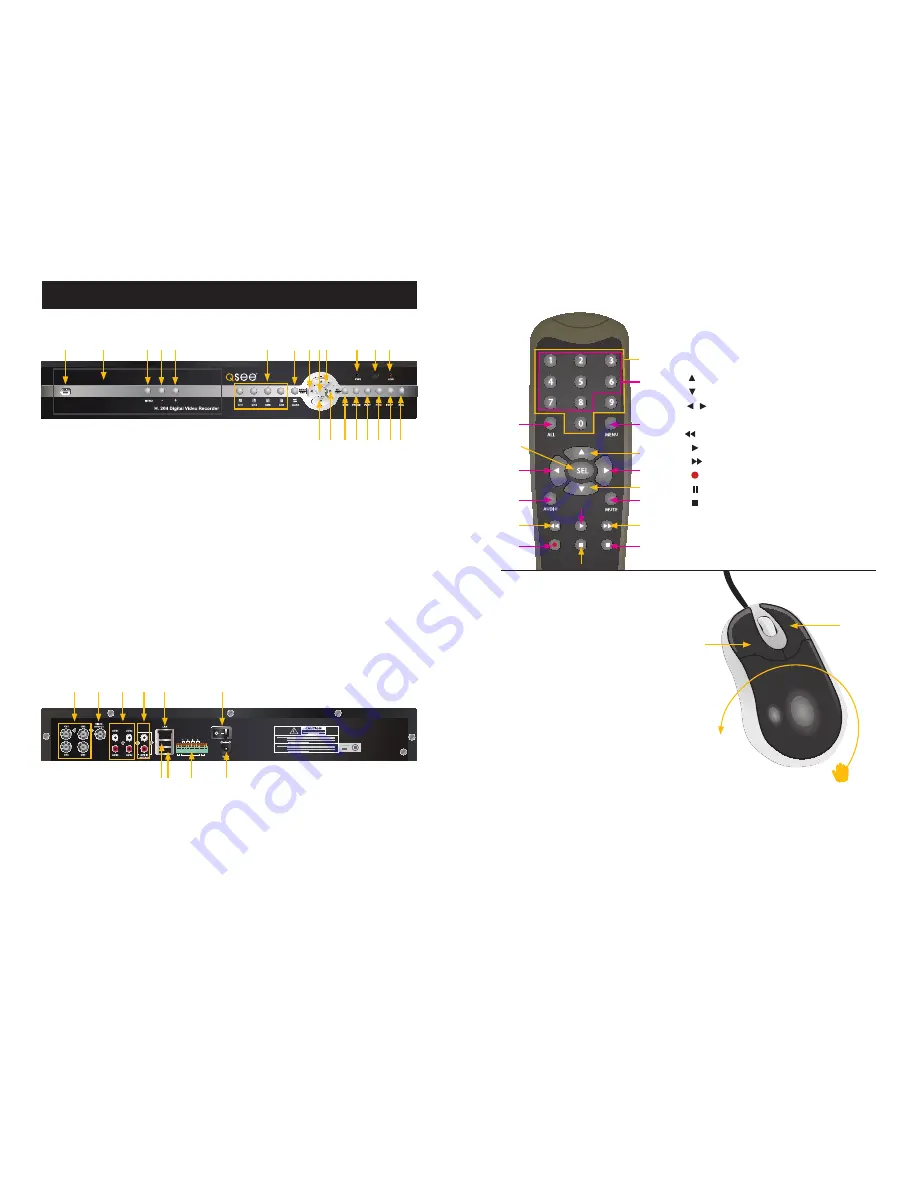
background image

10

11

GETTING TO KNOW THE QSDR74RTS

1. 

Enter/Exit Display Screen

2. 

7” LCD Screen for Monitoring

3. 

Show Menu

4. 

Scroll Down in Menu

5. 

Scroll Up in Menu

6. 

Numeric Keys and Channel Select

7. 

View All Channels 

8. 

Menu/Escape/Left

9.

 Enter or Exit PTZ

10. 

Up Button

11. 

Power LED

12. 

IR Receiver

13. 

Hard Drive LED

14. 

Down Button 

15. 

Select/Edit/Right

16. 

Reverse/PTZ Focus

17. 

Pause/Auto Sequence

18. 

Play

19. 

Forward

20. 

Stop Recording

21. 

Record

1. 

Video Input 1 - 4

2. 

Video Output

3. 

Audio Inputs

4. 

Audio Outputs

5. 

Ethernet Port

6. 

POWER Switch

7. 

Mouse Port 

8. 

USB Port

9.

 RS-485/ SENSOR/ ALARM Block

10. 

DC Power Input Port

FRONT PANEL

REAR PANEL

1

2

3 4

5

6

7 8 9 10

11

14 15 16 17 18 19 20 21

12 13

1

2

3

4

5

6

7 8

9

10

1. Left Click

(DVR MENU IN UNLOCK MODE)

A. 

Edit your record settings

B. 

Playback recorded files

C. 

Access a pull-down menu

D. 

Control color and volume settings

E. 

Choose your system’s language settings

F. 

Double clicking the left key of your mouse 

maximizes the screen view

2. Right Click

(DVR MENU IN LIVE DISPLAY MODE)

A. 

Exit system programming and configuration mode

B. 

Close all configuration menu dialog boxes

3. Drag Mouse

(DVR MENU IN LIVE DISPLAY MODE)

A. 

In Motion Set mode, sliding the mouse will select the area of motion you wish to choose

B. 

In Color Set mode, sliding the mouse allows you to access and adjust the color control 

bar and the volume control bar

REMOTE CONTROL

MOUSE

1. 

Numeric Keys

2. 

Channel Select (1-8)

3. 

ALL

” Preview All Channels

4. 

MENU

” Enter/Exit Main Menu

5. 

      Up Key

6. 

      Down Key

7. 

    /     Left/Right Key 

8. SEL 

Select Key/ Edit Key

9.

       Rewind

10.    

Play Recorded Events

11. 

     Forward

12. 

    Manual Recording

13. 

    Pause/Frame Play

14. 

    Manually Stop Recording or Playback 

15. 

AUDIO

” Play Audio from Selected Camera

16. 

MUTE

” Mute Audio

1

2

4

5

7

6
16

11

14

10

13

3

1

7

15

9

12

1

3

2

Summary of Contents for QSDR74RTS

Page 1: ...1 4 CH H 264 NETWORK DVR RETRACTABLE 7 LCD MONITOR User Manual MODELS QSDR74RTS AND QR4174...

Page 2: ...downloadable firmware updates for your DVR Register today at www Q See com Please see the back of this manual for exclusions This manual is written for the QSDR74RTS and QR4174 DVRs Not all features...

Page 3: ...Pop up Menu 17 Main Menu 17 Camera Setup 18 Set Camera Name and Position 18 Enable Live Viewing 18 Enable Auto Sequence 19 Setup Color Hue Brightness Contrast and Saturation 19 Record Setup 20 Turn Ca...

Page 4: ...39 Advanced Settings 39 Network Settings 40 Network Functions 40 Auxiliary Functions 40 Menu Button 40 Basic Settings 40 Setting up Alarm Record Mode 41 TROUBLESHOOTING 42 SYSTEM CONNECTIONS 43 Q SEE...

Page 5: ...use water do not use solvents Do not attempt to remove the DVR cover If there are any unusual sounds or smells coming from the DVR unplug it immediately and contact an authorized dealer or service ce...

Page 6: ...ded files C Access a pull down menu D Control color and volume settings E Choose your system s language settings F Double clicking the left key of your mouse maximizes the screen view 2 Right Click DV...

Page 7: ...on Only use the power adapter supplied with your DVR System Failure to do so may result in system failure DVR FEATURES FUNCTIONS Real Time Monitoring Supports Real Time Surveillance via Monitor Save F...

Page 8: ...nected the Main Interface screen will display a live feed from each camera in its respective box as shown in IMAGE 2 Alarm Sounds If the first box on the Main Interface screen displays an H and an ala...

Page 9: ...allows access to controls for the camera network HDD alarm PTZ and mobile phone To access the Main Menu IMAGE 6 from the MAIN INTERFACE screen right click using the mouse or select the Menu button on...

Page 10: ...w without applying changes select EXIT before selecting APPLY 6 To save changes select APPLY 7 A prompt will appear to save your settings select OK in order for the changes to take effect Note changes...

Page 11: ...M NOT RECORDING HR 08 00 AM 18 59 PM NORMAL RECORDING HR 19 00 PM 00 59 PM ALARM RECORDING RECORD ON ACTIVITY OR ALARM ONLY 8 To close the window without applying changes select EXIT before selecting...

Page 12: ...software will not run properly Follow the time zones as indicated on IMAGE 27 If necessary more information about time zones can be found at www time gov IMAGE 27 Password The Password Setup dialog b...

Page 13: ...ave settings 7 Select EXIT to return to the SYSTEM SETUP menu DEVICE MANAGEMENT The DEVICE MANAGEMENT menu as shown in IMAGE 33 allows access to configure the Hard Disk Drive External Alarm PTZ Camera...

Page 14: ...ng Formatting USB will erase all data Are you sure you wish to format 5 Click OK to continue 6 When the formatting has been completed a SUCCESSFUL FORMAT message will appear and the system will automa...

Page 15: ...drop down menu BUZZER Select 0 seconds 10 seconds 20 seconds 40 seconds or 60 seconds from the Buzzer drop down menu DURATION Select 0 seconds 30 seconds 1 minute 2 minutes or 5 minutes from the Durat...

Page 16: ...mouse to right click 2 Select LOCK from the popup menu 3 To UNLOCK the administrator password is required IMAGE 41 OPERATING THE DVR RECORD The DVR will start recording based on the settings that have...

Page 17: ...earch previously recorded video use the following steps 1 From the MAIN MENU select SEARCH to open the VIDEO SEARCH menu IMAGE 43 2 To search video by a specific date enter the desired date into the V...

Page 18: ...AVI using the Multi Player program that comes with the DVR or through the net viewer program Once converted files can then be viewed through any program that supports the AVI file format IMAGE 45 IMA...

Page 19: ...16 On screen display 17 Mute 18 Volume adjust Video Play Settings 1 In the multimedia player interface select SETTING from the toolbar 2 Select VIDEO PLAY SETTING 3 Select NORMAL VIDEO BAR IMAGE 51 4...

Page 20: ...of DVR Remotely 10 15 W Excluding HDD DC 12V 5A 50 F to 104 F 10 C to 40 C 10 90 15 75 x 11 25 x 2 75 in 400 286 70 178 w LCD up mm SPECIFICATIONS APPENDIX Time Setting Language Select Ch Setting Rec...

Page 21: ...effective after restart Set relative parameters The option will be effective after restart PTZ setting Recording set and Language select etc The button allows you save the modification of parameter va...

Page 22: ...Q Can I erase files from the hard drive of the DVR A You can not erase individual files You would need to re format the hard drive which will erase all of the files Q Why can t I log in to the Net Vi...

Page 23: ...humidity lightning and sudden surges of electricity 3 Damage caused by acts of nature e g earthquake fire etc 4 Equipment damage caused by the maintenance of personnel not authorized by Q See 5 Produc...

Page 24: ...46 Digital Peripheral Solutions Inc 8015 E Crystal Drive Anaheim CA 92807...

Reviews: