24
25
CHAPTER 3 BASIC OPERA
TION
PICTURE 3-16
Back-up
Individual files recorded by the DVR can be backed up to an external USB device for playback
on a computer.
11:37:22 M
11:48:00 R
11:54:00 A
12:10:00 M
13:00:00 R
14:00:00 R
15:00:00 R
16:00:00 R
17:00:00 R
StartTime Type
1p 2p 3p 4p
You must have a USB device connected
to the USB port on the side of the monitor
before proceeding.
STEP 1.
In your file list to the right of the
playback screen, check the box next
to the file(s) you wish to save.
STEP 2.
Select the BACKUP icon and
the Backup window will open. Your
device will be listed at the top of the
window showing how much space
is available. Below it, the list of file(s)
you wish to back up will be displayed
along with type, start and end
times and size. At the bottom of the
window, the space required to save
the file(s) will be displayed. You may
uncheck any files you do not wish
to back up at this time. The Remove
button will remove all the files from
your list.
STEP 3.
Press start to back up your
selected files.
Right-clicking the mouse will exit this window without saving the files.
More information about backing up files – including backing up the entire hard drive – can be
found in
Section 3.8
.
NOTE!
The video files are in a proprietary format that will not play outside
the DVR without being converted to .avi format using the included General
Player software included on the Manuals and Software disc that came with this
DVR or available for free download at Q-See.com by searching for your model
number and looking under Software.
Right-clicking with the mouse will exit the playback window.
3.6 SCHEDULE
The
Schedule
menu is located in the
Settings
menu and it allows you to determine when
your cameras will record and under what circumstances. While the settings in this menu can
be generally overridden by the user in the
Record
menu, the settings made in the
Schedule
menu are more detailed and flexible.
NOTE!
Motion Detection can also be set up in the Detection menu as
described in
Section 3.7
. If you need the DVR to do more than just record
Motion events, then follow the instructions in
Section 3.7
. You do not need
to set up motion detection in both menus.
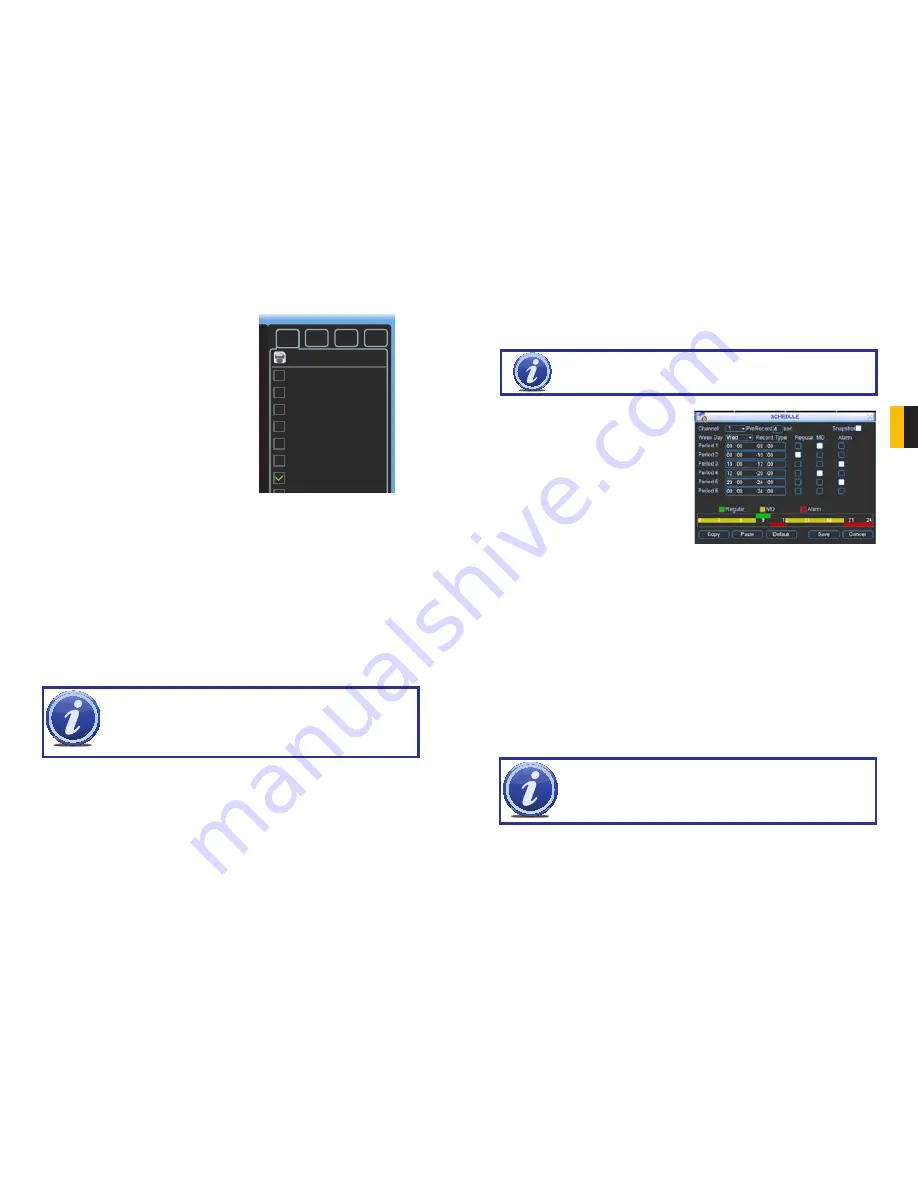
Channel
– The first setting is which channel
you wish to configure. In addition to
selecting a channel number, you can
globally configure all of your cameras
by selecting the
All
option.
Week Day
– You can set the recording
schedule by day of the week, or apply
the schedule to every day.
Pre-Record
– This allows you to capture the
moments before an event occurs.
You can set the lead time from 1 to
30 seconds depending on the bit
stream you are recording at.
PICTURE 3-17
Snapshot
– By selecting this feature, you enable the DVR to take a still image “snapshot”
when an alarm occurs. The number of snapshots taken, their format and other
parameters are set in the
Encode
menu. (See
Section 4.3
for details.)
Record Types
– You can schedule which type of recording occurs at what time of the day.
There are six blocks of time that can be scheduled, and the duration of those blocks
can be determined as well. There are two types of recordings that can be made;
Regular
(always recording) and
MD
(motion detection).
A white-filled box underneath a
Record
type indicates that it has been selected for that block
of time. If no boxes are selected, that camera will not record although you will be able to see
its video feed in
Live View
.
You may set more than one type of recording to occur at the same time but it should be noted
that when regular recording is selected, the DVR will be already be recording whether a Motion
Detection event occurs or not.
Default
– Returns your DVR’s recording settings to the factory default of recording all the time.
You must check the
Save
button to apply your settings. Right-clicking or hitting
Cancel
will
leave your settings unchanged.
NOTE!
The menu will show the option to record based on Alarm notification.
This feature is not available on this model and cameras set to record using this
setting will not be activated.


