background image

8

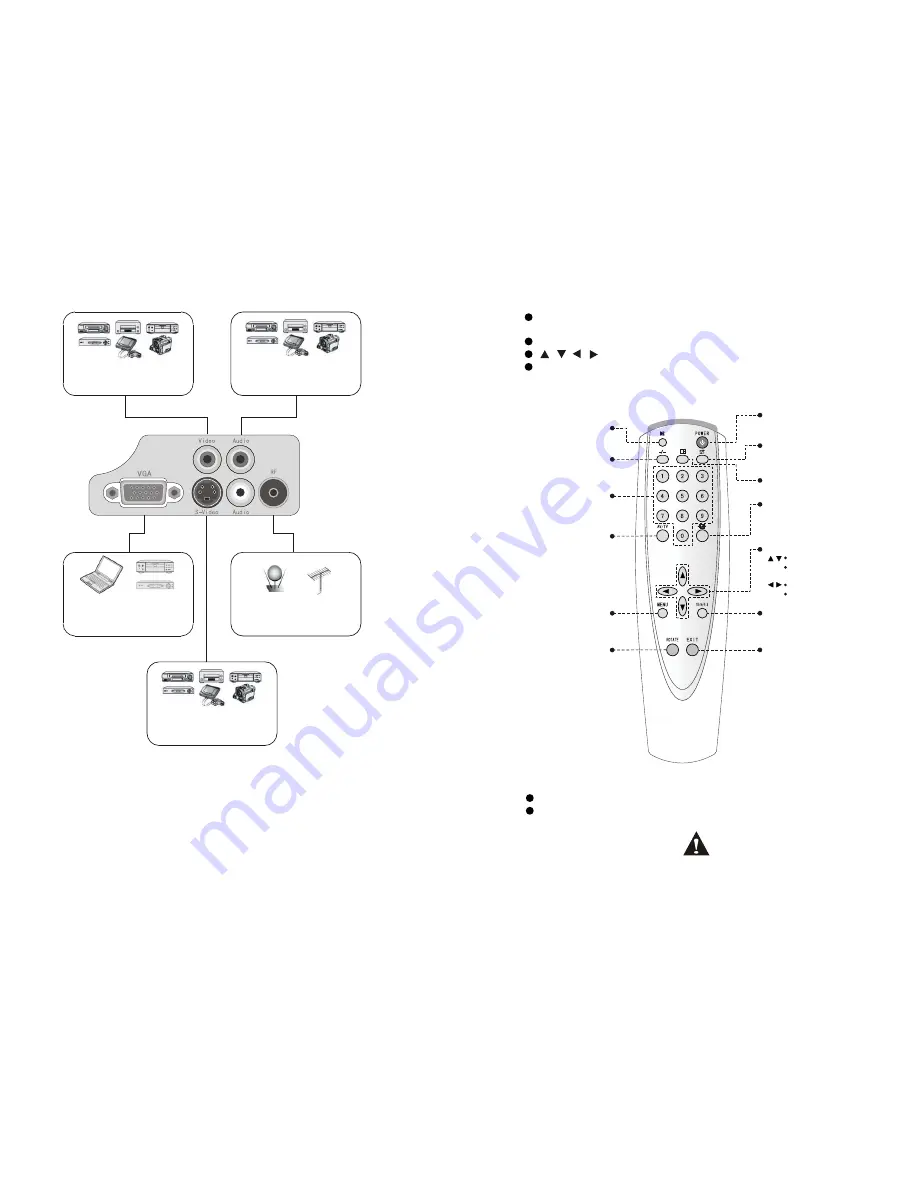
CONNECT MAIN EQUIPMENT

Connecting video equipment
Without S-video output terminal.

Connecting audio equipment
With RCA output terminal.

Connecting video equipment
With S-video output terminal.

Connecting PC or DVD
equipment VGA output terminal.

Connecting an cable with
matched receiving antenna.

9

REMOTE CONTROL


POWER 

button: Push this button to turn the projector on when it's in stand-by 

mode and push it again to return to stand-by mode.


MENU

 button: Push this button to open the menu.

      /     /      /     buttons: Use  these buttons to  navigate through the  menu.
  

AV/PV

 button: Use this button to select the video source you want to use. You can 

select between signals like PC, VCR or DVD. The projector will switch between 
video sources every time you push this.

PRECAUTIONS

  You need to dry the remote control with a dry cloth immediately when it gets wet.
  When the battery hasn't been used for a long time we advise you to remove it from 

the remote. Be sure that children can't reach the removed button cell. Swallowing a 
button cell will cause a child a lot
of harm and is 

very dangerous!

                           MUTE
   

For temporarily turning off 

    the sound.

POWER

For turning the power on.

RETURN

C

ancel the direct channel 

selection.

DISPLAY

Information display.

        Number Buttons

Selects TV channel directly.

     Number Amount

Selects the amount of TV 
channel number display.

                        AV/TV

For selecting input source.

PICTURE MODE button

For selecting image effect: bright, soft, 
normal, user.

No using.

PICTURE OVERTURN

For selecting the image display
modes.

DISPLAY MODE

16:9 or 4:3.

                      MENU

For displaying adjustment
and setting screens.

Adjustment buttons


            Selects a channel.
            Selects (vertically) or adjusts 
            an operation or item.
            V
            Selects (horizontally) or 
            adjusts an operation or item.

olume control.

Summary of Contents for PRJV66

Page 1: ...Multimedia Lcd Projector Model PRJV66 User Manual www PyleAudio com ...

Page 2: ...le mount setup 6 Warning 6 Making connections 7 Connect main equipment 8 Remote control 9 Precautions 9 Projector front view 10 Projector Focusing and keystone adjustment 11 Focusing 11 Keystone 11 OSD Menu 12 Picture menu 12 Display menu 12 Channel menu 12 Trouble shooting 13 Replacing the lamp 13 Maintenance filter 14 Accessoiries 14 controle 10 ENGLISH TABLE OF CONTENTS ...

Page 3: ...ms Also disconnect this product when not in use for a long period of time Water vapour might occur at first use after a long period of not using this product Please let the product reach room temperature before using it Never use this product outdoors or in a wet environment To prevent accidents in professional environments please heed instructions and guidelines at all times Keep this product out...

Page 4: ...roduct with computer and video input signals Computer resolutions up to 1024 768 and video signals like DVD VCR TV SVHS etc Resolutions over 1024 768 are not connectable Please reduce your computer s resolution before connecting it with this product If a trapezoid image occurs you can adjust this with the Keystone correction and solve the problem The OSD menu can be called upon with the remote con...

Page 5: ...Remote doesn t operate Projector turned on to quickly after last turn off needs 5 minutes Batteries defect Aim remote correctly at IR receiver No image Lens cap not removed Projector turned off Faulty wiring Selected the wrong input signal Projector turns off automatically Air in and or outlets and or filter no more power are covered or blocked Lamp doesn t function Power supply isn t correct Temp...

Page 6: ...e key to elect the function picture two 4 use key to change the parameter 5 Finished to adjust the parameter press the menu key again exit the window 6 Repeat operate the 2 5step till finished all the parameter s setting press exit key exit the menu window Bright Contrast Tone Color English English Sharpness Sharpness TV mode Volume menu adjustment Adjust the volume of the speaker or amplifier equ...

Page 7: ...smoke filled environment The projector might malfunction in a moist or wet environment Take care of sufficient ventilation around the projector Otherwise this projector might overheat and cause life threatening situations Screen Screen Screen Screen Projector Projector Projector Projector Front projection ceiling mount Front projection table mount Rear projection ceiling mount Rear projection tabl...

Page 8: ...tton Push this button to open the menu buttons Use these buttons to navigate through the menu PC AV button Use this button to select the video source you want to use You can select between signals like PC VCR or DVD The beamer will switch between video sources every time you push this LED indicator Put the projector into stand by mode the LED is flashing when the projector is working the LED is li...

Page 9: ...d to dry the remote control with a dry cloth immediately when it gets wet When the battery hasn t been used for a long time we advise you to remove it from the remote Be sure that children can t reach the removed button cell Swallowing a button cell will cause a child a lot of harm and is very dangerous MUTE For temporarily turning off the sound POWER For turning the power on RETURN Cancel the dir...

Reviews: