VIP-T300H-U USER MANUAL
VERSION 1.1
74
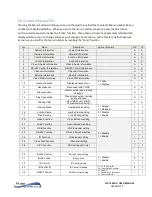
Diagnostic Information
Diagnostic Information
0 = Disable
1 = Enable
1
X
80
Video Routing
Video Routing setting
0 ~ 999 = Specific Channel
1000=Follow Channel
1000
X
81
Audio Routing
Audio Routing setting
1000
X
82
USB Routing
USB Routing setting
1000
X
83
RS-232 Routing
RS-232 Routing setting
1000
X
84
IR Routing
IR Routing setting
1000
X
85
GPIO Routing
GPIO Routing setting
1000
X
86
Load Routing Mapping
Load Free Routing Mapping
0~4
A
X
87
Save Routing Mapping
Save Free Routing Mapping
A
X
90
Video Wall Max Row
Rows of Video Wall
0~7
0
X
91
Video Wall Max Column
Columns of Video Wall
0~15
0
X
92
Monitor Row Position
Monitor Position in Row
0~7
0
X
93
Monitor Column Position
Monitor Position in Column
0~15
0
X
94
Monitor Outside Width
Outer Width of Monitor
0~65000 (0.1mm)
0
X
95
Monitor Outside Height
Outer Height of Monitor
0
X
96
Monitor Viewable Width
Width of Viewable Area
0
X
97
Monitor Viewable Height
Height of Viewable Area
0
X
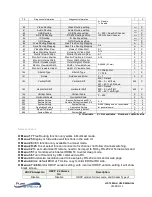
100
Stretch Type
Stretch Type
0 = Stretch Out
1 = Fit In
1
X
101
Rotate
Rotation and Mirror
0 ~ 7
0
X
102
Vertical Shift
Vertical Shift
400 = Default
399 ~ 0 = shift up
401 ~ 801 = shift down
400
X
103
Horizontal Shift
Horizontal Shift
400 = Default
399 ~ 0 = shift left
401 ~ 801 =shift right
400
X
104
Vertical Scale
Vertical Scale
0 ~ 255
0
X
105
Horizontal Scale
Horizontal Scale
0
X
200
Backup Setting
Backup Setting to bank 0~4
0 ~ 4
A
A
201
Restore Setting
Restore Setting from bank 0~4
A
A
202
System Setting
System Setting
0~255 (Debug use, no recommend
for general users)
A
A
203
Application Setting
Application Setting
A
A
333
Reset To Default
Reset to factory default
A
A
999
System Reboot
System Reboot
A
A
A = Available
X = Not available Numbers = default value
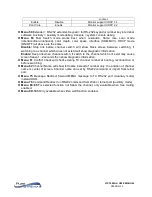
Notes on Menus
Menu 17
Free Routing function only works in Multicast mode.
Menu 25
Display or hide video wall functions in the web UI.
Menu 26
CEC function only available in unicast mode.
Menu 20~25
To set select function connect to fix channel, not follow channel switching.
Menu 32
To set customize IR remote, need to be import to RX by RS-232 or Telnet command
Menu 35
For monitors which detect HDMI 5V to enter sleep mode.
Menu 36
Turn off monitor by CEC command via RX.
Menu 40
Customize resolution need to be setup by RS-232 command or web page
Menu 44
Use default EDID at TX side, copy monitor EDID at RX side.
Menu 47~48
Monitor HDCP version setting, with incorrect HDCP version setting it will show
black screen.
HDCP Always On
HDCP 2.2 Always
On
Description
Disable
Disable
HDCP version follow source and Stream Type of


