background image

Mega-Classic Owners Manual

page 7

Preparing For Installation

Before proceeding with the installation, you must determine the mode of operation

(Auto Drain Mode or Manual Drain Mode). Pure Water, Inc. recommends that your

Mega-Classic be operated in the Auto Drain Mode, but we recognize that all locations

may not have an adequate drain available.

Auto Drain Mode:  

Auto Drain Mode:  

Auto Drain Mode:  

Auto Drain Mode:  

Auto Drain Mode:  This allows the boiling tank of the distiller to drain automati-

cally when the storage tank is full or when there is a power interruption. In the

Auto Drain Model, the Mega-Classic needs to be installed in a location with an

appropriate drain and drain connections, as explained in the 

Connecting the

Boiling Tank Drain Line

     section on page 10 of this manual. The Drain Operation

The Drain Operation

The Drain Operation

The Drain Operation

The Drain Operation

Switch is preset at the factory to the “Auto” mode.

Switch is preset at the factory to the “Auto” mode.

Switch is preset at the factory to the “Auto” mode.

Switch is preset at the factory to the “Auto” mode.

Switch is preset at the factory to the “Auto” mode.

Manual Drain Mode: 

Manual Drain Mode: 

Manual Drain Mode: 

Manual Drain Mode: 

Manual Drain Mode:  This allows the boiling tank to be drained manually. This is

ideal for locations that do not have an appropriate drain or connection. Manual

Drain Mode will not allow the unit to drain the boiling tank automatically. If you

wish to set your drain mode to manual, you must remove the side panel and

locate the Drain Operation Switch on the side of the unit and change it to

“Manual”.  

Note

:::::  When draining the boiling tank manually, you must depress and

hold the Drain Switch in the “Override” position. This switch is located under the

top panel. 

. . 

. . You must also turn the Function Switch to “Clean”. Make sure you

return the Function Switch to “Distill” once manual draining is complete.

Other things to consider when installing your Mega-Classic:

Select an area that will allow the distiller to remain level. Improper leveling

could affect the production rate.

The distiller must be located in close proximity to a water supply, floor or other

drain and appropriate electrical supply source. The distiller should also be

located in a well ventilated room.

The Mega-Classic should be installed at least two feet above the floor. This is

for several reasons:

1.

Easier position to observe and maintain.

2.

Better drainage from the boiling tank when it dumps the residue water.

Electrical requirements:  Isolated 115 VAC, 20 amp circuit (220 VAC, 10 amp).

Check the electrical rating on the label on the rear of the distiller.

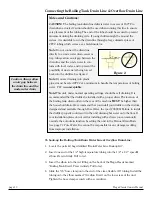
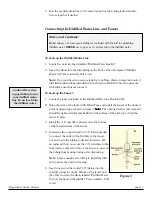
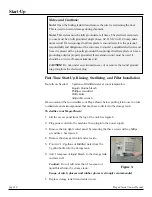
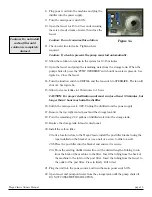
When connecting the tubing into the quick-connect fittings, it is critical the

tubing be inserted fully!  The tubing should insert into the fitting 1/2” to 3/4”.

Failure to do so could cause water damage. We recommend that prior to

inserting the tubing, you mark the tubing 1/2” from the end being inserted into

the fitting, then pull back on the tubing to verify it is attached securely. This

should ensure the tubing is properly and fully installed. Also, make sure the

tubing is cut squarely and is free of rough edges.

Note: The use of

softened water is
recommended to

minimize scale

build-up in the

automatic drain valve.

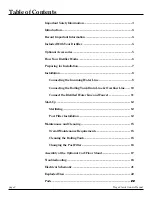
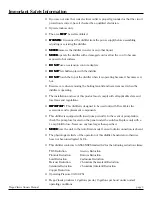
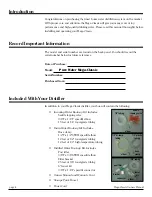
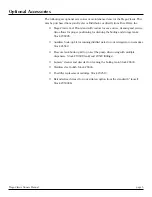
Summary of Contents for Mega Classic

Page 1: ...Mega Classic Operator s Manual Pure Water Inc 3725 Touzalin Ave Lincoln NE 68507 Phone 402 467 9300 Fax 402 467 9393 ...

Page 2: ...er Line 8 Connecting the Boiling Tank Drain Line Overflow Line 10 Connect the Distilled Water Line and Faucet 11 Start Up 12 Sterilizing 12 Post Filter Installation 12 Maintenance and Cleaning 15 Overall Maintenance Requirements 15 Cleaning the Boiling Tank 15 Changing the Post Filter 16 Assembly of the Optional Cart Floor Stand 17 Troubleshooting 18 Electrical Schematic 21 Exploded View 22 Parts ...

Page 3: ...t when the distiller is operating The installation and use of this product must comply with all applicable state and local laws and regulations IMPORTANT IMPORTANT IMPORTANT IMPORTANT IMPORTANT This distiller is designed to be used only with Pure Water Inc accessories and replacement components This distiller is equipped with fused pump circuitry In the event of pump failure check the pump fuse lo...

Page 4: ...lassic distiller your box will contain the following Incoming Water Hook up Kit Includes Saddle tapping valve 3 8 T x 1 4 T speedfit elbow 15 feet of 1 4 food grade tubing Drain Water Hook up Kit Includes Hose clamp 1 2 T x 1 2 STEM speedfit elbow 12 feet of 1 2 food grade tubing 12 feet of 1 2 high temperature tubing Distilled Water Hook up Kit Includes Post filter 3 8 T x 3 8 STEM speedfit elbow...

Page 5: ... proper positioning for draining the boiling and storage tanks Stock 36996 Auxiliary hook up kit for running distilled water to your refrigerator or icemaker Stock 4540 Pressure tank hook up kit to protect the pump when using with multiple dispensers Stock 19001 tank and 9523 fittings Lumen cleaner and descaler for cleaning the boiling tank Stock 6603 Stainless steel polish Stock 6606 Post filter ...

Page 6: ...in off until the condition is corrected Once the storage tank is full of distilled water the unit will automatically shut down and the contents of the boiling tank are drained by the automatic drain valve thereby flushing out most of the contaminants from the boiling tank If a drain is not available for automatic draining the unit can be set to drain manually The Mega Classic will begin distilling...

Page 7: ...and locate the Drain Operation Switch on the side of the unit and change it to Manual Note When draining the boiling tank manually you must depress and hold the Drain Switch in the Override position This switch is located under the top panel You must also turn the Function Switch to Clean Make sure you return the Function Switch to Distill once manual draining is complete Other things to consider ...

Page 8: ...Pure Water Inc Distributor for other water line connection options CAUTION DO NOT use a hot water line for your supply line CAUTION DO NOT turn the saddle tapping valve handle before or during installation Be sure the piercing lance does not protrude beyond the rubber gasket Failure to do this may result in damage to the piercing needle To hook up the Incoming Water Line 1 Locate the parts kit bag...

Page 9: ...a Drill a 3 16 hole in the pipe Use a hand drill to avoid shock hazard b Turn the saddle tapping valve handle to expose the lance beyond the rubber gasket no more than 3 16 c Assemble and place the body of the valve over the hole so the lance fits into the hole Make sure the outlet is in a convenient direction See figure 1 d Tighten the screws evenly The brackets should be parallel Tighten firmly ...

Page 10: ...installed with a proper drain The location of the boiling tank drain outlet on the rear of the machine MUST be higher than the household drain We recommend that you install your distiller on the custom designed stand available through Pure Water Inc part 36996 Failure to install the distiller properly could result in the unit draining hot water onto the floor If your installation plans do not call...

Page 11: ...d install the faucet at the desired point of dispensing as shown in figure 3 Note Note Note Note Note The channel washer and stem nut should be tightened fully and be flush to the bottom of the sink top to hold the faucet in place 3 Install the 3 8 speedfit connector onto the bottom of the threaded stem of the faucet 4 Determine the correct length of 3 8 tubing needed to connect the outlet of the ...

Page 12: ... Installation Tools Items Needed 5 gallons of Distilled water at room temperature Liquid chlorine bleach Phillips screwdriver Utility knife Adjustable wrench We recommend that you sterilize your Mega Classic before putting it into use in order to eliminate any microorganisms that may have collected in the storage tank To sterilize your Mega Classic 1 Lift the access panel from the top of the unit ...

Page 13: ... harm the distiller 16 Switch the main power to OFF Unplug the distiller from the power supply 17 Remove the top right vented panel and the storage tank lid 18 Pour the remaining 2 1 2 gallons of distilled water into the storage tank 19 Replace the storage tank lid and vented panel 20 Install the carbon filter 20 a At a location close to the Mega Classic install the post filter bracket using the t...

Page 14: ... and residue out of the boiling tank after each full tank of distilled water is produced This minimizes the build up of scale in the boiling tank Overall Maintenance Requirements The following guide should be used for the maintenance of your distiller The timing will vary according to your local water conditions It is your responsibility to maintain your equipment Without proper maintenance your d...

Page 15: ...l remove the boiling tank lid 5 Add Lumen by following the directions on the package 6 Add additional water using a jar or pitcher until the water level inside the boiling tank is above the scale line CAUTION Do not overfill 7 Let the solution stand overnight 8 After the scale has softened push down and hold the Drain Switch to Override This will allow the boiling tank to drain Once the boiling ta...

Page 16: ...securely 4 Connect the inlet side of the filter to the water line 5 Using a bucket hold the filter outlet over the bucket Turn the main power switch to On and allow water to flush the carbon fines out of the new filter If the storage tank is low depress the pump switch to Override to flush the filter 6 Once flushed turn the main power switch to Off 7 Reconnect the outlet side of the filter to the ...

Page 17: ...t pieces D with pieces A and C with the bolts B provided Piece A should be positioned on top as shown in the drawing 2 Insert the Castor Inserts F into the legs of Piece D 3 Insert the Castors E into the legs Make sure that the Castor Inserts and Castors are inserted completely into the legs 4 Place the distiller on top of the cart ensuring that the legs on one side of the Mega Classic are inserte...

Page 18: ...e boiling tank is resting against the support arm and is fully depressing the low level microswitch you probably need to replace the microswitch Check with a volt ohm meter If the microswitch checks out ok and the heating element and fan come on then you need to replace the heating element relay Another indication of a bad heating element relay is the reset will pop If the solenoid is making a buz...

Page 19: ...ut ok and the heating element and fan come on then you need to replace the heating element relay Check with a volt ohm meter If the microswitches and heating element relay check out ok then you may have a defective solenoid Turn the main power switch to Off If water contin ues to flow into the boiling tank then you need to replace the solenoid If the float is not moving freely you may need to inst...

Page 20: ... drain valve or a defective drain valve Clean or replace the drain valve The demand pump does not work properly or not at all Note The storage tank must be at least 1 4 full for the pump to operate If the unit is plugged in and the main power switch is On you may have a blown fuse defective pump switch defective pressure switch or defective pump Check with a volt ohm meter If pump cycles on and of...

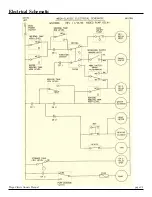
Page 21: ...Electrical Schematic Mega Classic Owners Manual page 21 ...

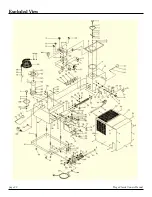
Page 22: ...page 22 Mega Classic Owners Manual Exploded View ...

Page 23: ...50 Boiling tank side insulation 32051 Boiling tank bottom insulation parts kit not shown on exploded view Parts Listing Mega Classic Owners Manual page 23 1 8009 Lid knob w stud 2 6022 Lid o ring 3 519 Lid disc 4 6049 Gasket 5 9009 Flat washer 1 4 6 9085 Lid spring 7 402B Lid crossbar w nut 8 224 0003 Locknut 1 4 20 409 Lid Assembly includes 1 8 9 6010 Boiling tank gasket 10 7206 Relay heating ele...

Page 24: ...Form 6325 1998 Pure Water Inc Rev 7 00 ...

Reviews: